> ## Documentation Index
> Fetch the complete documentation index at: https://docs.ntop.com/llms.txt
> Use this file to discover all available pages before exploring further.
# Bending and Translating Bodies via Remap Field
This lesson explains how to take a “straight” geometric body and deform it to follow a specific path using a **Curved Coordinate System**. By the end of this tutorial, you will understand how to use the **Remap Field** block to map standard Cartesian space onto a custom vector field defined by a curve.
### 1. The Core Concept: Spatial Remapping
In a standard 3D environment, every point is represented by (x, y, z). The **Remap Field** block allows us to “re-target” these coordinates. Instead of the body looking for its shape at (x, y, z), it looks for its shape at a new set of coordinates defined by a **Vector Field**. Below is an example of Translating the Body by adding an X value to the equation.
Translation offset (*a*)
Drag to see how coordinate logic affects position.
0 mm
fnew(x) =
fold(x)
No translation applied.
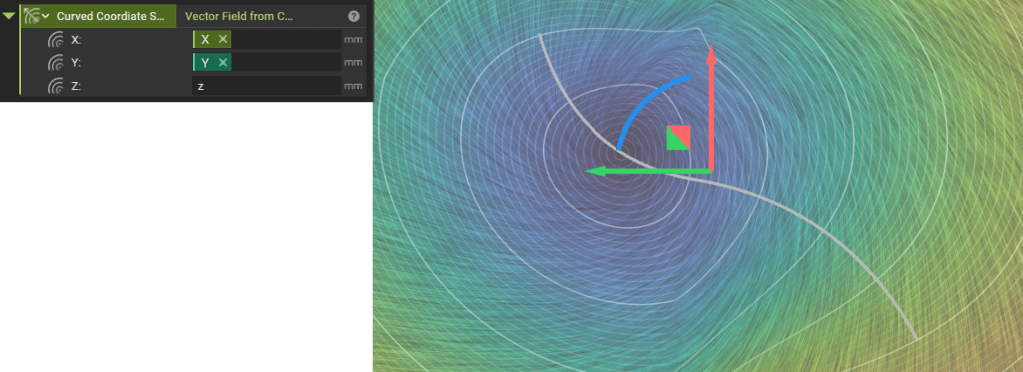
If we define a Vector Field where the “X” axis follows the length of a curve and the “Y” axis follows the distance away from that curve, the body will naturally “wrap” itself around that geometry.
[Follow Along: Remap Field Example](https://files.learn.ntop.com/Courses/A%26D%20Learning%20Path/nTop%20Files/bend-remap-example.ntop)
### 2. Building the Curved Coordinate System
To bend the body, we must first build a new coordinate system using the **Vector Field from Components** block. This block requires three inputs representing the new X, Y, and Z axes.
#### **The X-Axis: Movement Along the Curve**
The X-component defines where the body sits along the length of the curve.
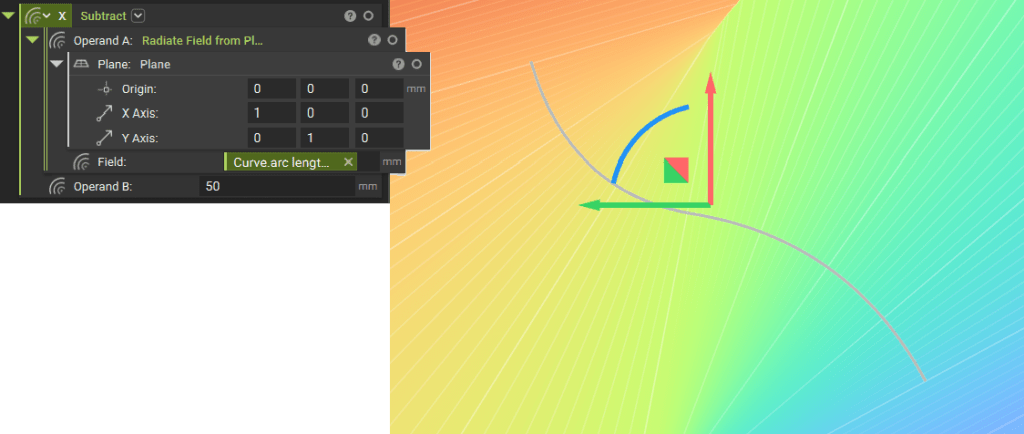
* **Radiate Field from Plane:** This generates a gradient representing distance. When combined with the curve's arc length, it creates a field that increases as you move along the path of the curve.
Radiate Field from Plane.ntop
* **The Subtract Block (Translation):** This is your “Slider” for positioning. By subtracting a value (Operand B) from the Radiate Field, you shift the body's starting point.
* *Example:* If you subtract 10mm, the body moves 10mm further along the curve.
 #### **The Y-Axis: Distance from the Curve**
The Y-component defines the thickness and the body's perpendicular orientation relative to the curve.
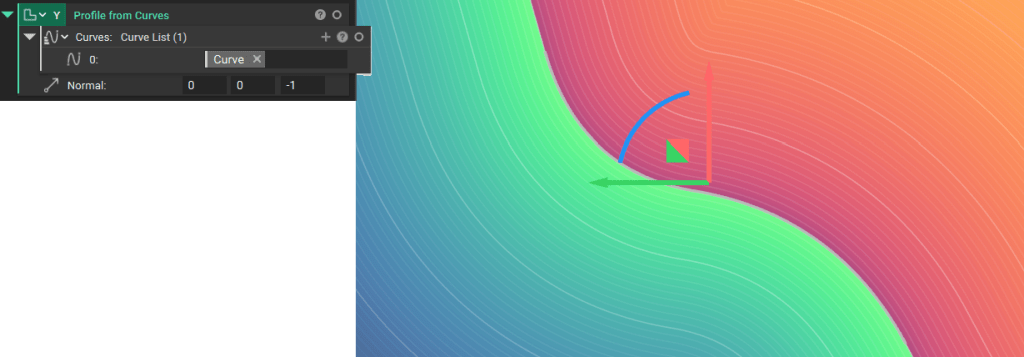
* **Profile from Curve:** This block generates a field where the value is 0 on the curve itself. It determines the “inside” and “outside” of the curve. This ensures your body is oriented correctly (e.g., standing upright on the curve rather than lying flat).
#### **The Y-Axis: Distance from the Curve**
The Y-component defines the thickness and the body's perpendicular orientation relative to the curve.
* **Profile from Curve:** This block generates a field where the value is 0 on the curve itself. It determines the “inside” and “outside” of the curve. This ensures your body is oriented correctly (e.g., standing upright on the curve rather than lying flat).
 #### **The Z-Axis: Maintaining Height**
* **z:** By simply inputting “z”, we ensure the body maintains its original height and does not compress or stretch vertically.
#### **The Z-Axis: Maintaining Height**
* **z:** By simply inputting “z”, we ensure the body maintains its original height and does not compress or stretch vertically.
 ### 3. Executing the Remap
Once the Vector Field is constructed, we apply it using the **Remap Field** block:
| **Input** | **Description** |
| ---------------- | ----------------------------------------------- |
| **Field** | The original, straight body (Body 1 or Body 2). |
| **Vector Field** | The “Curved Coordinate System” we built above. |
Fnew(x,y,z)=Fold(Vx,Vy,Vz)F\_\{new}(x, y, z) = F\_\{old}(V\_x, V\_y, V\_z)
Where V is the new coordinate logic derived from your curve. The result is a body that respects the curvature of the path while allowing for precise longitudinal translation via the subtraction operand.
### 3. Executing the Remap
Once the Vector Field is constructed, we apply it using the **Remap Field** block:
| **Input** | **Description** |
| ---------------- | ----------------------------------------------- |
| **Field** | The original, straight body (Body 1 or Body 2). |
| **Vector Field** | The “Curved Coordinate System” we built above. |
Fnew(x,y,z)=Fold(Vx,Vy,Vz)F\_\{new}(x, y, z) = F\_\{old}(V\_x, V\_y, V\_z)
Where V is the new coordinate logic derived from your curve. The result is a body that respects the curvature of the path while allowing for precise longitudinal translation via the subtraction operand.