> ## Documentation Index
> Fetch the complete documentation index at: https://docs.ntop.com/llms.txt
> Use this file to discover all available pages before exploring further.
# The Notebook Anatomy + nTop Interface
## Introduction
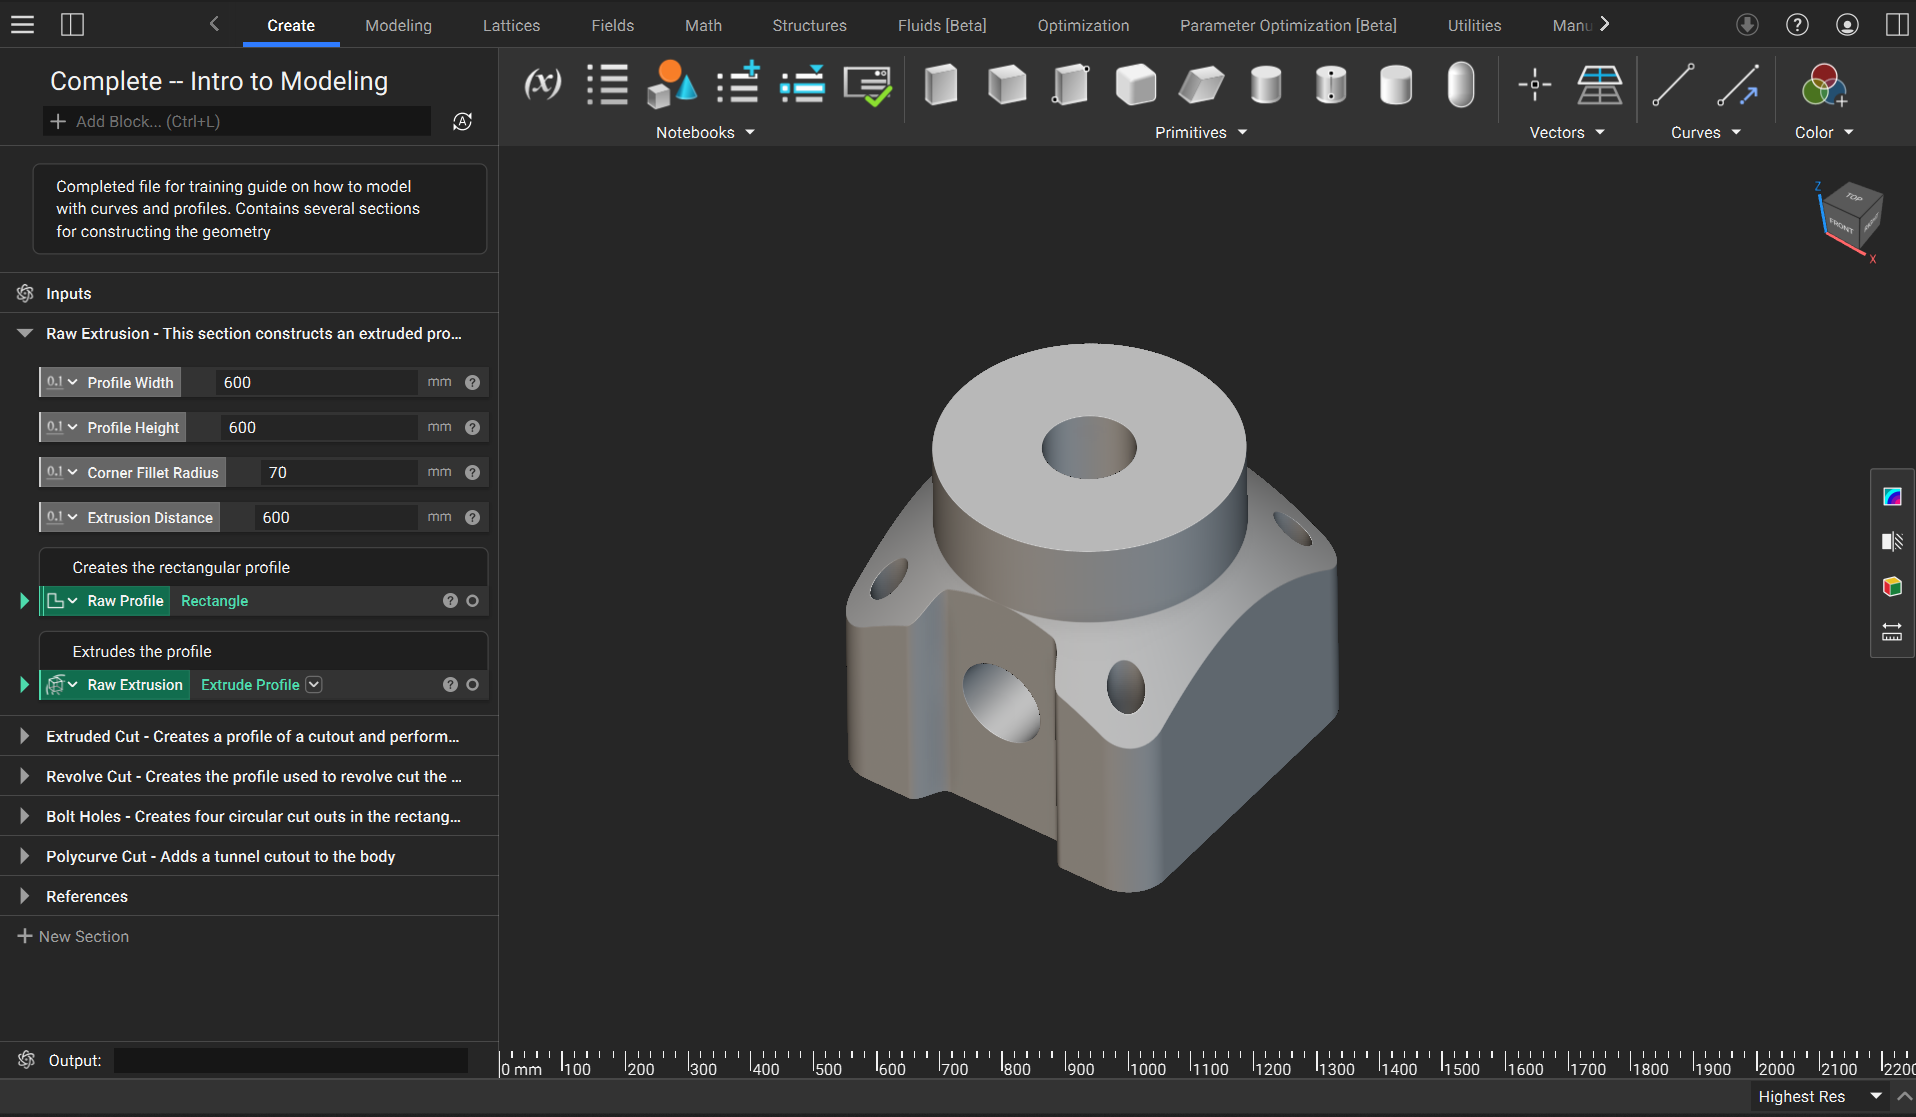 *An example of the nTop interface*
Everything you do in nTop happens in the Notebook. This lesson takes it apart piece by piece — the interface that surrounds it, the sections and comments that organize it, and the blocks that fill it. Below is an example file that you can explore along with this lesson.
**Downloadable Files:**
[Example File Download](https://files.learn.ntop.com/Courses/nTop%20Foundational%20Learning%20Course/Course%201/nTop%20Files/C1S2_Lesson1_NotebookLesson.ntop)
*This file was last updated in nTop* 5.54.2
## The Notebook & The Block System
A block is a function. It takes a set of inputs and computes an output. That output can then become an input to another block. The nTop Notebook is the collection of all the blocks in your file. The Notebook documents and represents an engineering workflow in nTop. It records all functions performed and captures a process that can be applied to any part, allowing users to reuse the workflow to generate new designs.
*An example of the nTop interface*
Everything you do in nTop happens in the Notebook. This lesson takes it apart piece by piece — the interface that surrounds it, the sections and comments that organize it, and the blocks that fill it. Below is an example file that you can explore along with this lesson.
**Downloadable Files:**
[Example File Download](https://files.learn.ntop.com/Courses/nTop%20Foundational%20Learning%20Course/Course%201/nTop%20Files/C1S2_Lesson1_NotebookLesson.ntop)
*This file was last updated in nTop* 5.54.2
## The Notebook & The Block System
A block is a function. It takes a set of inputs and computes an output. That output can then become an input to another block. The nTop Notebook is the collection of all the blocks in your file. The Notebook documents and represents an engineering workflow in nTop. It records all functions performed and captures a process that can be applied to any part, allowing users to reuse the workflow to generate new designs.
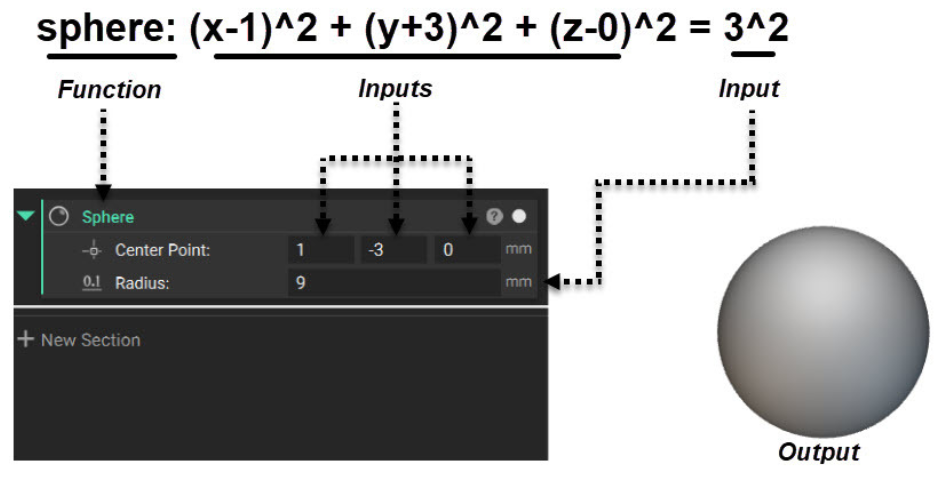 *An example of how the **Sphere** block correlates to the original equation for a Sphere*
Comparable to the model tree in traditional CAD software, the Notebook keeps a record of modeling operations.
*An example of how the **Sphere** block correlates to the original equation for a Sphere*
Comparable to the model tree in traditional CAD software, the Notebook keeps a record of modeling operations.
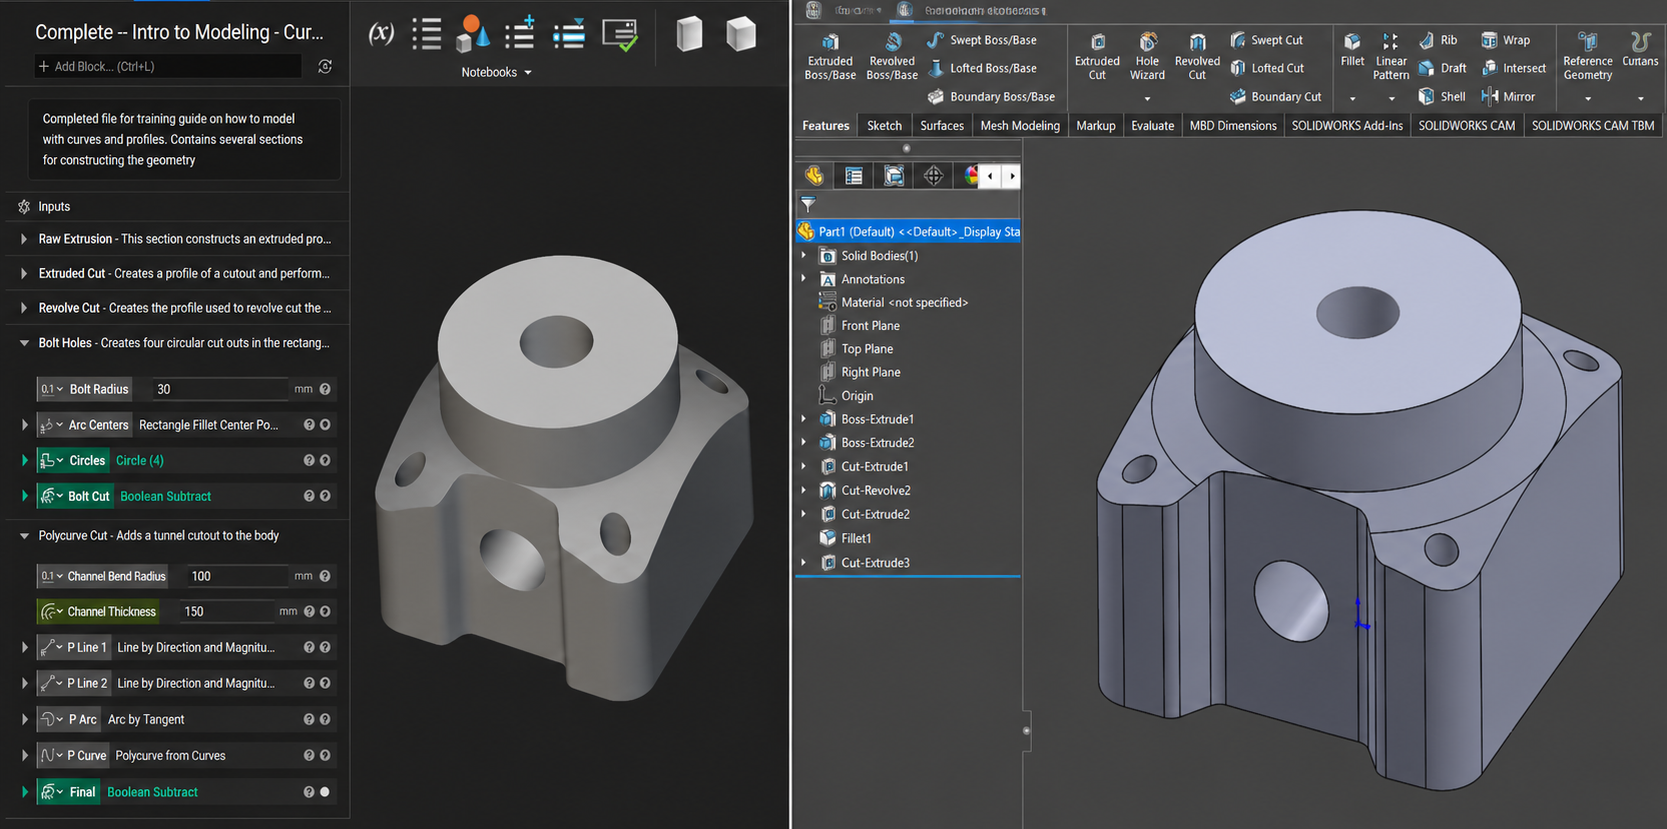 *An nTop Notebook (left) compared to a traditional CAD feature tree (right)*
A feature tree records an ordered sequence of operations applied to a specific feature of geometry, while nTop Notebook defines a process that can be applied to any part. This distinction makes nTop workflows inherently reusable: the Notebook is what the engineer builds, and the geometry is what it produces for a given set of inputs.
### Inputs, outputs, and types
Every block produces an output with a specific type — such as an Implicit Body, Mesh, or Scalar Field(see nTop Block Types Image below). Types determine which blocks can connect: for example, an input expecting an Implicit Body will not accept a Mesh.
Like types in programming languages, nTop prevents incompatible data from being connected. This helps:
* Ensure reliability: Use the right data in the right place.
* Prevent errors: Catch type mismatches immediately before they propagate downstream.
* Improve clarity\*\*:\*\* Colors and icons make data types easy to identify throughout the workflow.
*An nTop Notebook (left) compared to a traditional CAD feature tree (right)*
A feature tree records an ordered sequence of operations applied to a specific feature of geometry, while nTop Notebook defines a process that can be applied to any part. This distinction makes nTop workflows inherently reusable: the Notebook is what the engineer builds, and the geometry is what it produces for a given set of inputs.
### Inputs, outputs, and types
Every block produces an output with a specific type — such as an Implicit Body, Mesh, or Scalar Field(see nTop Block Types Image below). Types determine which blocks can connect: for example, an input expecting an Implicit Body will not accept a Mesh.
Like types in programming languages, nTop prevents incompatible data from being connected. This helps:
* Ensure reliability: Use the right data in the right place.
* Prevent errors: Catch type mismatches immediately before they propagate downstream.
* Improve clarity\*\*:\*\* Colors and icons make data types easy to identify throughout the workflow.
 *nTop block types*
## The nTop Interface
*nTop block types*
## The nTop Interface
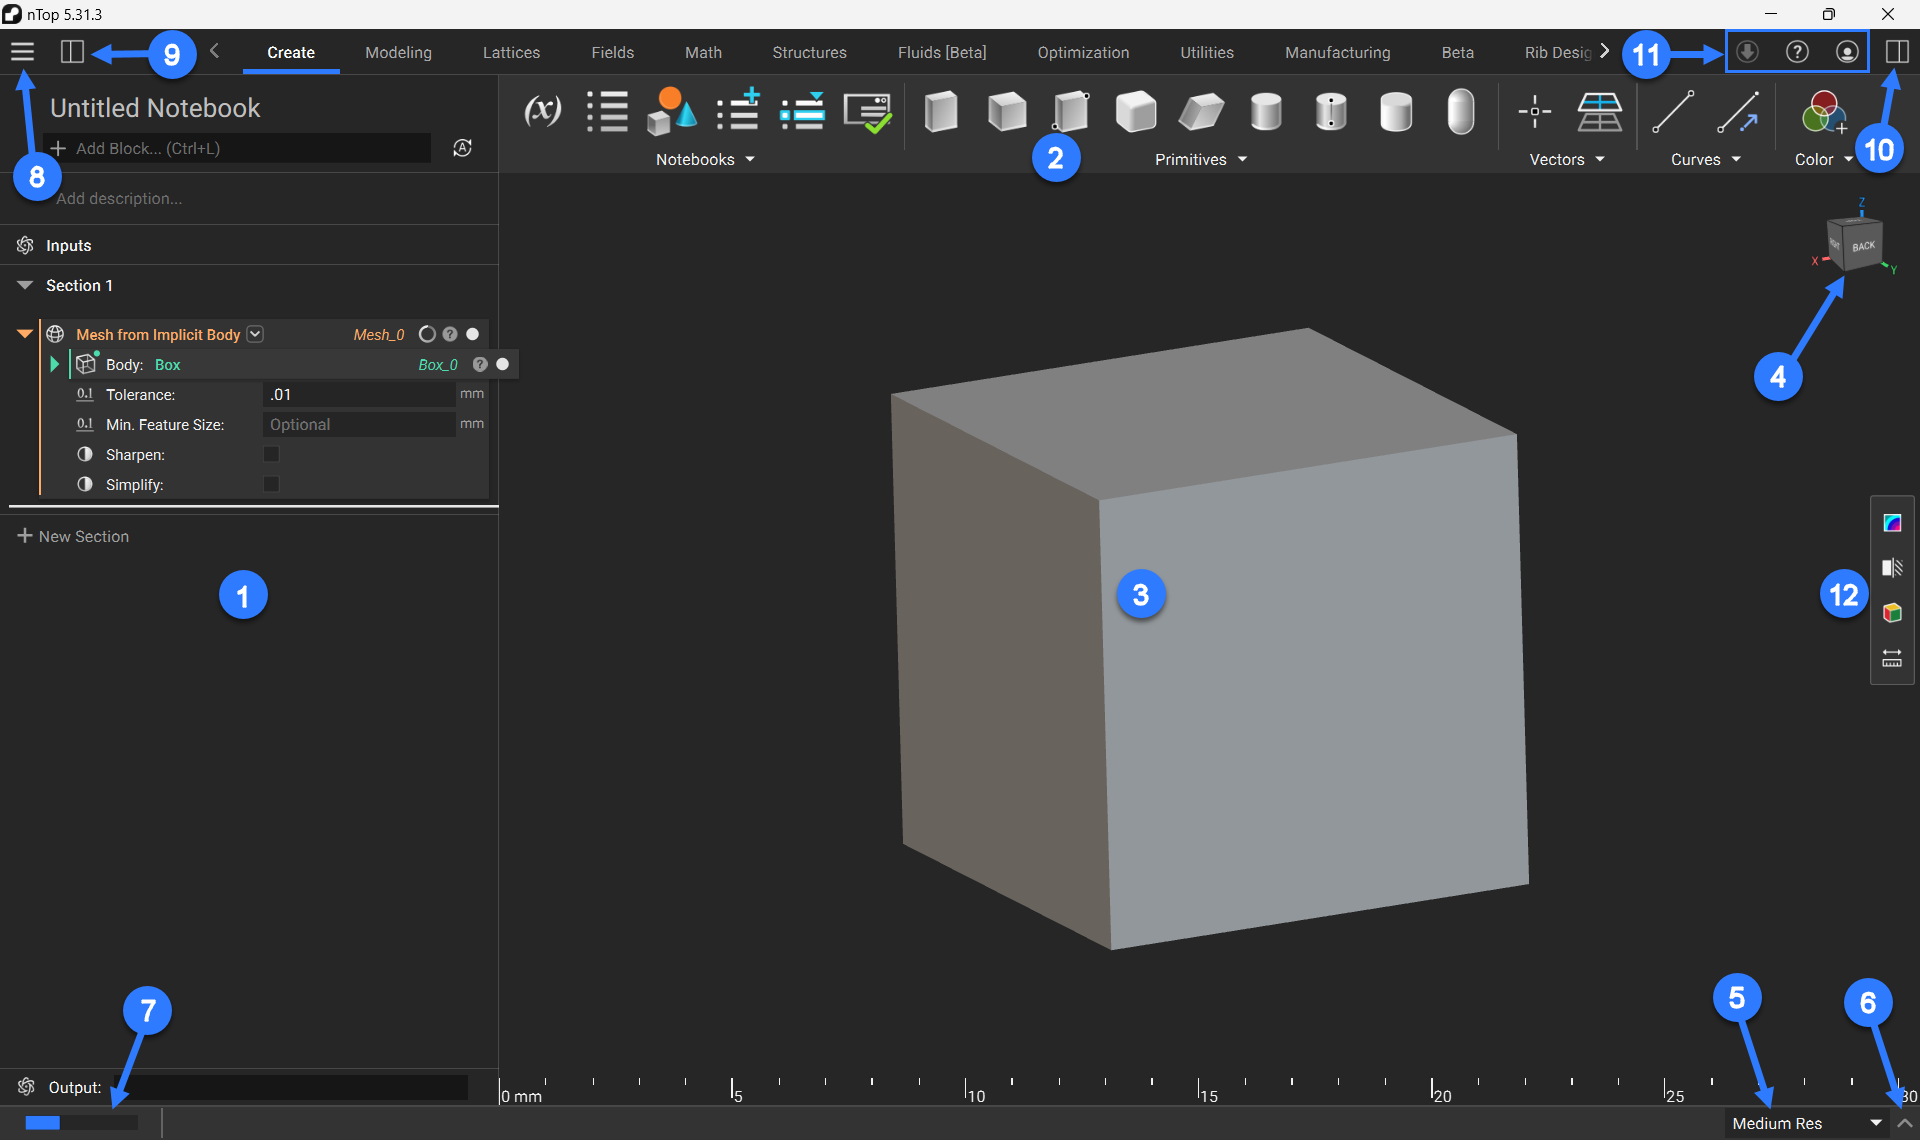 *The numbered labels correspond to the nTop interface components below*
The image above shows the nTop User Interface. Use the accordion folders below to learn about the different components of the UI.
The notebook on the left keeps a record of your modeling operations. You will work entirely within this notebook to build your workflow and manipulate the design parameters of your parts. The notebook allows you to:
* Title your notebook
* Add a notebook description
* Create/Rename sections to organize your notebook
* Use the search bar to quickly find and add blocks
* Add comments to individual blocks
*The numbered labels correspond to the nTop interface components below*
The image above shows the nTop User Interface. Use the accordion folders below to learn about the different components of the UI.
The notebook on the left keeps a record of your modeling operations. You will work entirely within this notebook to build your workflow and manipulate the design parameters of your parts. The notebook allows you to:
* Title your notebook
* Add a notebook description
* Create/Rename sections to organize your notebook
* Use the search bar to quickly find and add blocks
* Add comments to individual blocks
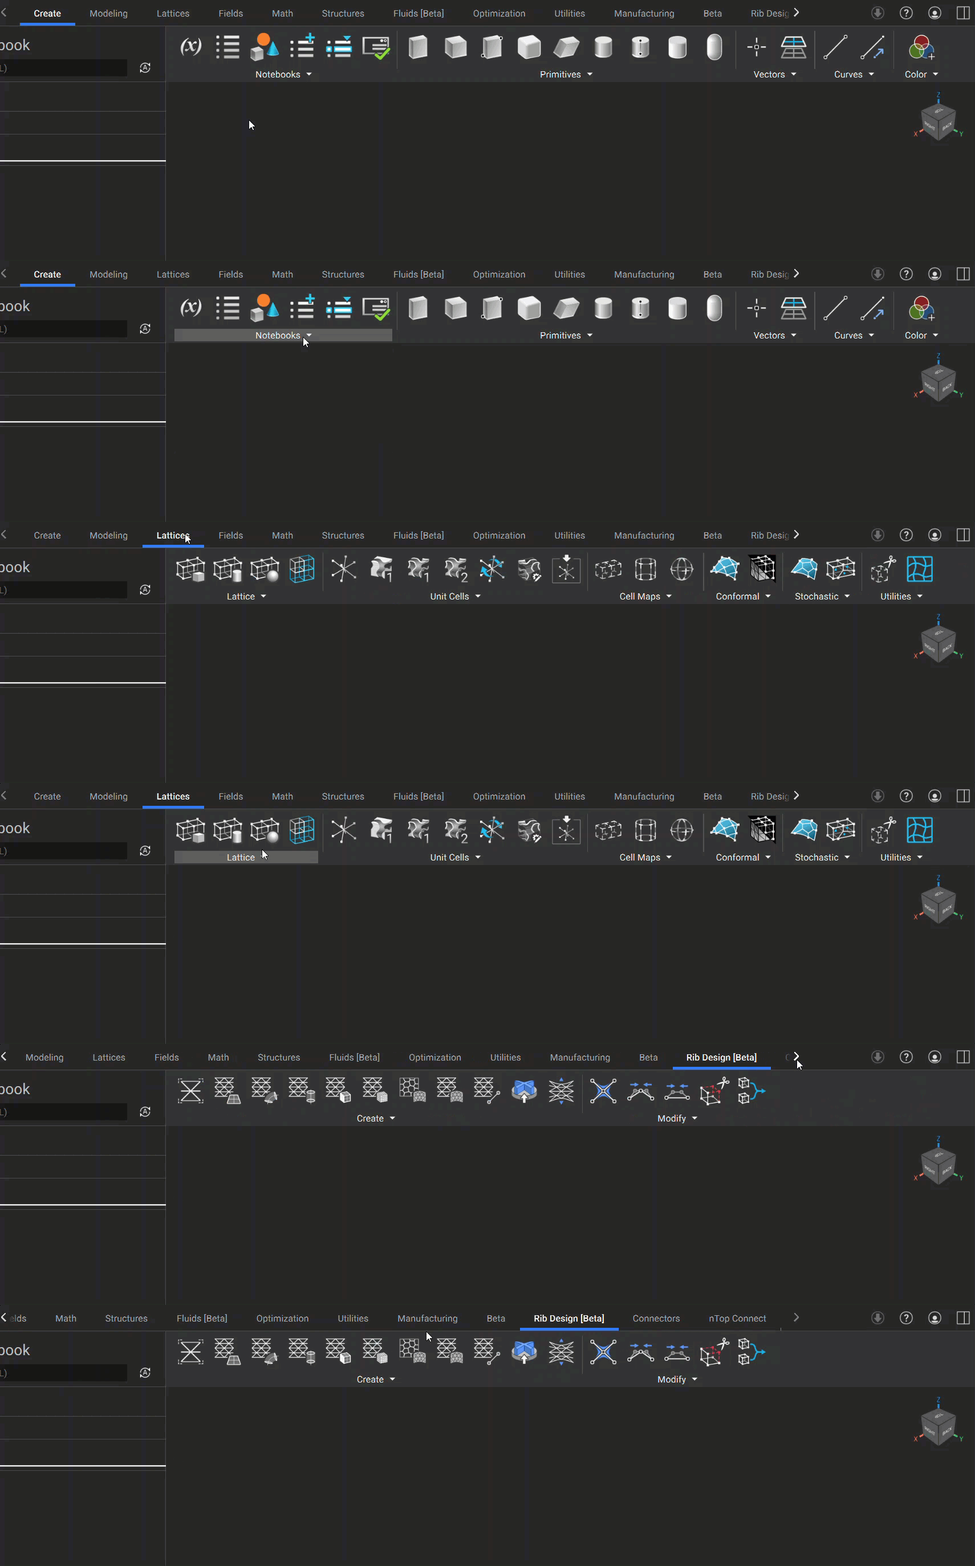
 The ribbon contains blocks for performing different operations in nTop. You can navigate the ribbon by clicking on the tabs to change block menus. You can also use the arrows to reveal additional tabs.
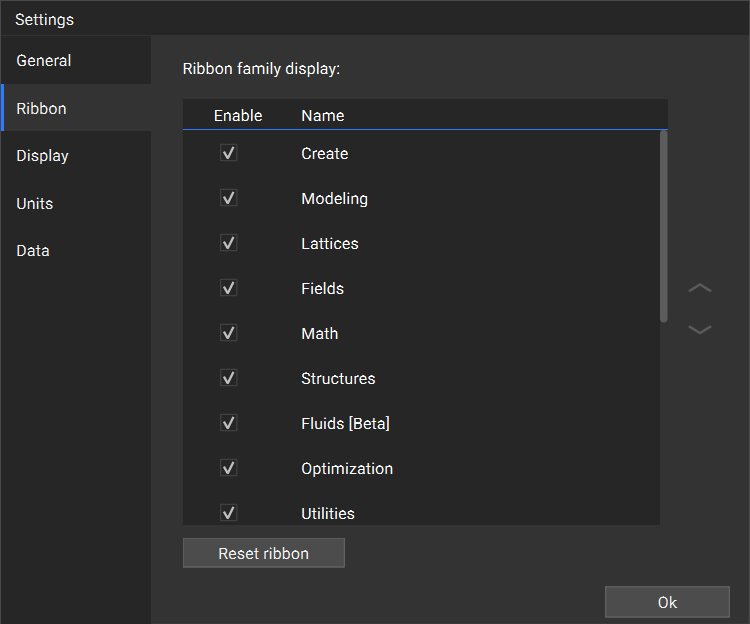
 The ribbon tabs can be configured under: **Menu>Settings>Ribbon**
Here you can toggle which tabs of the ribbon are visible in the nTop instance by turning on/off the checkboxes.
Note: If you don't see \[Beta] Ribbon tabs, you need to enable Beta blocks in the General section of the Settings.
The ribbon tabs can be configured under: **Menu>Settings>Ribbon**
Here you can toggle which tabs of the ribbon are visible in the nTop instance by turning on/off the checkboxes.
Note: If you don't see \[Beta] Ribbon tabs, you need to enable Beta blocks in the General section of the Settings.
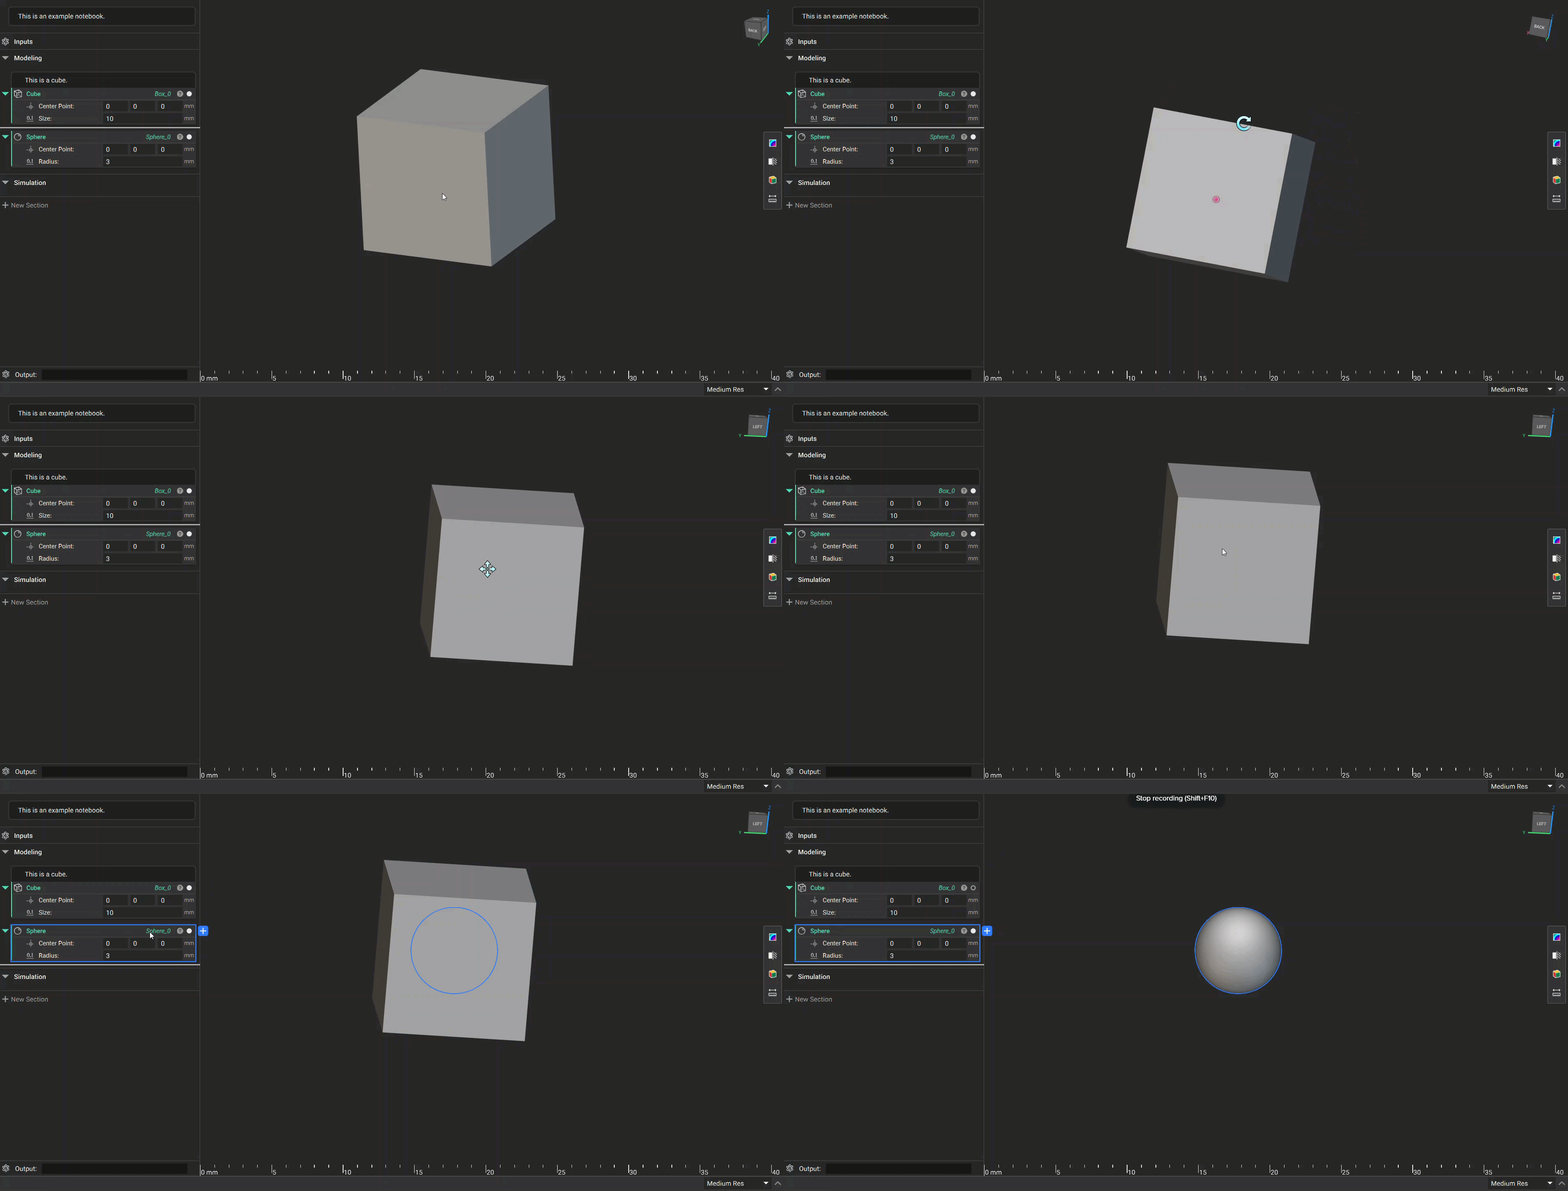
 The viewport is where you can see the visual rendering of the geometry you've created by working in the notebook. The main controls for operating in the viewport are:
* **Right Click:** Press and hold right-click while moving your mouse to rotate
* **Middle Mouse:** Press and hold the middle mouse button to move
* **Block Highlighting:** Select a block from the notebook to highlight it in the notebook and viewport
* **Toggle Block View:** Toggle the white circle icon next to a block to turn on/off its visibility
The viewport is where you can see the visual rendering of the geometry you've created by working in the notebook. The main controls for operating in the viewport are:
* **Right Click:** Press and hold right-click while moving your mouse to rotate
* **Middle Mouse:** Press and hold the middle mouse button to move
* **Block Highlighting:** Select a block from the notebook to highlight it in the notebook and viewport
* **Toggle Block View:** Toggle the white circle icon next to a block to turn on/off its visibility
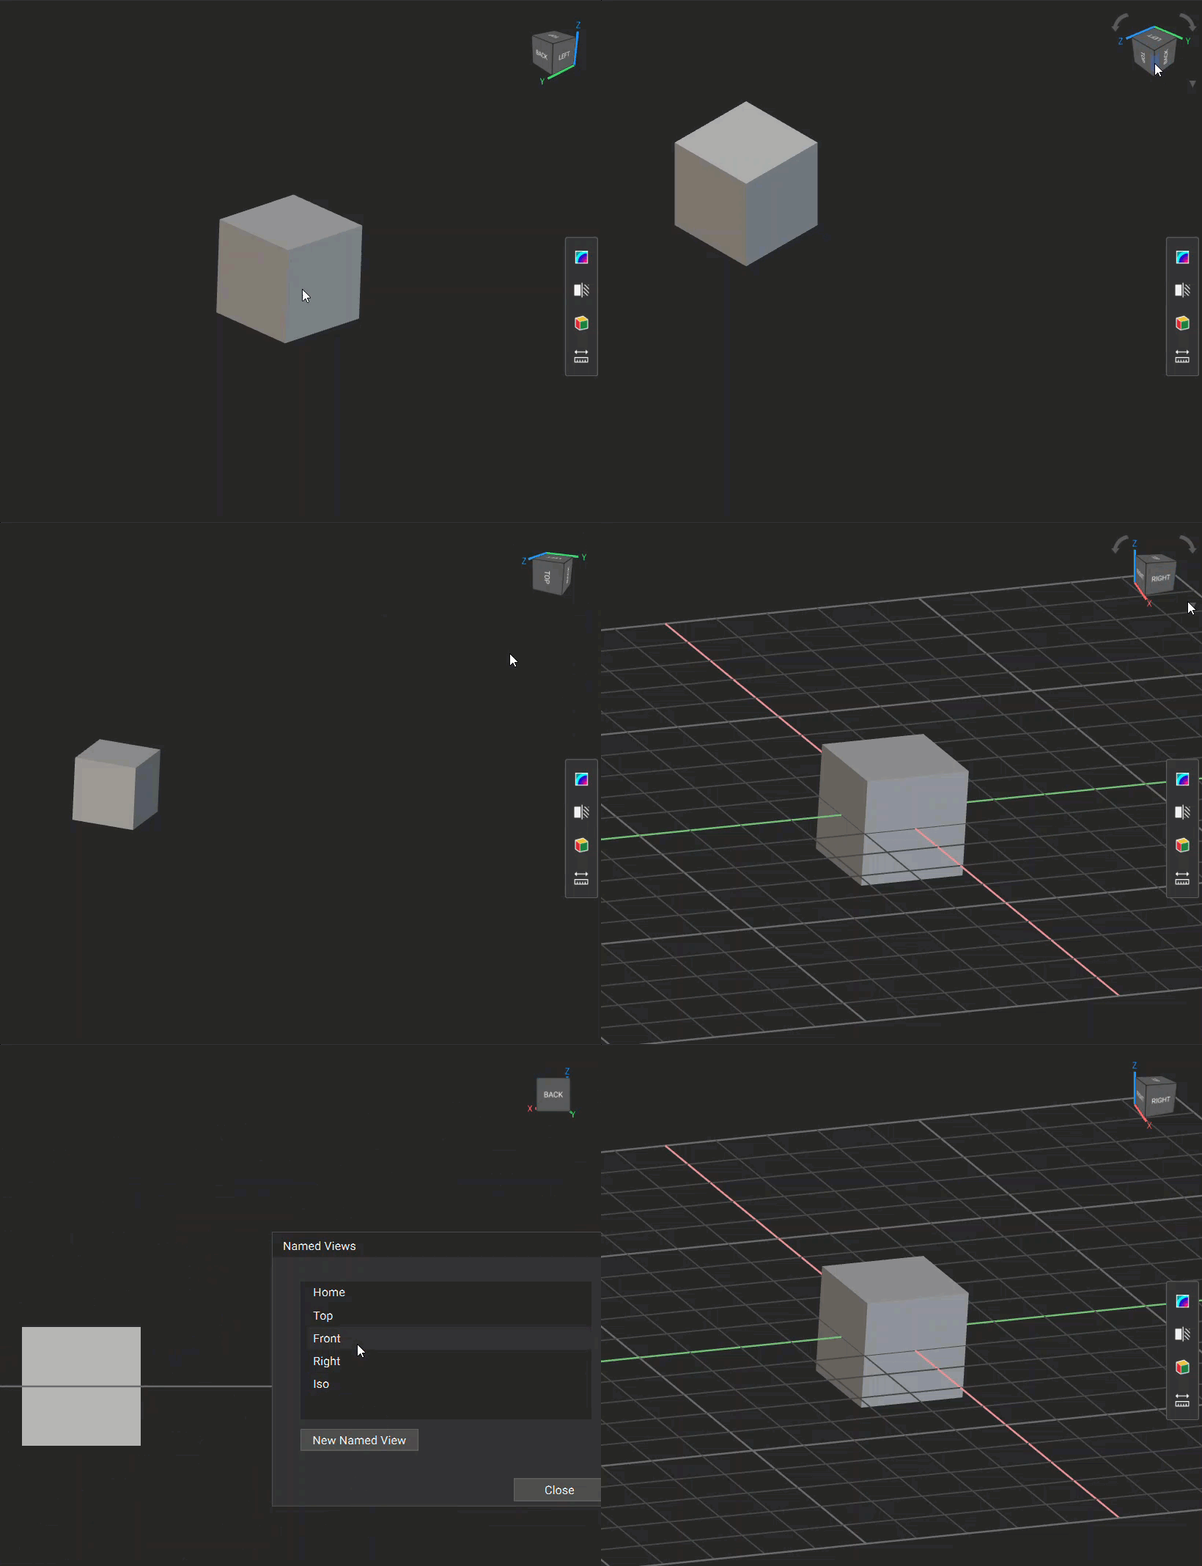
 The view cube shows the XYZ axis indication and has different options for viewing your geometry:
* **Camera Settings:** Choose to view your part in either Perspective or Orthographic. Note: The ruler is unavailable in Perspective view
* **Rotation Setting:** Choose between Turntable and Tumbler for how your part rotates in the viewport
* **Show Grid:** Toggle the grid on/off in the viewport
* **Show Ruler:** Toggle the ruler on/off in the viewport
* **Named Views:** Quickly jump between preset views or create your own view. To create your own, select “New Named View” when your part is oriented correctly and type in a name for the view.
* **Capture Image:** Use this tool to screenshot your geometry and save the image to your machine.
The view cube shows the XYZ axis indication and has different options for viewing your geometry:
* **Camera Settings:** Choose to view your part in either Perspective or Orthographic. Note: The ruler is unavailable in Perspective view
* **Rotation Setting:** Choose between Turntable and Tumbler for how your part rotates in the viewport
* **Show Grid:** Toggle the grid on/off in the viewport
* **Show Ruler:** Toggle the ruler on/off in the viewport
* **Named Views:** Quickly jump between preset views or create your own view. To create your own, select “New Named View” when your part is oriented correctly and type in a name for the view.
* **Capture Image:** Use this tool to screenshot your geometry and save the image to your machine.
 Resolution settings are located at the bottom right corner. We recommend working in low or medium res, and using high or highest res only to check your geometry. Changing the resolution only affects the loading time and the quality of the rendered image on the screen, not the actual part.
* Adaptive Resolution raises rendering quality for complex implicit models by adjusting local resolution based on your view.
* If you need to see the true geometry at the highest quality, use Precise Render (Ctrl + H), which produces a single high-resolution snapshot. Precise Render is only compatible with implicit bodies.
* If you increase the resolution and save the file, new instances of nTop inherit that setting.
Resolution settings are located at the bottom right corner. We recommend working in low or medium res, and using high or highest res only to check your geometry. Changing the resolution only affects the loading time and the quality of the rendered image on the screen, not the actual part.
* Adaptive Resolution raises rendering quality for complex implicit models by adjusting local resolution based on your view.
* If you need to see the true geometry at the highest quality, use Precise Render (Ctrl + H), which produces a single high-resolution snapshot. Precise Render is only compatible with implicit bodies.
* If you increase the resolution and save the file, new instances of nTop inherit that setting.
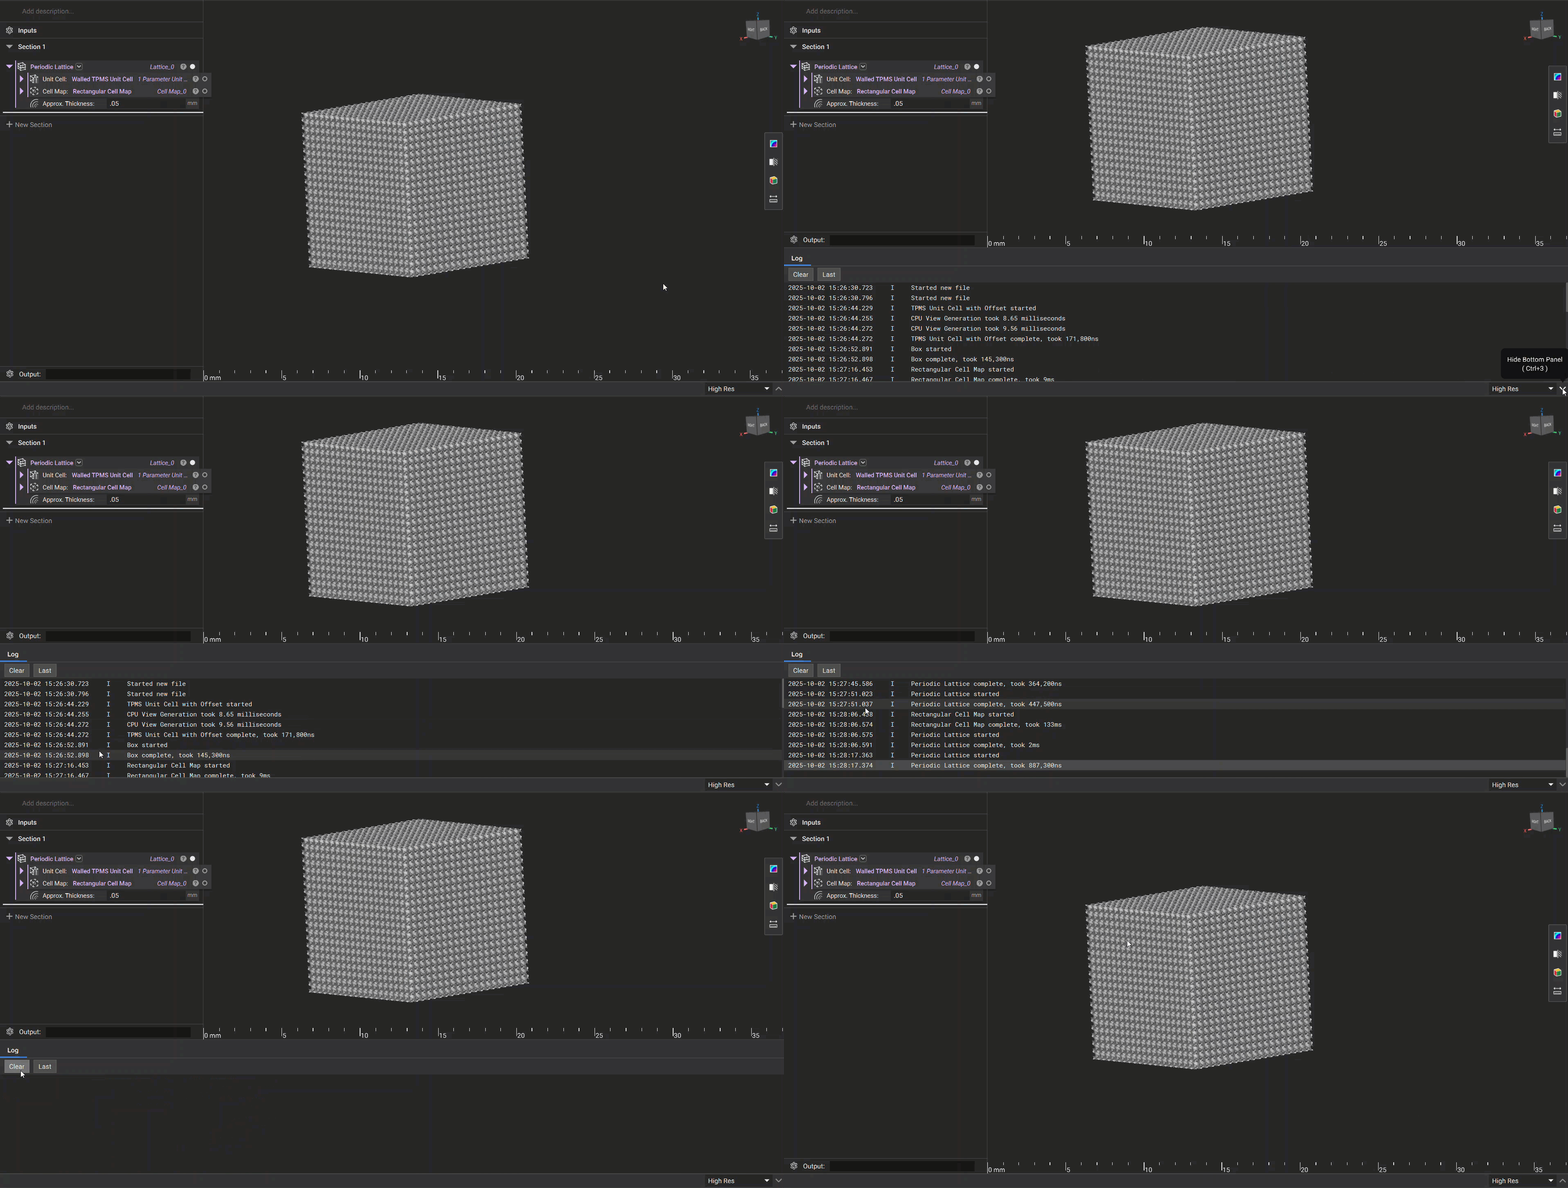
 The arrow to the right of the resolution settings expands and collapses the Log Panel. The Log Panel:
* Records every operation with a date and time stamp, as well as a description of the operation
* Every operation has one of two types – 'I' for info, or 'E' for error
* Newest entries appear at the bottom
* The Last button jumps to the most recent operation and Clear empties the log
* Double-clicking an entry will expand it in its own window
The arrow to the right of the resolution settings expands and collapses the Log Panel. The Log Panel:
* Records every operation with a date and time stamp, as well as a description of the operation
* Every operation has one of two types – 'I' for info, or 'E' for error
* Newest entries appear at the bottom
* The Last button jumps to the most recent operation and Clear empties the log
* Double-clicking an entry will expand it in its own window
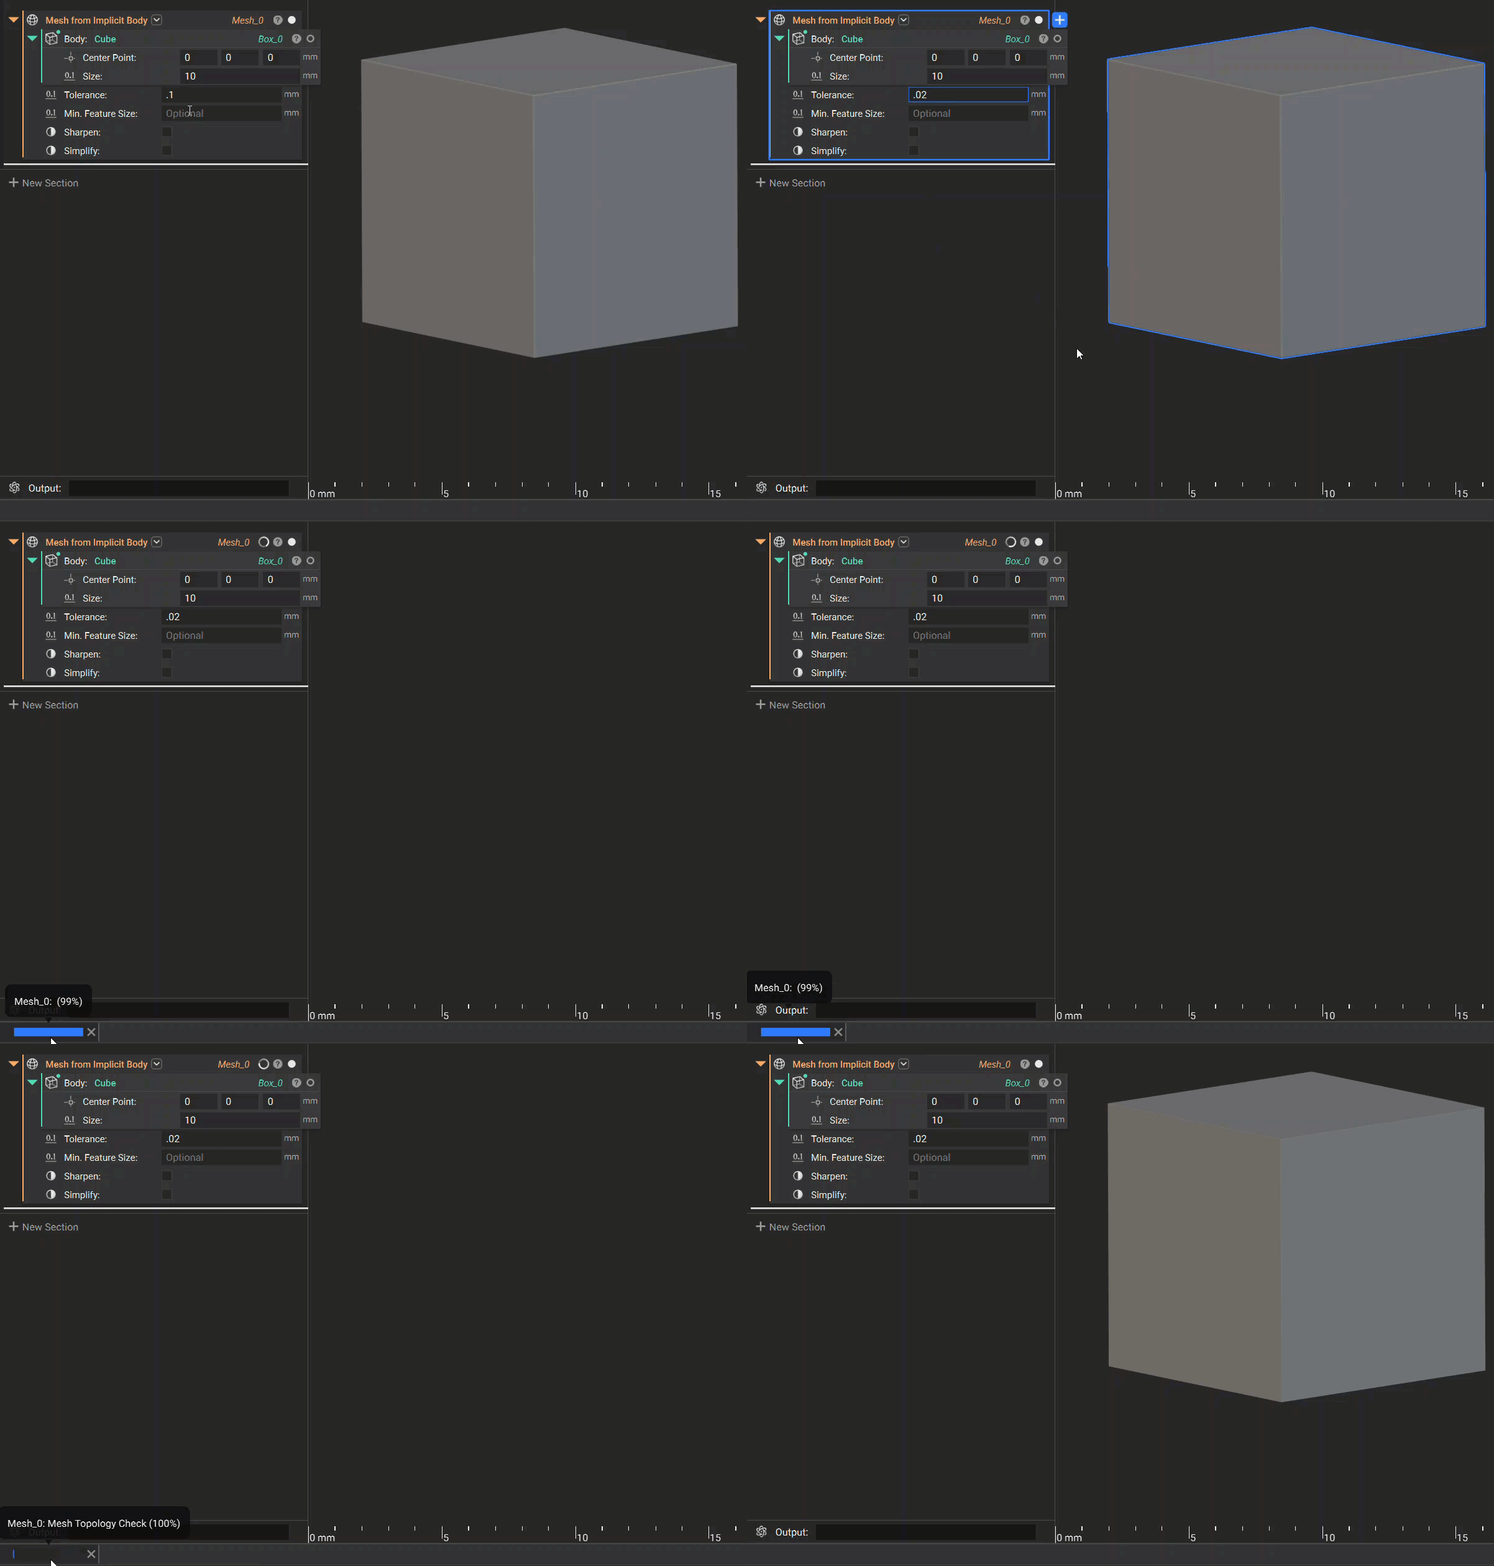
 If a process is in progress, the Status Bar on the left side would appear. By hovering over it, you can see the related block's name, the process being executed, and the percentage completion.
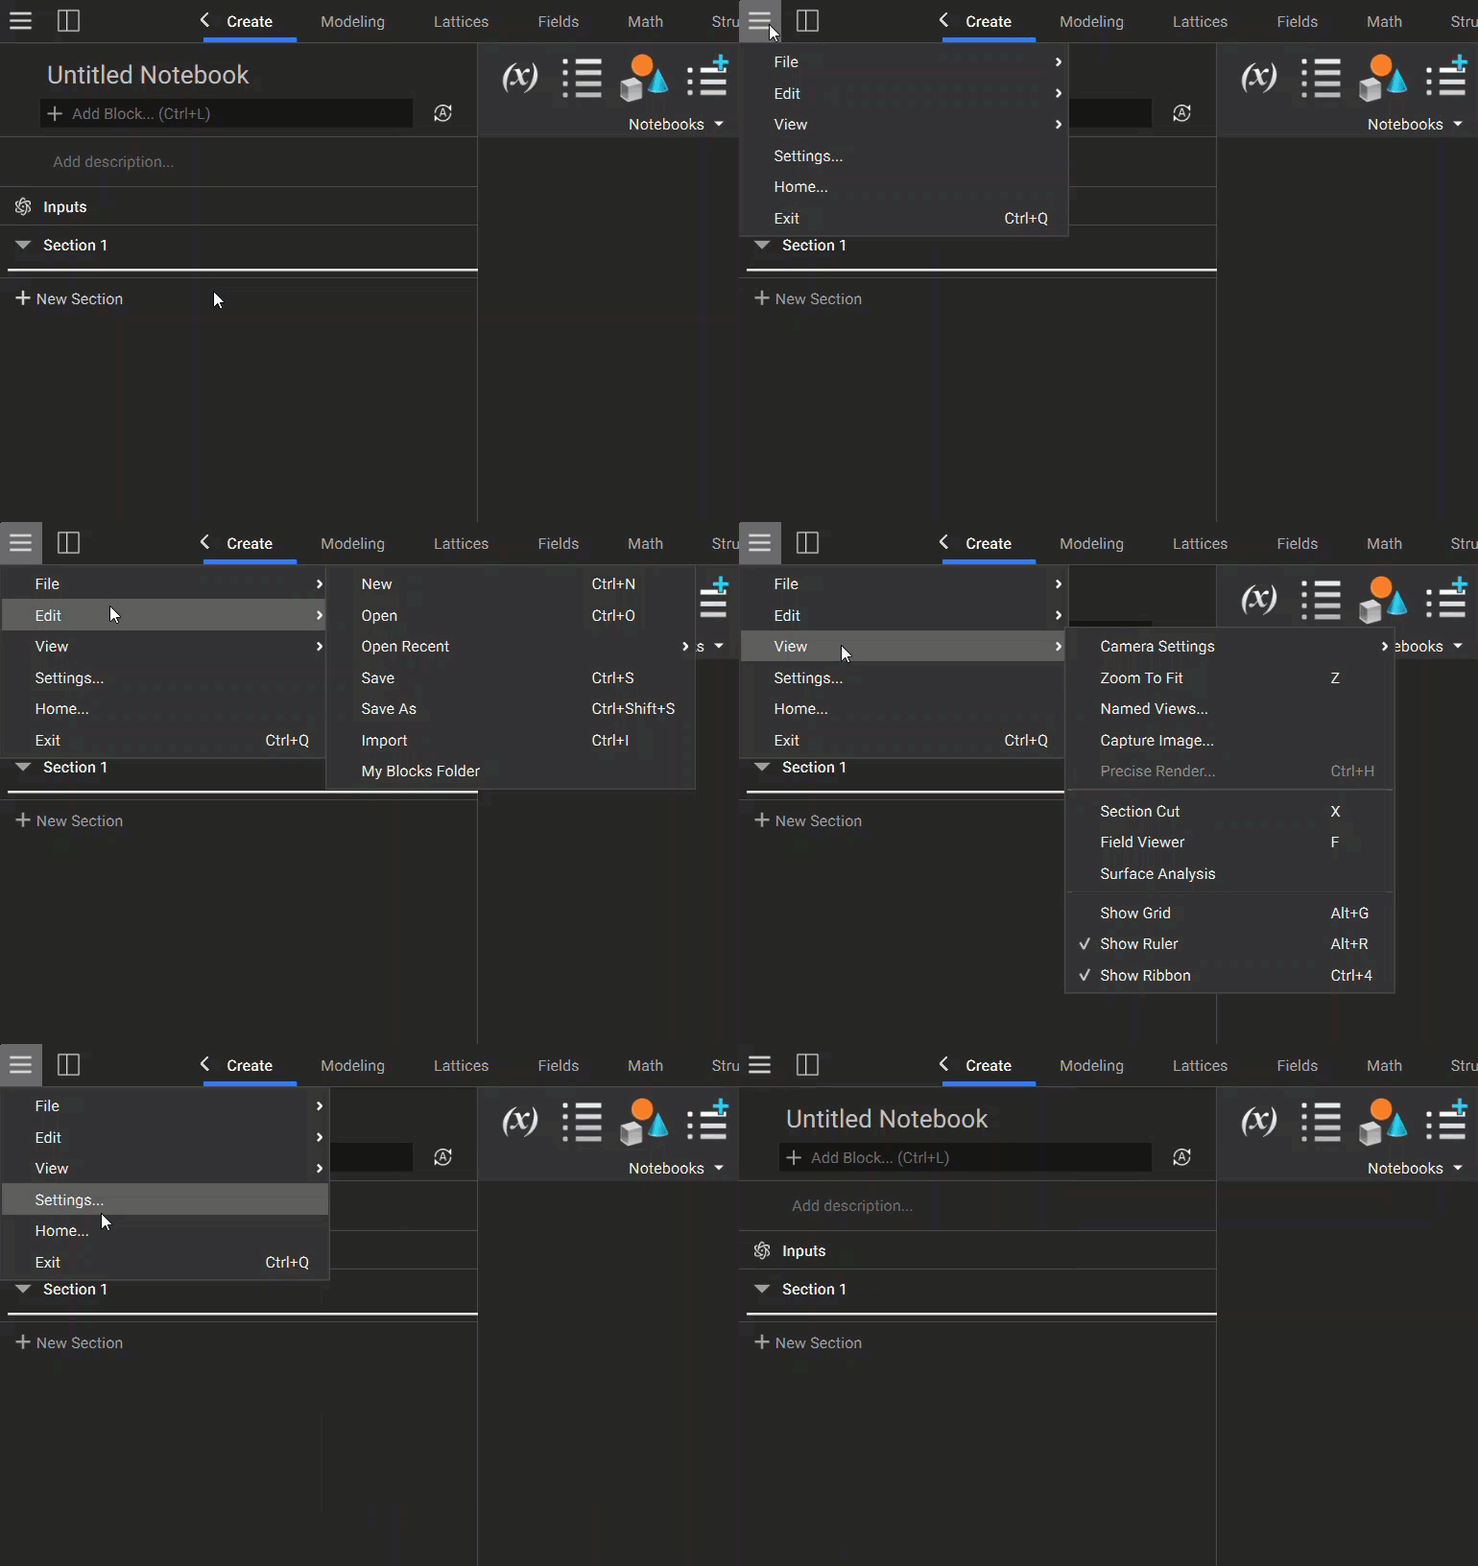
 The Menu is located in the top left corner of the nTop window and can be opened by clicking the three horizontal lines button. This contains multiple operations that are divided into several sections:
* **File**: Create/Open/Save files using the applicable options. The “Import” option is used to import custom blocks, and the “My Blocks Folder” opens the custom blocks folder.
* **Edit:** Undo/Redo/Cut/Copy/Paste/Paste with References are all available for operations performed in nTop. The “Select All Visible” option selects all geometry in a notebook.
* **View:** Contains options and settings for how geometry is presented in the viewport. This menu has some of the same options as the view cube, as well as some important additional controls. You can use [Precise Render](https://support.ntop.com/hc/en-us/articles/8288161848723-What-is-a-Precise-Render) to generate an accurate still frame of your geometry and to take screenshots. The other tools that aren't covered under view cube are explained in *View Tools*.
* **Settings:** Opens the nTop *Settings* menu. Here you can configure your nTop platform using the different settings tabs. This includes key settings like [Show Beta blocks](https://support.ntop.com/hc/en-us/articles/360062442113-What-are-beta-blocks), Enable GPU acceleration, and configuring the ribbon. You can also change the global units for your workflows and customize display options.
* **Home:** Returns you to the nTop home page.
The Menu is located in the top left corner of the nTop window and can be opened by clicking the three horizontal lines button. This contains multiple operations that are divided into several sections:
* **File**: Create/Open/Save files using the applicable options. The “Import” option is used to import custom blocks, and the “My Blocks Folder” opens the custom blocks folder.
* **Edit:** Undo/Redo/Cut/Copy/Paste/Paste with References are all available for operations performed in nTop. The “Select All Visible” option selects all geometry in a notebook.
* **View:** Contains options and settings for how geometry is presented in the viewport. This menu has some of the same options as the view cube, as well as some important additional controls. You can use [Precise Render](https://support.ntop.com/hc/en-us/articles/8288161848723-What-is-a-Precise-Render) to generate an accurate still frame of your geometry and to take screenshots. The other tools that aren't covered under view cube are explained in *View Tools*.
* **Settings:** Opens the nTop *Settings* menu. Here you can configure your nTop platform using the different settings tabs. This includes key settings like [Show Beta blocks](https://support.ntop.com/hc/en-us/articles/360062442113-What-are-beta-blocks), Enable GPU acceleration, and configuring the ribbon. You can also change the global units for your workflows and customize display options.
* **Home:** Returns you to the nTop home page.
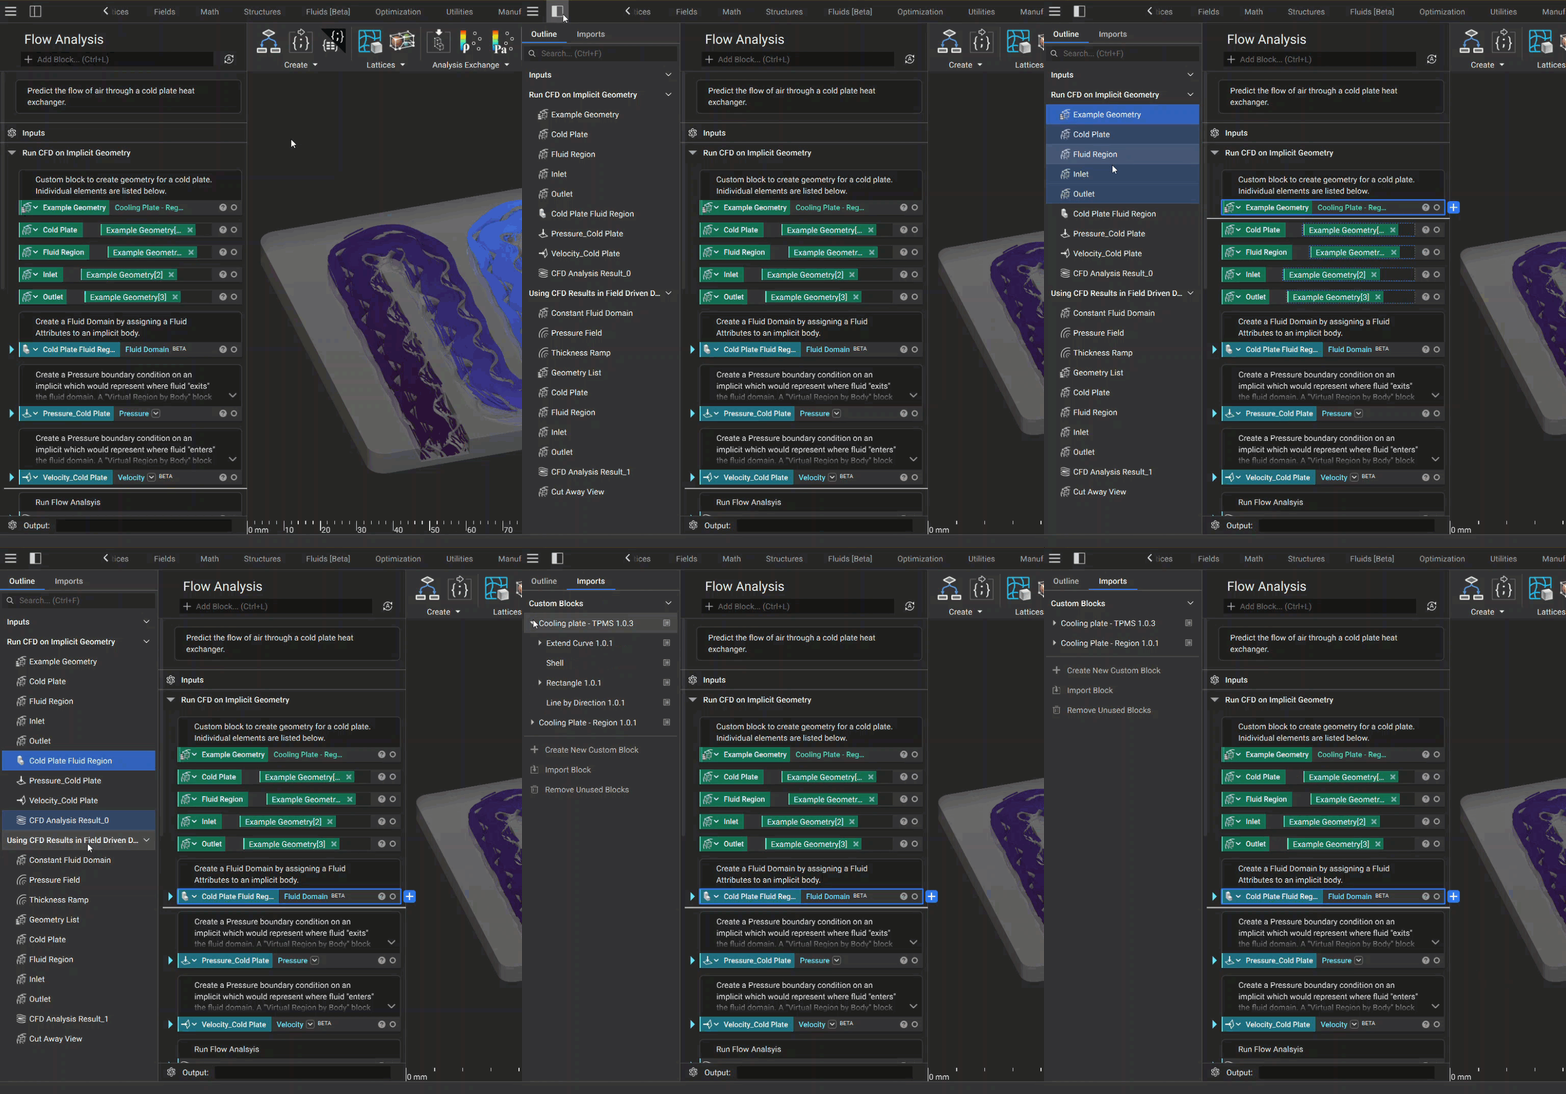
 The Left Side Panel can be opened/closed by clicking the white/black rectangle icon next to the menu. This panel contains two tabs: Outline and Imports.
* **Outline:** The *Outline* is a list of all top level blocks in your notebook (i.e. It does not include blocks nested inside another block) that are separated by your notebook sections. When you select a block from the list, it is highlighted in bright blue. If this block is used downstream in another block, the parent block will be highlighted in a darker blue.
* The Outline also contains Notebook Search, which you can use to quickly find blocks or comments in the notebook. You can search using:
* Block names
* Variable names
* Comment text
* Results show a number next to each entry, indicating how many instances of that block exist in the Notebook. Expand a result to see each instance individually.
* **Imports:** The *Imports* tab is used to manage custom blocks in your workflow. Any custom blocks that have been imported will appear at the top under the Custom Blocks drop-down. You also have the options to create a custom block, import a custom block, and remove unused custom blocks that are not being used in your notebook or are outdated.
The Left Side Panel can be opened/closed by clicking the white/black rectangle icon next to the menu. This panel contains two tabs: Outline and Imports.
* **Outline:** The *Outline* is a list of all top level blocks in your notebook (i.e. It does not include blocks nested inside another block) that are separated by your notebook sections. When you select a block from the list, it is highlighted in bright blue. If this block is used downstream in another block, the parent block will be highlighted in a darker blue.
* The Outline also contains Notebook Search, which you can use to quickly find blocks or comments in the notebook. You can search using:
* Block names
* Variable names
* Comment text
* Results show a number next to each entry, indicating how many instances of that block exist in the Notebook. Expand a result to see each instance individually.
* **Imports:** The *Imports* tab is used to manage custom blocks in your workflow. Any custom blocks that have been imported will appear at the top under the Custom Blocks drop-down. You also have the options to create a custom block, import a custom block, and remove unused custom blocks that are not being used in your notebook or are outdated.
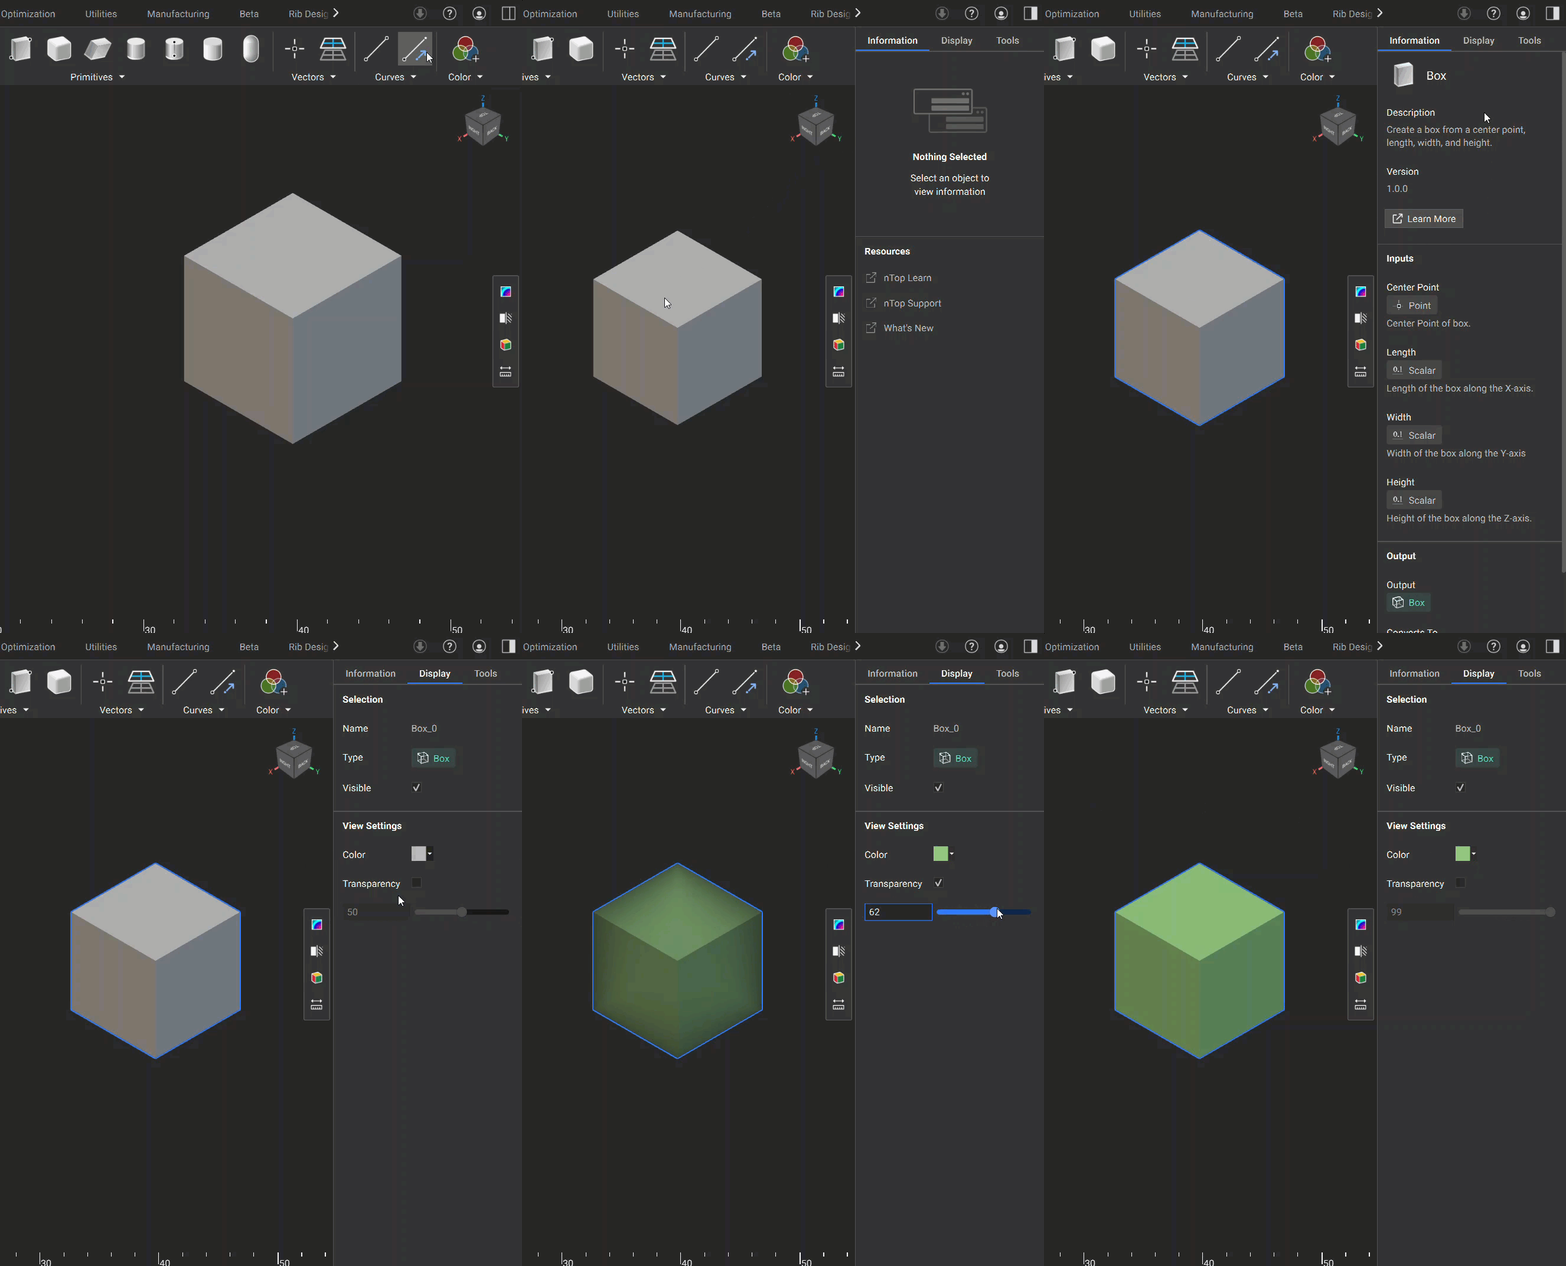
 The Right Side Panel can be opened/closed by clicking the white/black rectangle icon in the top right corner of the nTop window. This panel contains three tabs: *Information*, *Display*, and *Tools*.
* **Information:** Displays block information based on which block is selected. Here you can see the block description, input descriptions, and output information. There is also a *Learn More* button that will open the selected block's documentation file for more information.
* **Display:** Contains options for changing the selected body's appearance using color and transparency.
* **Tools:** This tab is covered under *View Tools*.
The Right Side Panel can be opened/closed by clicking the white/black rectangle icon in the top right corner of the nTop window. This panel contains three tabs: *Information*, *Display*, and *Tools*.
* **Information:** Displays block information based on which block is selected. Here you can see the block description, input descriptions, and output information. There is also a *Learn More* button that will open the selected block's documentation file for more information.
* **Display:** Contains options for changing the selected body's appearance using color and transparency.
* **Tools:** This tab is covered under *View Tools*.
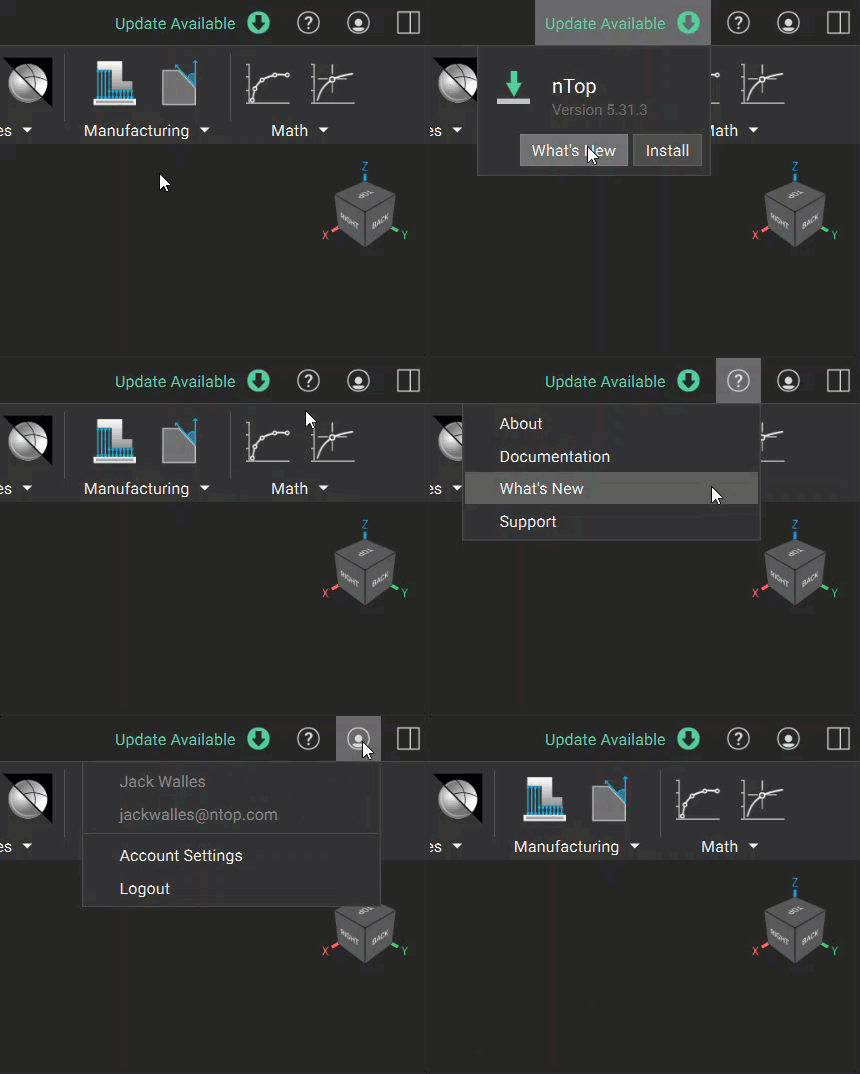
 * **Update Button:** If you are not working in the latest version of nTop, you will see *Update Available* followed by a green download symbol. If you are on the latest version, the download symbol will appear gray.
* **Information Button:** The question mark icon contains:
* *About:* Information regarding your current software version.
* *Documentation:* Opens the nTop internal documentation
* *What's New:* Opens the most recent release notes for the current software version
* *Support:* Opens the nTop Support site. This contains helpful articles, release notes, installation information, and more.
* **User Icon**: Shows user information and a link to access *Account Settings*. This also contains a *Logout* option.
* **Update Button:** If you are not working in the latest version of nTop, you will see *Update Available* followed by a green download symbol. If you are on the latest version, the download symbol will appear gray.
* **Information Button:** The question mark icon contains:
* *About:* Information regarding your current software version.
* *Documentation:* Opens the nTop internal documentation
* *What's New:* Opens the most recent release notes for the current software version
* *Support:* Opens the nTop Support site. This contains helpful articles, release notes, installation information, and more.
* **User Icon**: Shows user information and a link to access *Account Settings*. This also contains a *Logout* option.
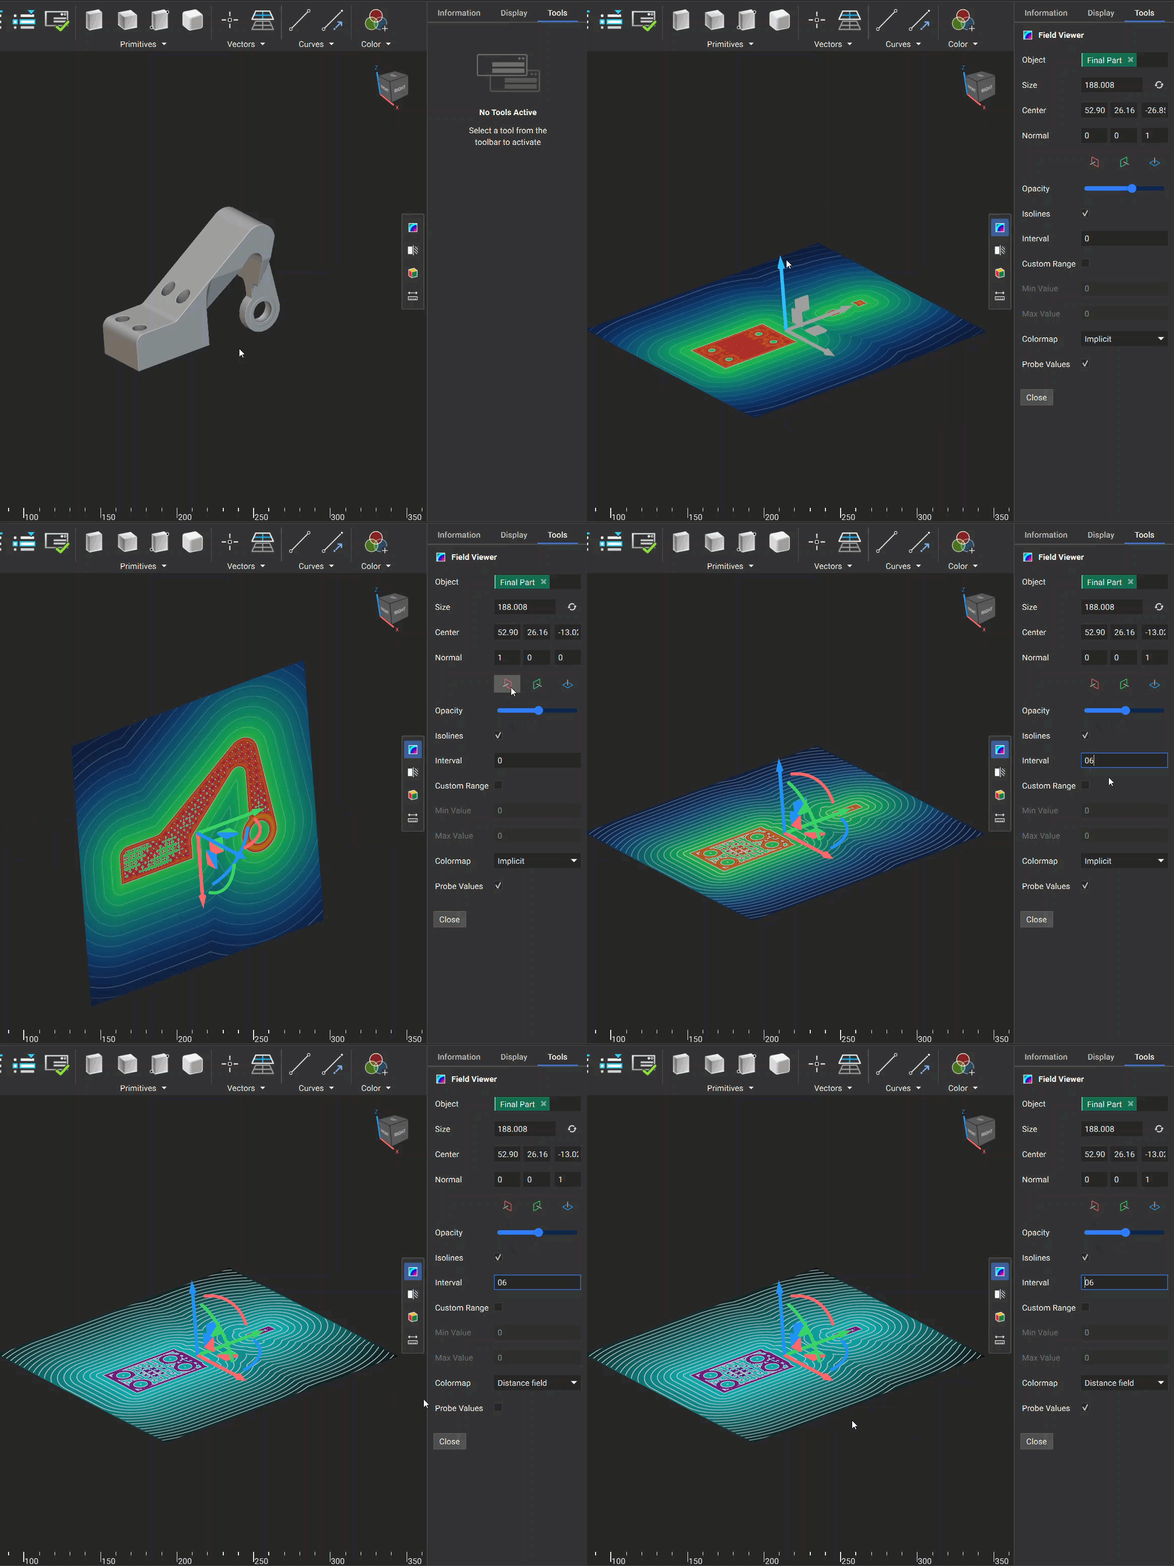
 The View Tools sidebar contains several helpful tools for analyzing your geometry:
* **Field Viewer:** The *Field Viewer* allows you to visualize a field. You can change the plane of visualization using the colored plane icons. The following options are available to analyze the field:
* *Opacity:* Changes the opacity of the visualized field
* *Isolines:* Option to turn on/off the isolines
* *Interval:* Changes the spacing between the isolines
* *Custom Range:* Option to manually specify the value range of the field
* *Min Value:* Minimum value when a Custom Range is applied
* *Max Value:* Maximum value when a Custom Range is applied
* *Colormap:* Option to change the color scheme of the field
* *Probe Values:* Toggles the ability to see field values when moving the mouse over the field
The View Tools sidebar contains several helpful tools for analyzing your geometry:
* **Field Viewer:** The *Field Viewer* allows you to visualize a field. You can change the plane of visualization using the colored plane icons. The following options are available to analyze the field:
* *Opacity:* Changes the opacity of the visualized field
* *Isolines:* Option to turn on/off the isolines
* *Interval:* Changes the spacing between the isolines
* *Custom Range:* Option to manually specify the value range of the field
* *Min Value:* Minimum value when a Custom Range is applied
* *Max Value:* Maximum value when a Custom Range is applied
* *Colormap:* Option to change the color scheme of the field
* *Probe Values:* Toggles the ability to see field values when moving the mouse over the field
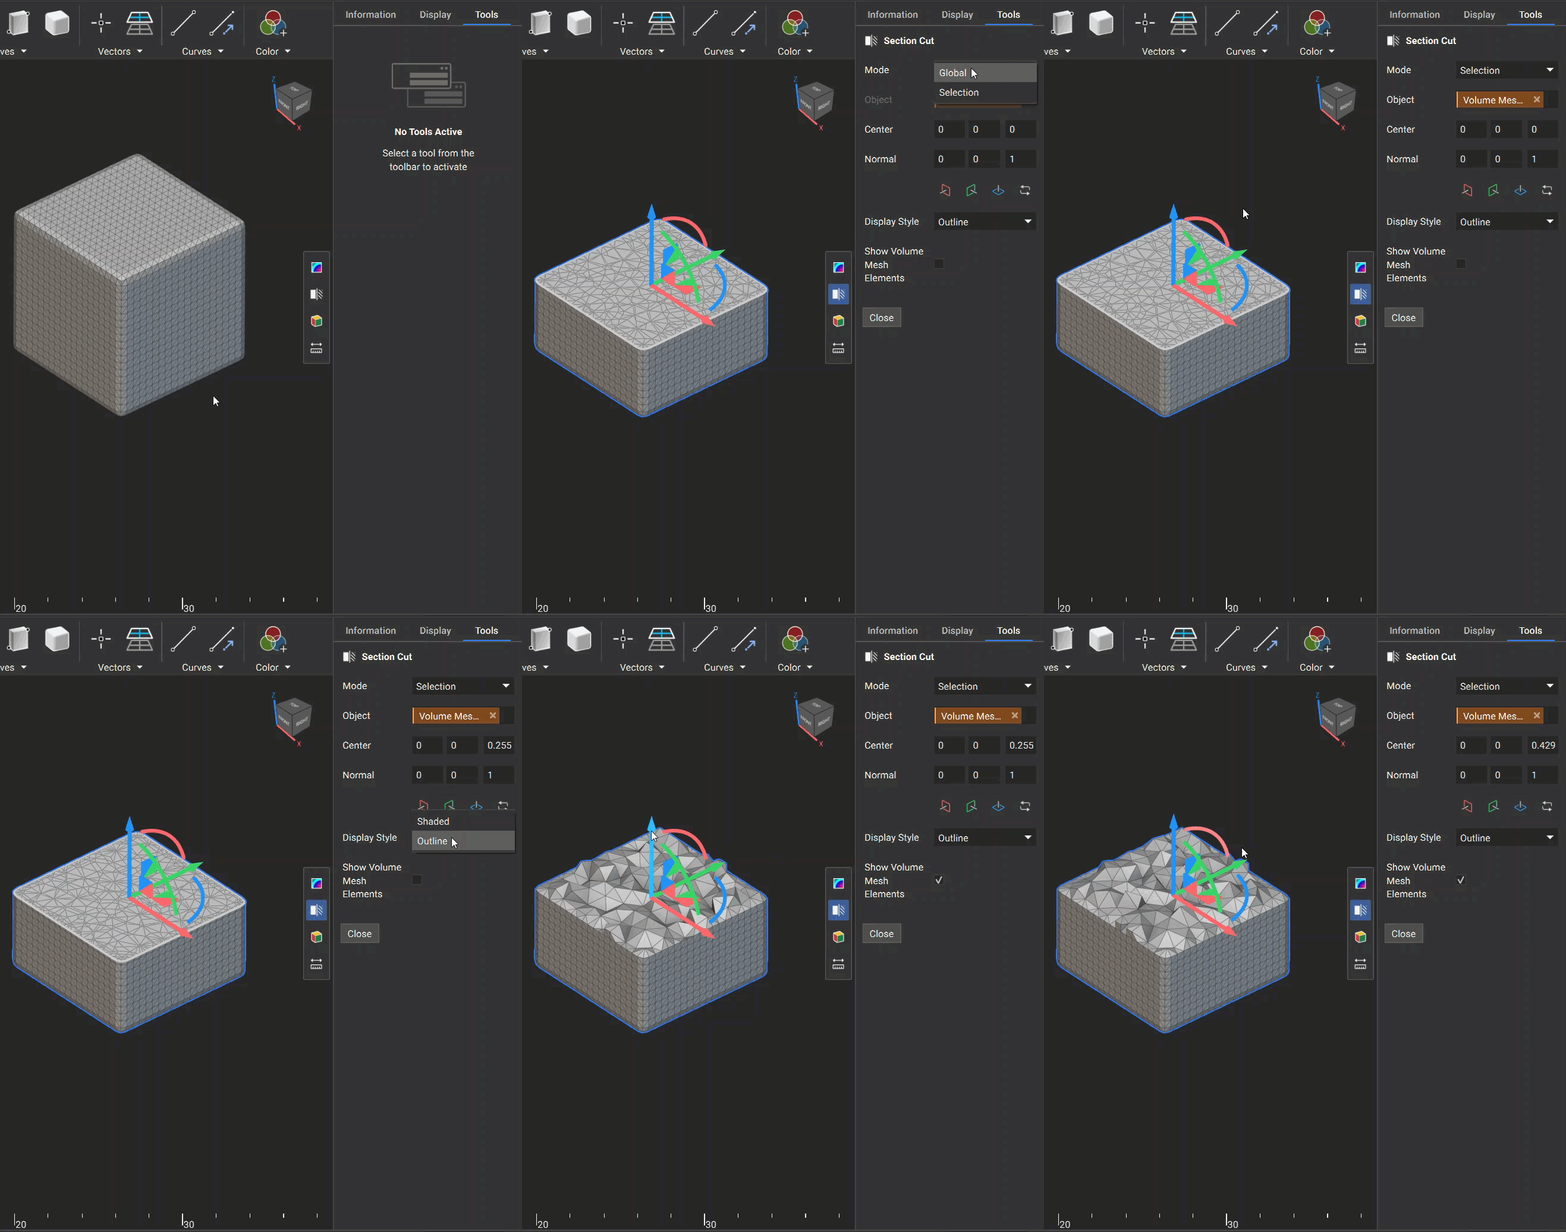
 * **Section Cut:** This tool is used to cut geometry at a specified plane. You can change the plane of visualization using the colored plane icons. The following options are available when performing a section cut:
* *Mode:* Choose between performing a section cut on a specific body (*Selection*) or on all visualized bodies that intersect the plane (*Global*)
* *Display Style:* Changes the display style of the sectioned body
* *Show Volume Mesh Elements:* If the body is a volume mesh, you can toggle the visualization of the 3D internal volume elements
* **Section Cut:** This tool is used to cut geometry at a specified plane. You can change the plane of visualization using the colored plane icons. The following options are available when performing a section cut:
* *Mode:* Choose between performing a section cut on a specific body (*Selection*) or on all visualized bodies that intersect the plane (*Global*)
* *Display Style:* Changes the display style of the sectioned body
* *Show Volume Mesh Elements:* If the body is a volume mesh, you can toggle the visualization of the 3D internal volume elements
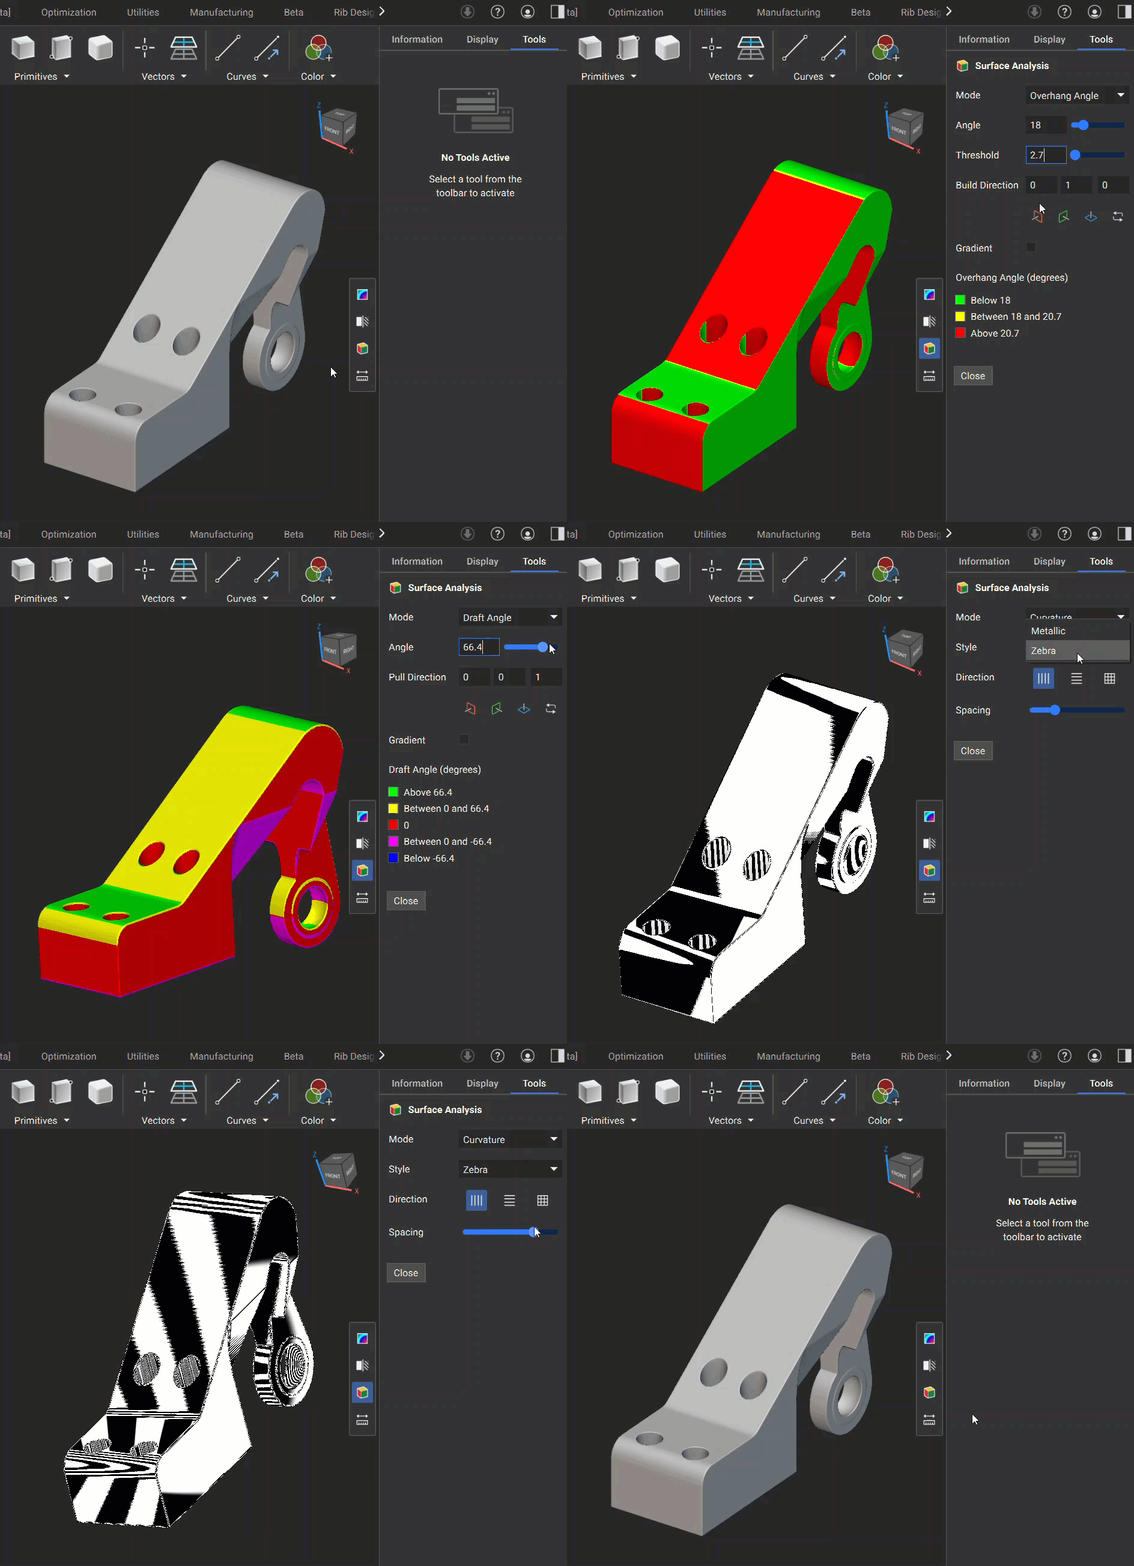
 * **Surface Analysis:** The Surface Analysis tool has three different modes you can use to analyze the surface of your geometry:
* *Overhang Angle:* This mode is used to identify regions in your model where angles may exceed the printable threshold, helping you inspect the design for additive manufacturability. It has the following options for inspection:
* *Angle:* The lower value of the angle analysis
* *Threshold:* The range between the lower and upper angle values being evaluated
* *Build Direction:* Specifies the build plane normal direction
* *Gradient:* Option to display the color scheme as gradient or not
* *Draft Angle:* This mode visualizes areas of your model based on a specified draft angle relative to a pull direction, helping you verify that your design meets manufacturability requirements. It has the following options for inspection:
* Angle: The specified angle to evaluate the geometry
* Pull Direction: The plane used to specify the angle relative to the geometry
* Gradient: Option to display the color scheme as gradient or discrete
* *Curvature:* This mode is used to analyze the curvature of a geometry's surface.
* *Metallic:* Renders the geometry with a shiny, reflective surface, which improves the clarity of curvature and surface quality.
* *Zebra:* Displays a series of alternating black and white stripes on a surface. The reflection patterns of these stripes help visualize the surface's curvature. You can select from three buttons to choose the orientation of the stripes and use a slider to adjust their spacing.
* **Surface Analysis:** The Surface Analysis tool has three different modes you can use to analyze the surface of your geometry:
* *Overhang Angle:* This mode is used to identify regions in your model where angles may exceed the printable threshold, helping you inspect the design for additive manufacturability. It has the following options for inspection:
* *Angle:* The lower value of the angle analysis
* *Threshold:* The range between the lower and upper angle values being evaluated
* *Build Direction:* Specifies the build plane normal direction
* *Gradient:* Option to display the color scheme as gradient or not
* *Draft Angle:* This mode visualizes areas of your model based on a specified draft angle relative to a pull direction, helping you verify that your design meets manufacturability requirements. It has the following options for inspection:
* Angle: The specified angle to evaluate the geometry
* Pull Direction: The plane used to specify the angle relative to the geometry
* Gradient: Option to display the color scheme as gradient or discrete
* *Curvature:* This mode is used to analyze the curvature of a geometry's surface.
* *Metallic:* Renders the geometry with a shiny, reflective surface, which improves the clarity of curvature and surface quality.
* *Zebra:* Displays a series of alternating black and white stripes on a surface. The reflection patterns of these stripes help visualize the surface's curvature. You can select from three buttons to choose the orientation of the stripes and use a slider to adjust their spacing.
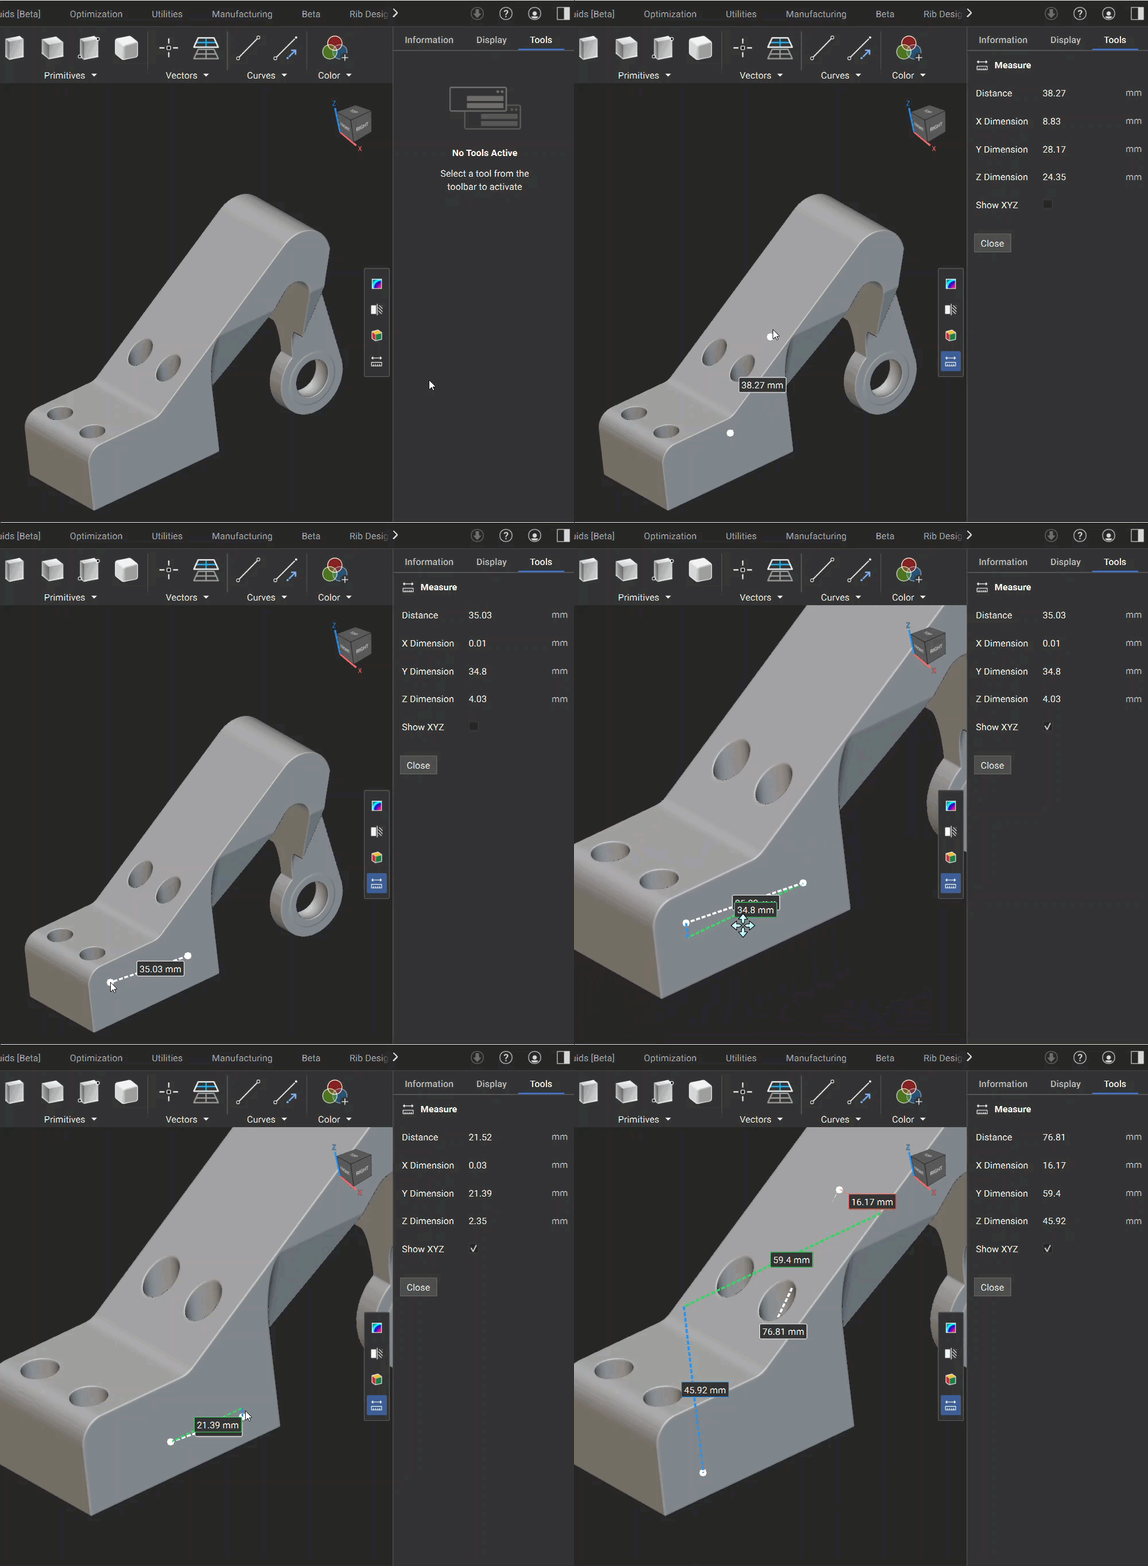
 * **Measure:** The *Measure Tool* lets you directly measure distances between two points within your 3D model. This feature is ideal for quick inspections and supports interactive visualization of distances along global X, Y, and Z axes. The total distance and XYZ dimensions appear in the Right Side Panel, and you can check the “Show XYZ” checkbox to display dimension lines for X, Y, and Z in the 3D view.
 ## Notebook Anatomy, Operations, & Best Practices
Your Notebook documents your work, and a little housekeeping goes a long way. Keeping it organized and commented helps with future use and sharing.
### 1. Identifying the workflow
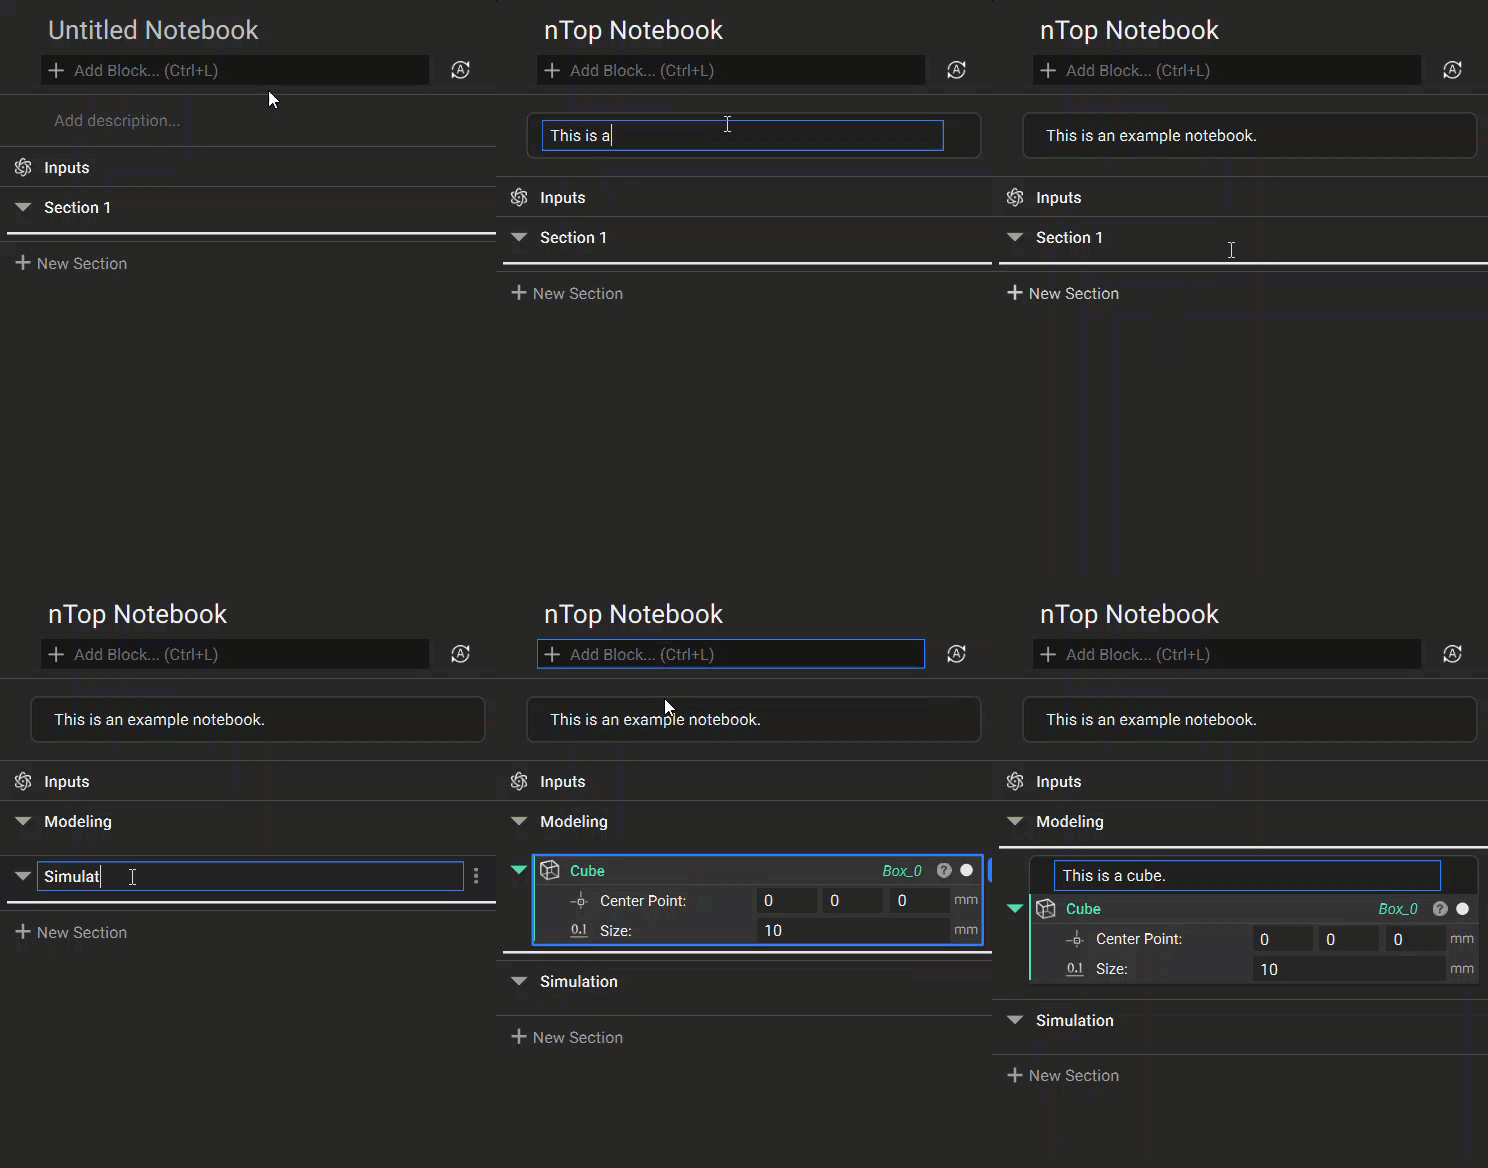
1. Notebook Name — Double-click 'Untitled Notebook' to name it. Use something unique and memorable, and match it to the file name.
2. Notebook Description — Double-click 'Add description' to write one. The description is what tells you, or a colleague, what the workflow accomplishes.
## Notebook Anatomy, Operations, & Best Practices
Your Notebook documents your work, and a little housekeeping goes a long way. Keeping it organized and commented helps with future use and sharing.
### 1. Identifying the workflow
1. Notebook Name — Double-click 'Untitled Notebook' to name it. Use something unique and memorable, and match it to the file name.
2. Notebook Description — Double-click 'Add description' to write one. The description is what tells you, or a colleague, what the workflow accomplishes.
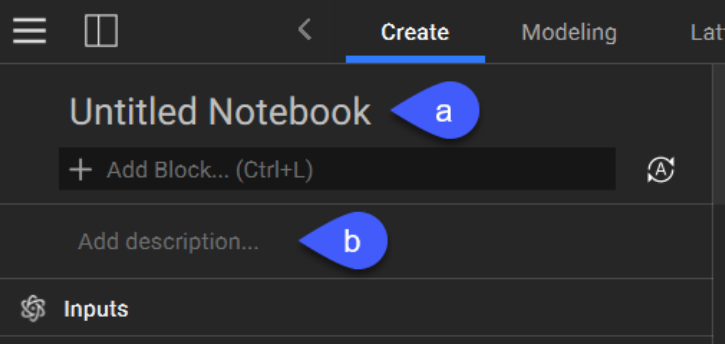 *The Notebook Name and Description are located at the top of the notebook*
### 2. Adding, Placing, and Deleting Blocks
#### Search Bar
As an alternative to using the ribbon, the search bar lets you quickly find a block when you know its name. Click it or press *Ctrl + L*, then start typing a block name. Results show the block color/type on the left and the block name beside it. Hovering provides the name, description, and Output type.
*The Notebook Name and Description are located at the top of the notebook*
### 2. Adding, Placing, and Deleting Blocks
#### Search Bar
As an alternative to using the ribbon, the search bar lets you quickly find a block when you know its name. Click it or press *Ctrl + L*, then start typing a block name. Results show the block color/type on the left and the block name beside it. Hovering provides the name, description, and Output type.
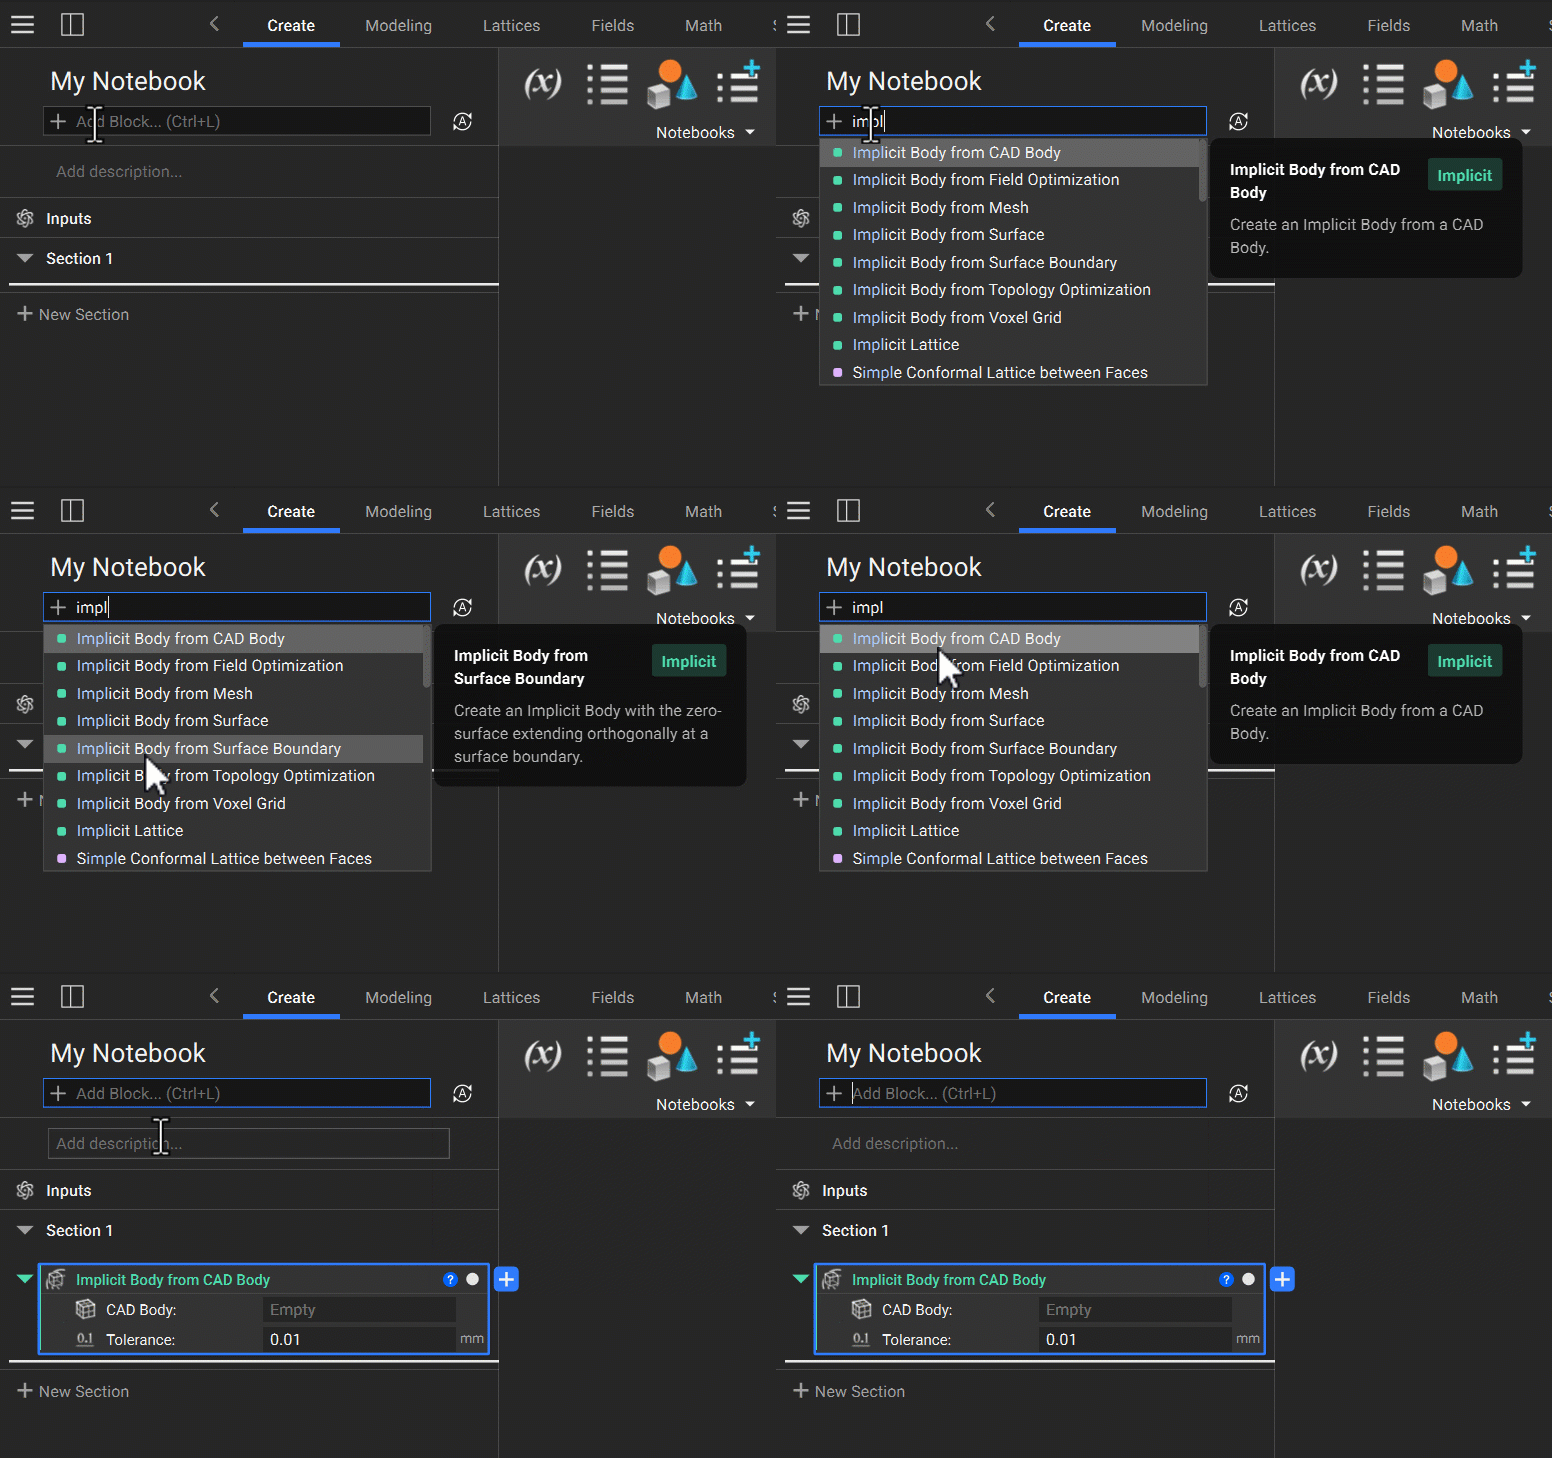 *The search bar displays all blocks relevant to the input text*
Alternatively, you can add blocks to the Notebook via the Ribbon. Click on block icons or select from the drop-down list in the Ribbon. Show/hide the Ribbon with *Ctrl+D*.
*The search bar displays all blocks relevant to the input text*
Alternatively, you can add blocks to the Notebook via the Ribbon. Click on block icons or select from the drop-down list in the Ribbon. Show/hide the Ribbon with *Ctrl+D*.
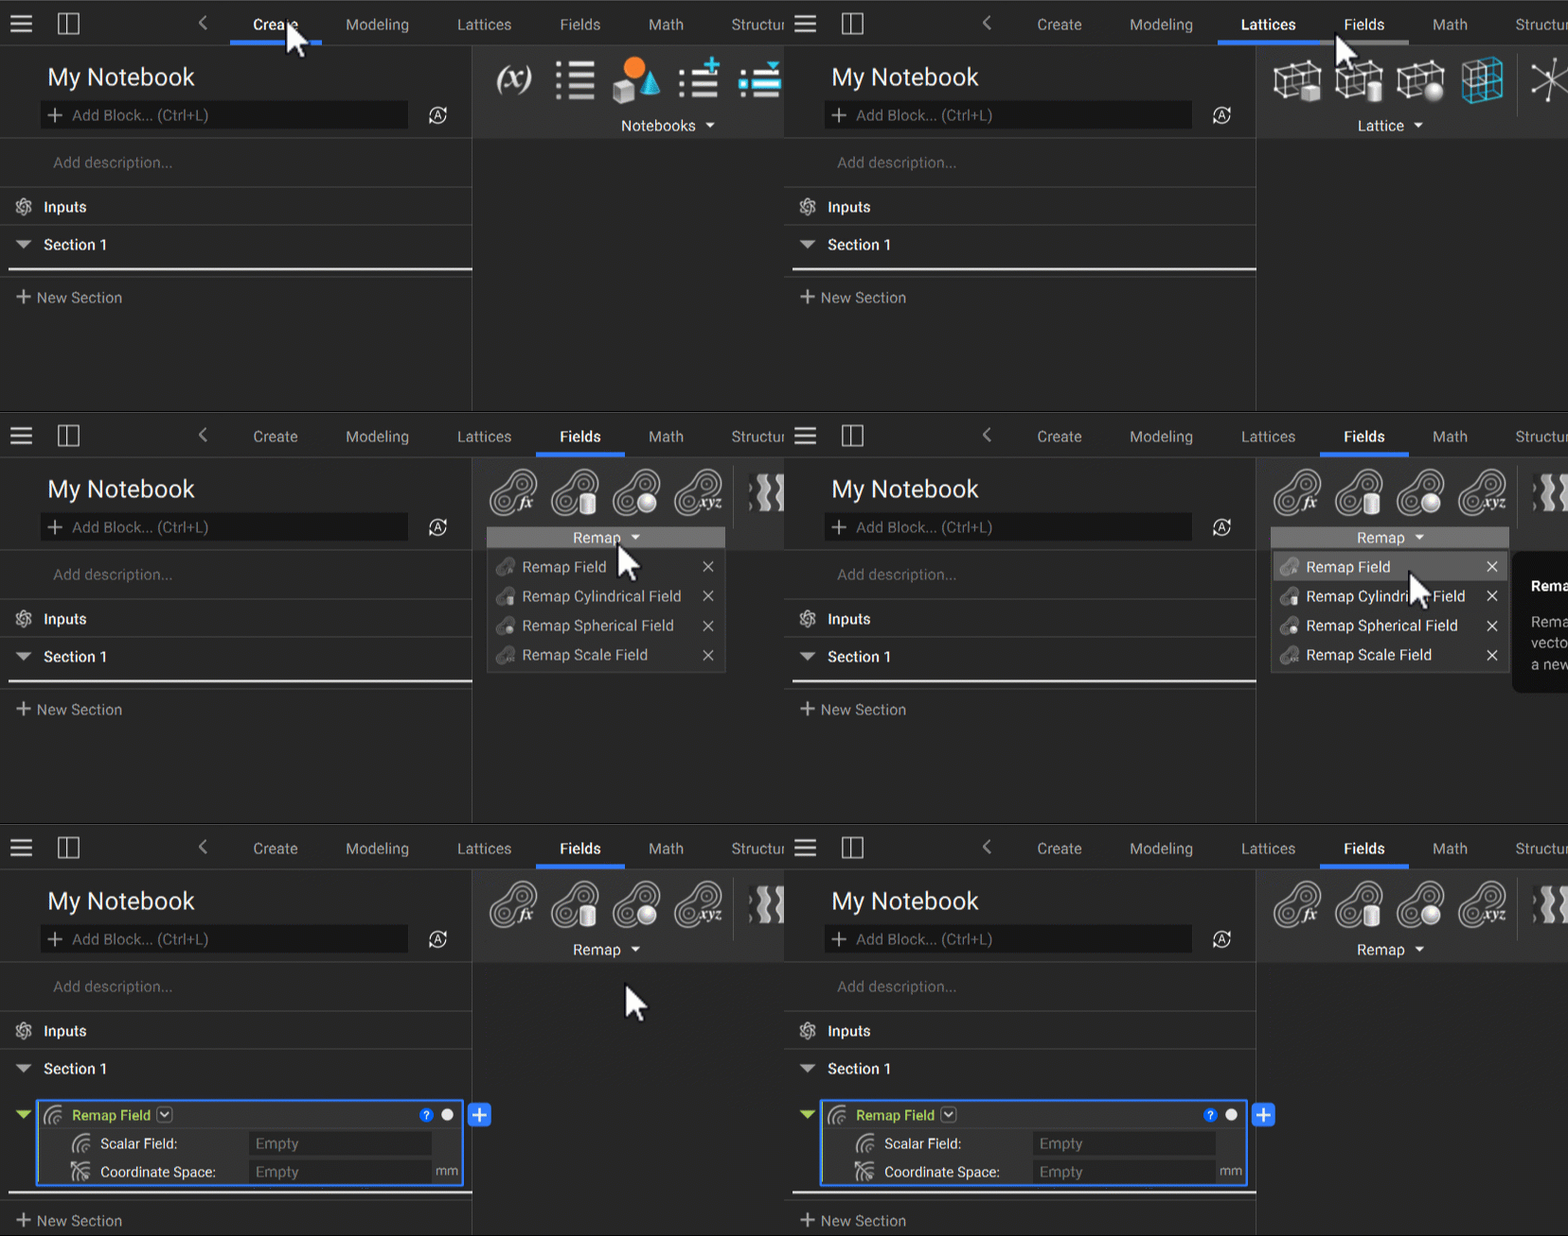 *You can navigate different sections of the Ribbon by clicking the tab names at the top bar*
#### Placement Highlight
The blue line indicates where you are in the Notebook. New blocks land at the Placement Highlight. Move this by hovering over blocks and selecting above or below them.
*You can navigate different sections of the Ribbon by clicking the tab names at the top bar*
#### Placement Highlight
The blue line indicates where you are in the Notebook. New blocks land at the Placement Highlight. Move this by hovering over blocks and selecting above or below them.
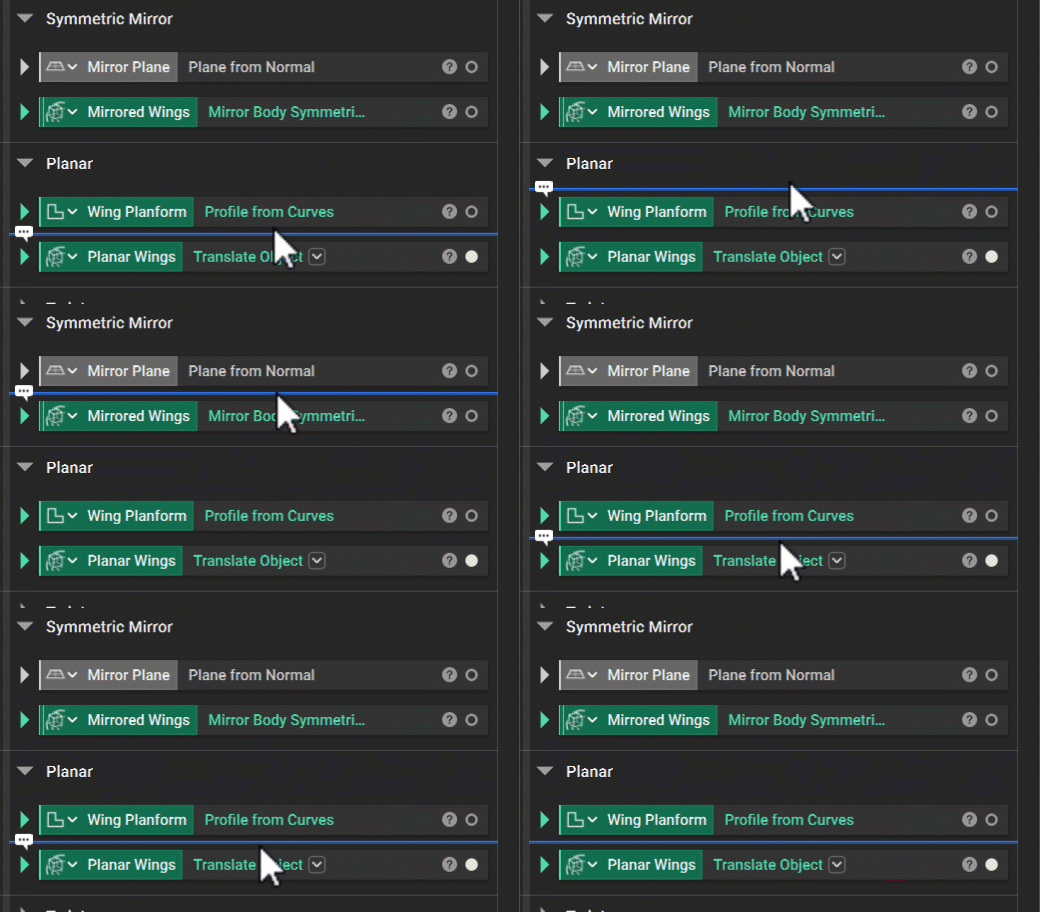 *Clicking between blocks changes the location of the Placement Highlight*
#### Search in Place
Right-click the dividing line between blocks to add a block, a section, or a comment at that exact spot. Double-clicking the line skips straight to the block search.
*Clicking between blocks changes the location of the Placement Highlight*
#### Search in Place
Right-click the dividing line between blocks to add a block, a section, or a comment at that exact spot. Double-clicking the line skips straight to the block search.
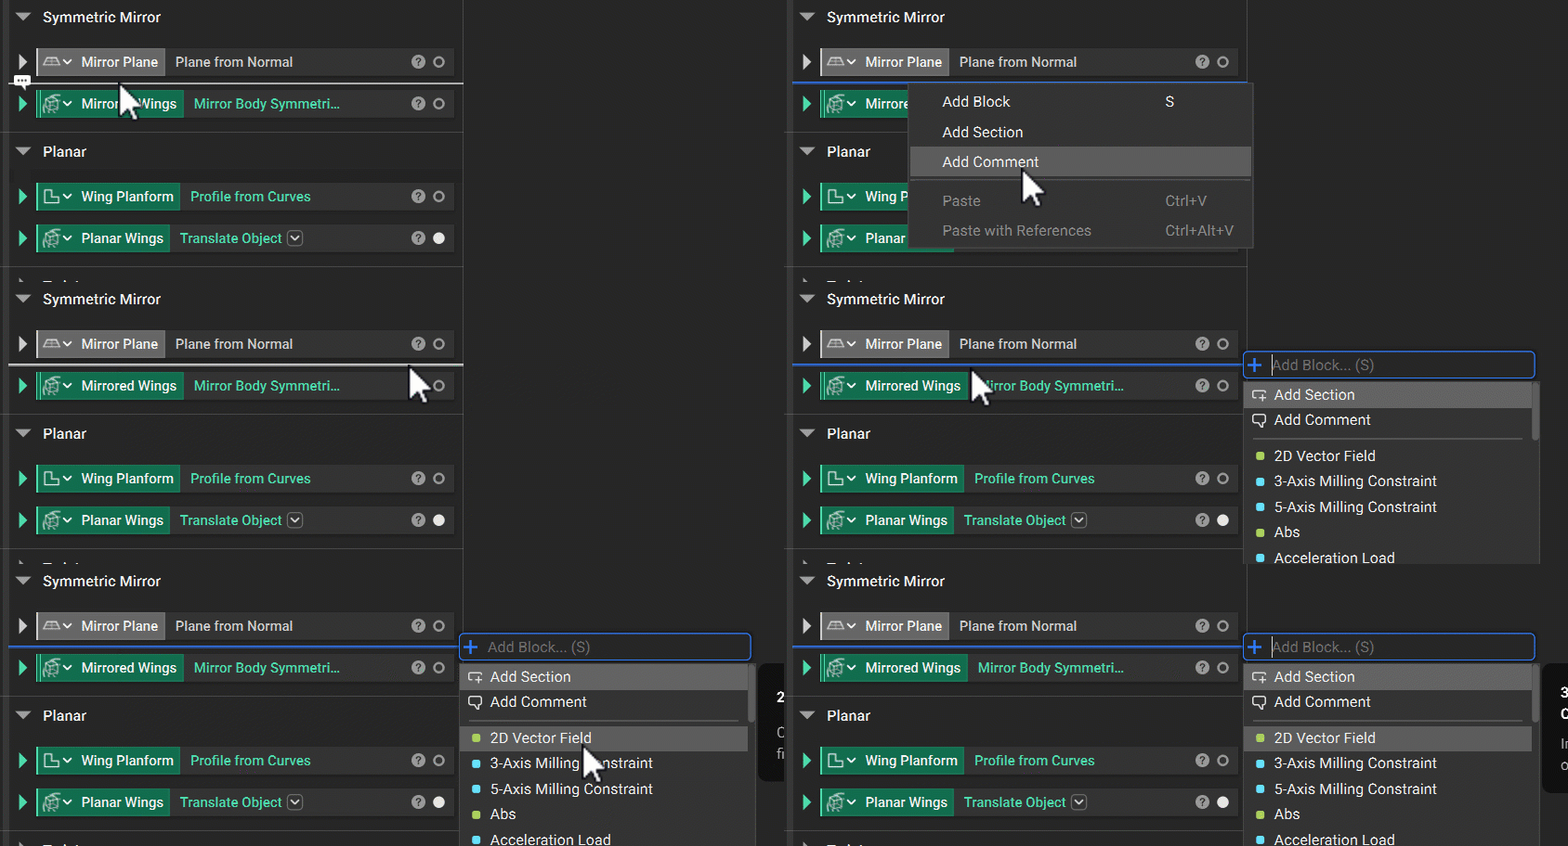 *Search in Place allows you to add a block at the Placement Highlight*
#### Context Search
Searches for blocks that are compatible with a block already in your Notebook, and nests your selection around it. Select a block and press *S*, or click the “+” icon on the block. In the GIF below, this functionality looks different when you make the block a Variable. We'll cover Variables later in the lesson.
*Search in Place allows you to add a block at the Placement Highlight*
#### Context Search
Searches for blocks that are compatible with a block already in your Notebook, and nests your selection around it. Select a block and press *S*, or click the “+” icon on the block. In the GIF below, this functionality looks different when you make the block a Variable. We'll cover Variables later in the lesson.
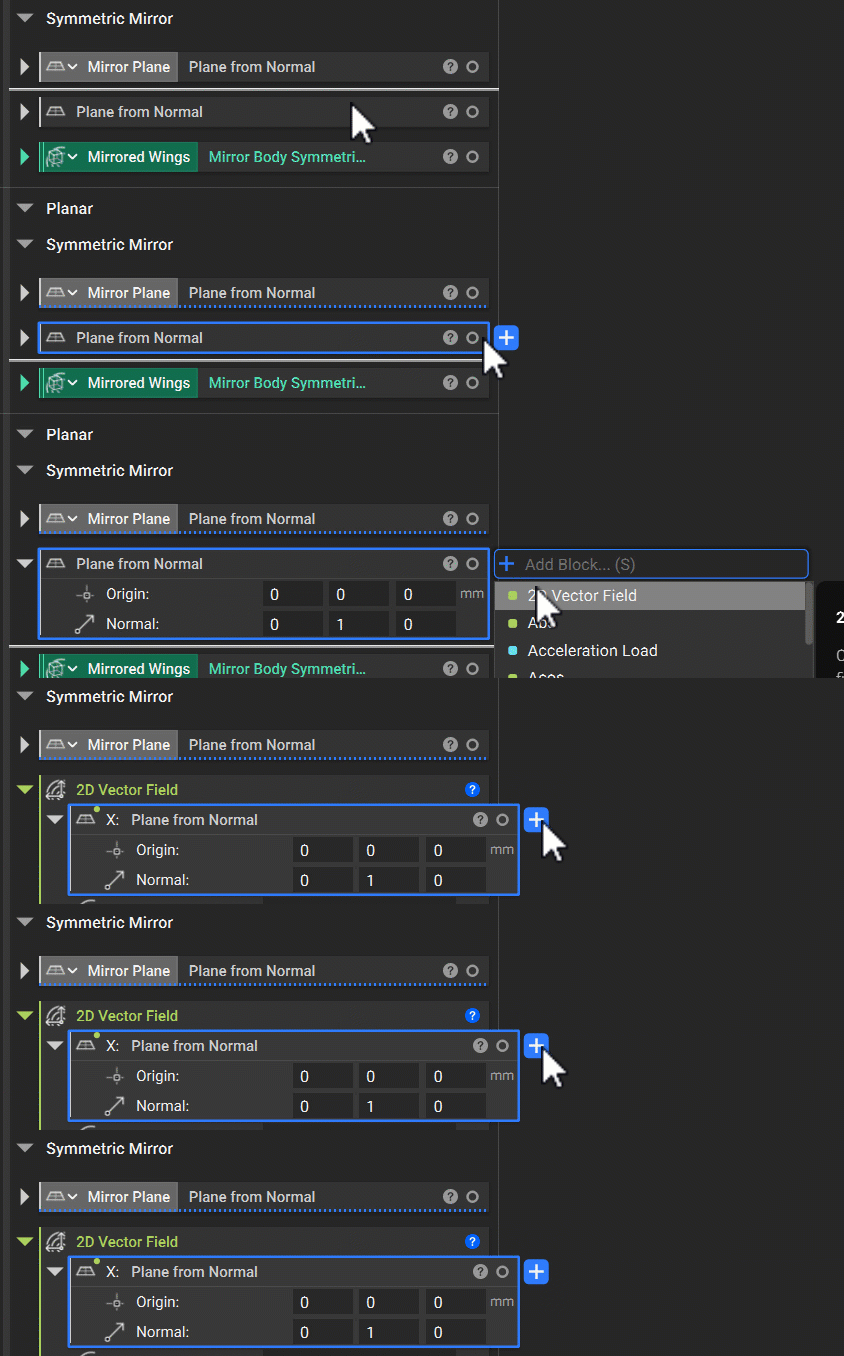 *Using Context Search on a non-variable block*
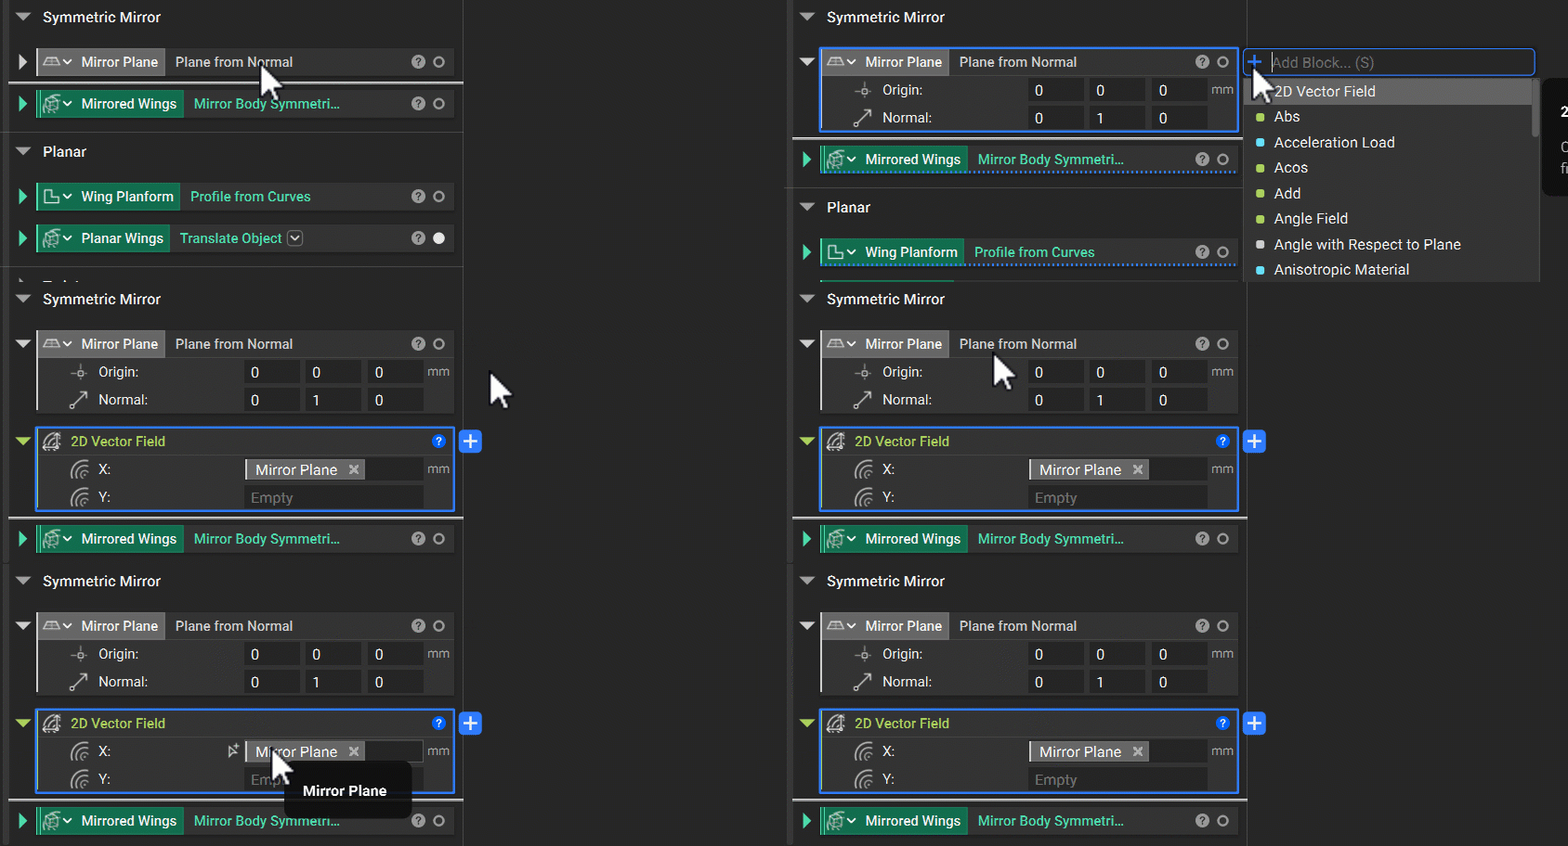 *Using Context Search on a block variable*
#### Duplicating Blocks
This can be done with two methods: Duplicate and Duplicate with References
1. Duplicate – Makes a copy of the block and a copy of all blocks nested within that block. In this case, think of Duplicate as “copy block and nested blocks”. This is useful when you want to copy a block and change all parameters without links back to the original. To Duplicate, right-click a block and select Duplicate.
*Using Context Search on a block variable*
#### Duplicating Blocks
This can be done with two methods: Duplicate and Duplicate with References
1. Duplicate – Makes a copy of the block and a copy of all blocks nested within that block. In this case, think of Duplicate as “copy block and nested blocks”. This is useful when you want to copy a block and change all parameters without links back to the original. To Duplicate, right-click a block and select Duplicate.
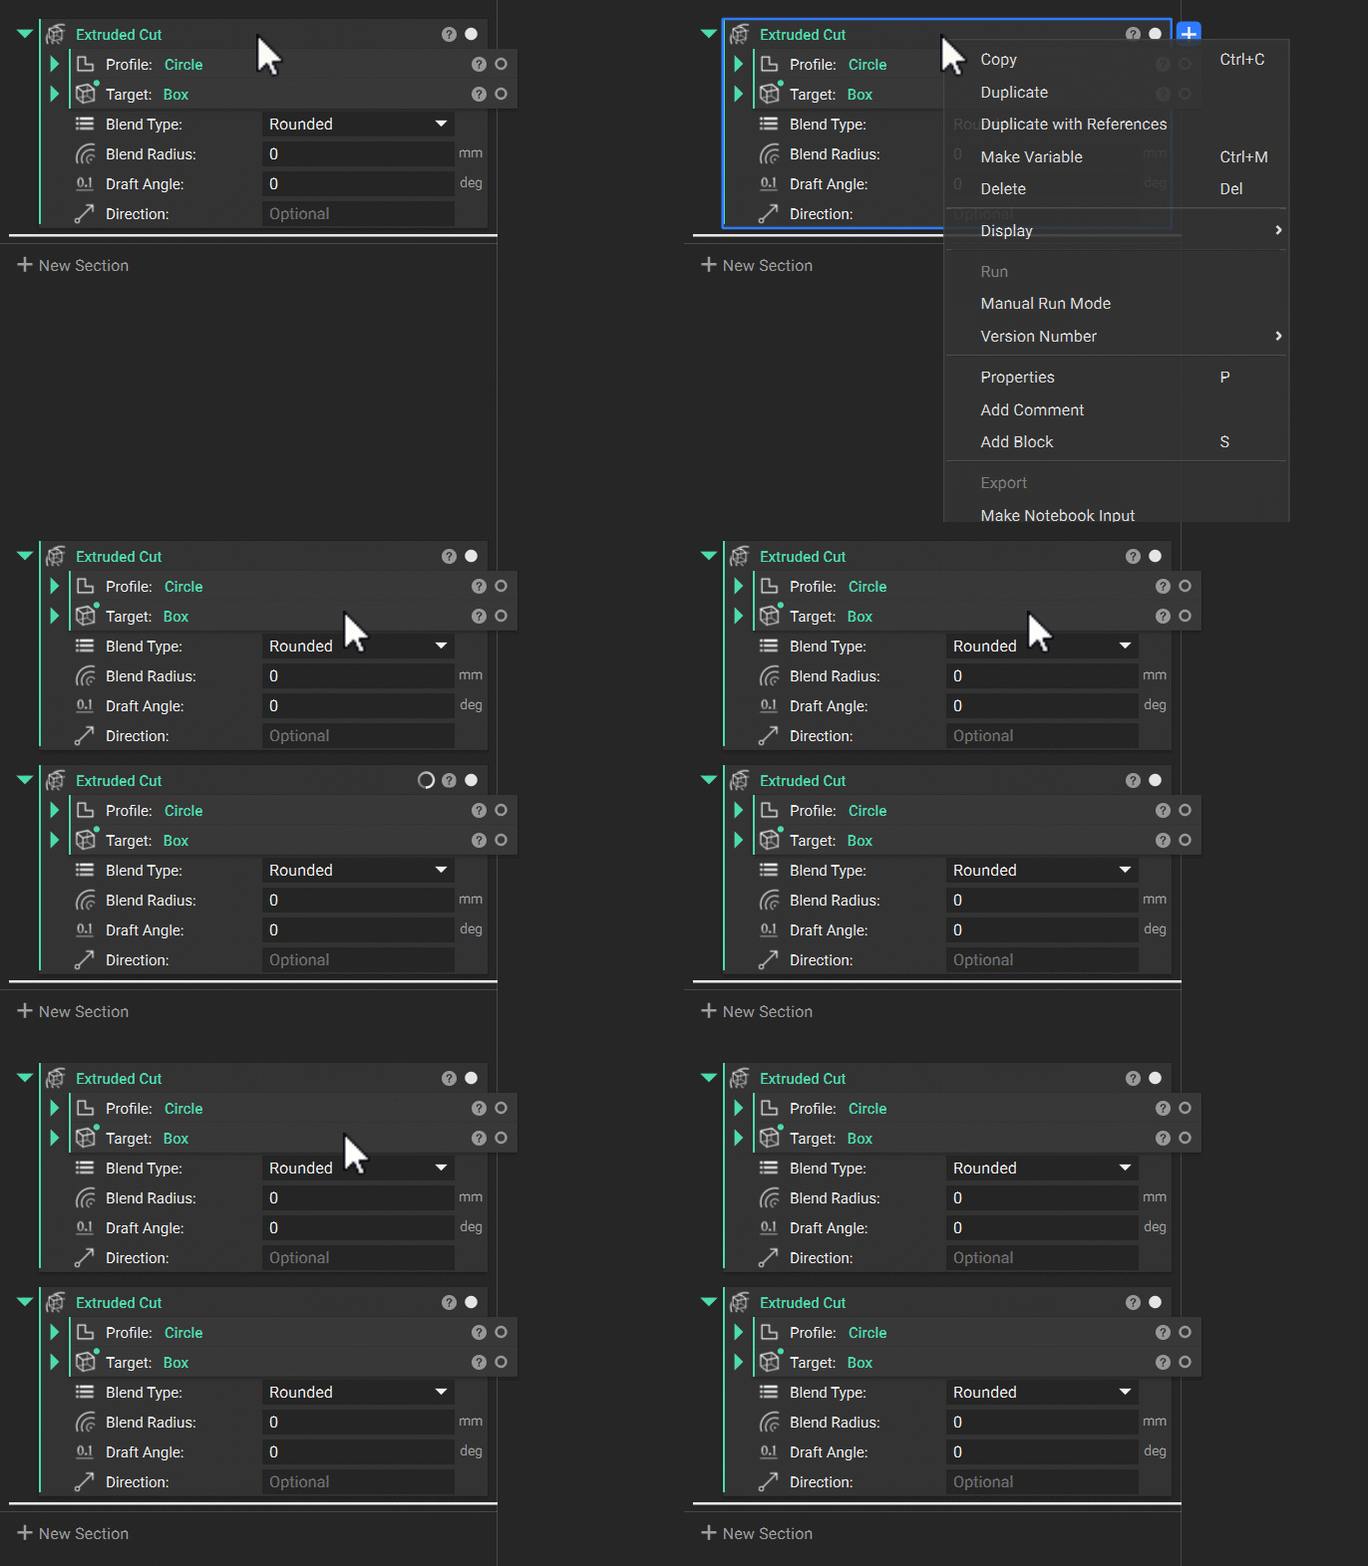 *An example of using the Duplicate function in the right-click menu*
2. Duplicate with References – Creates a copy of the top-level block while preserving references to its nested blocks. Changes to the referenced blocks update everywhere they are used. Use Duplicate with References when you want to modify the top-level block while keeping the same inputs. To Duplicate with References, right-click a block and select Duplicate with References.
*An example of using the Duplicate function in the right-click menu*
2. Duplicate with References – Creates a copy of the top-level block while preserving references to its nested blocks. Changes to the referenced blocks update everywhere they are used. Use Duplicate with References when you want to modify the top-level block while keeping the same inputs. To Duplicate with References, right-click a block and select Duplicate with References.
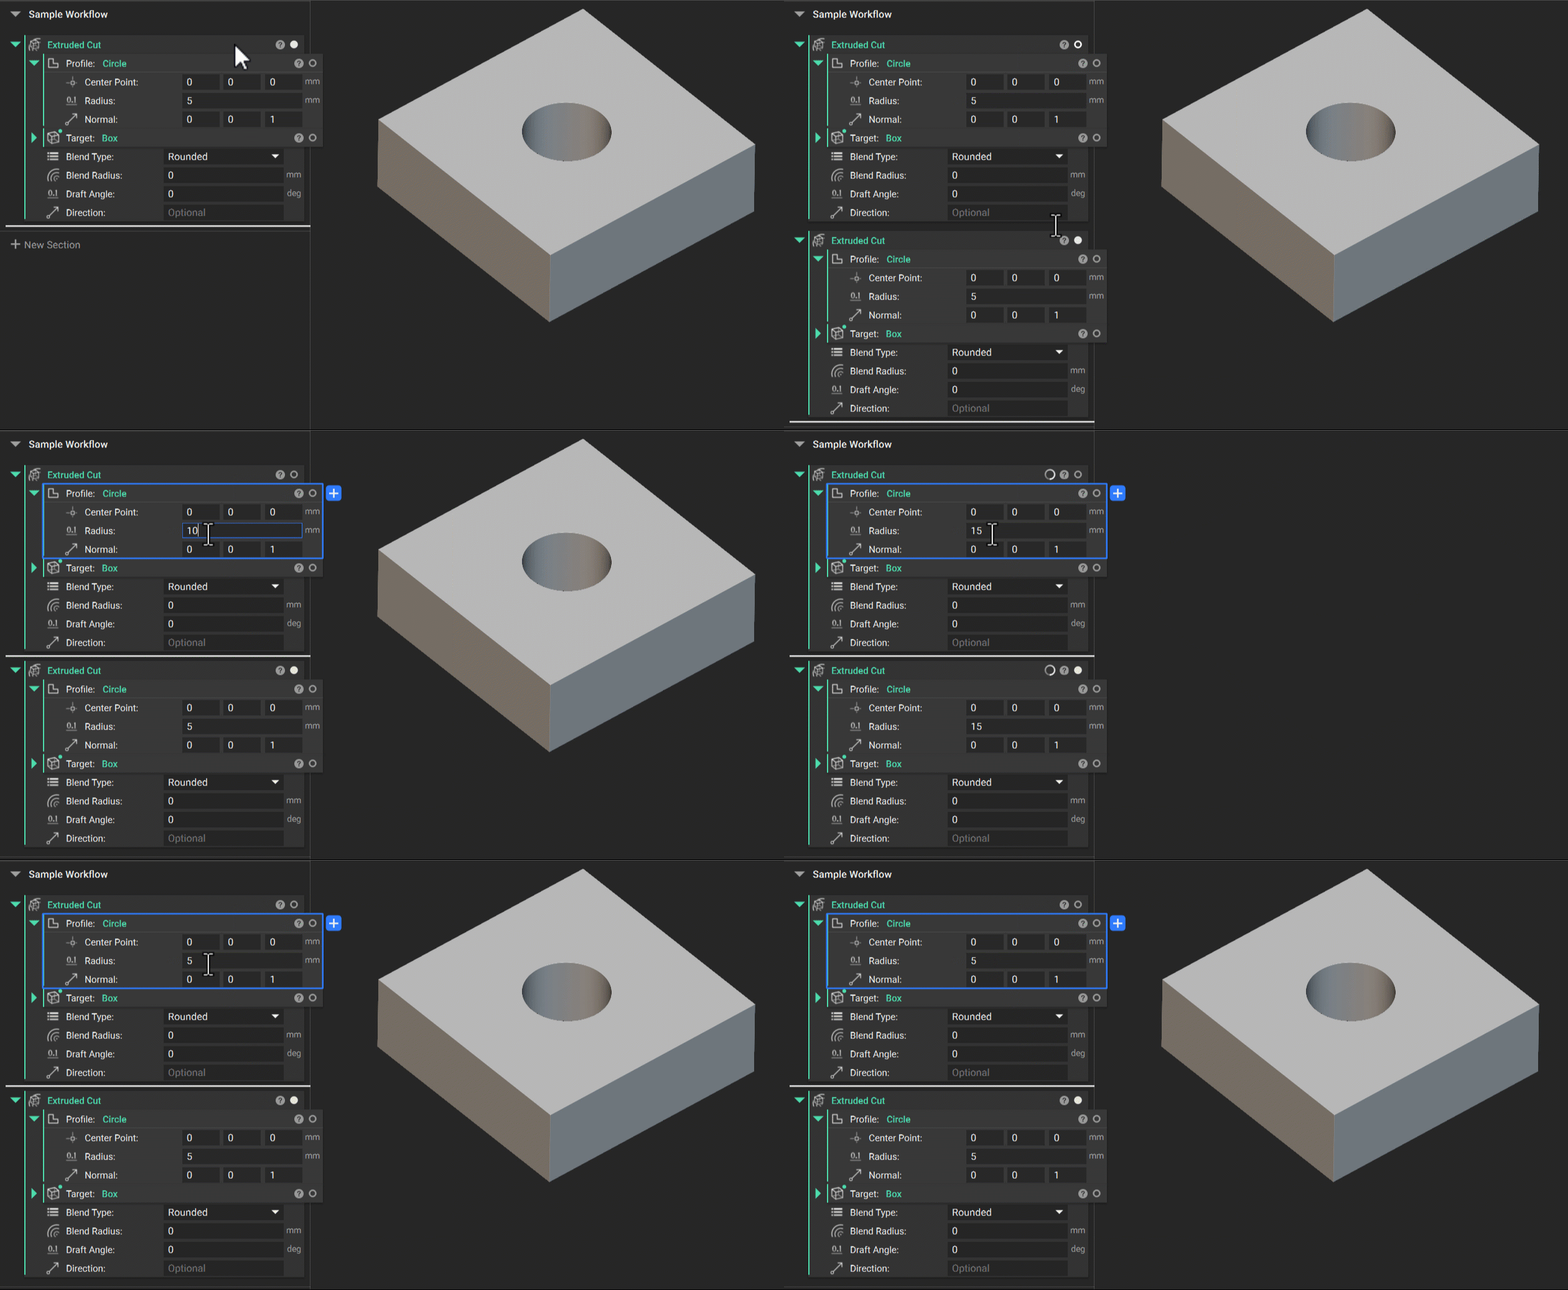 *An example of using the Duplicate with References function in the right-click menu*
The image above shows Duplicate with References applied to the top-level **Extruded Cut** block. The original block's visibility is turned off, and changes to its referenced inputs automatically update the duplicated geometry.
Both Duplicate and Duplicate with References create new blocks, so they should not be used as substitutes for Variables (more on variables to be covered later in this lesson).
#### Cut, Copy, and Paste
Cut, Copy, and Paste move a single block or a multi-block selection through the clipboard. From the clipboard, blocks can be pasted into:
1. The Notebook
2. A compatible block input
3. A separate instance of nTop – a different Notebook
To select multiple blocks, hold the *Ctrl* key and select each block:
*An example of using the Duplicate with References function in the right-click menu*
The image above shows Duplicate with References applied to the top-level **Extruded Cut** block. The original block's visibility is turned off, and changes to its referenced inputs automatically update the duplicated geometry.
Both Duplicate and Duplicate with References create new blocks, so they should not be used as substitutes for Variables (more on variables to be covered later in this lesson).
#### Cut, Copy, and Paste
Cut, Copy, and Paste move a single block or a multi-block selection through the clipboard. From the clipboard, blocks can be pasted into:
1. The Notebook
2. A compatible block input
3. A separate instance of nTop – a different Notebook
To select multiple blocks, hold the *Ctrl* key and select each block:
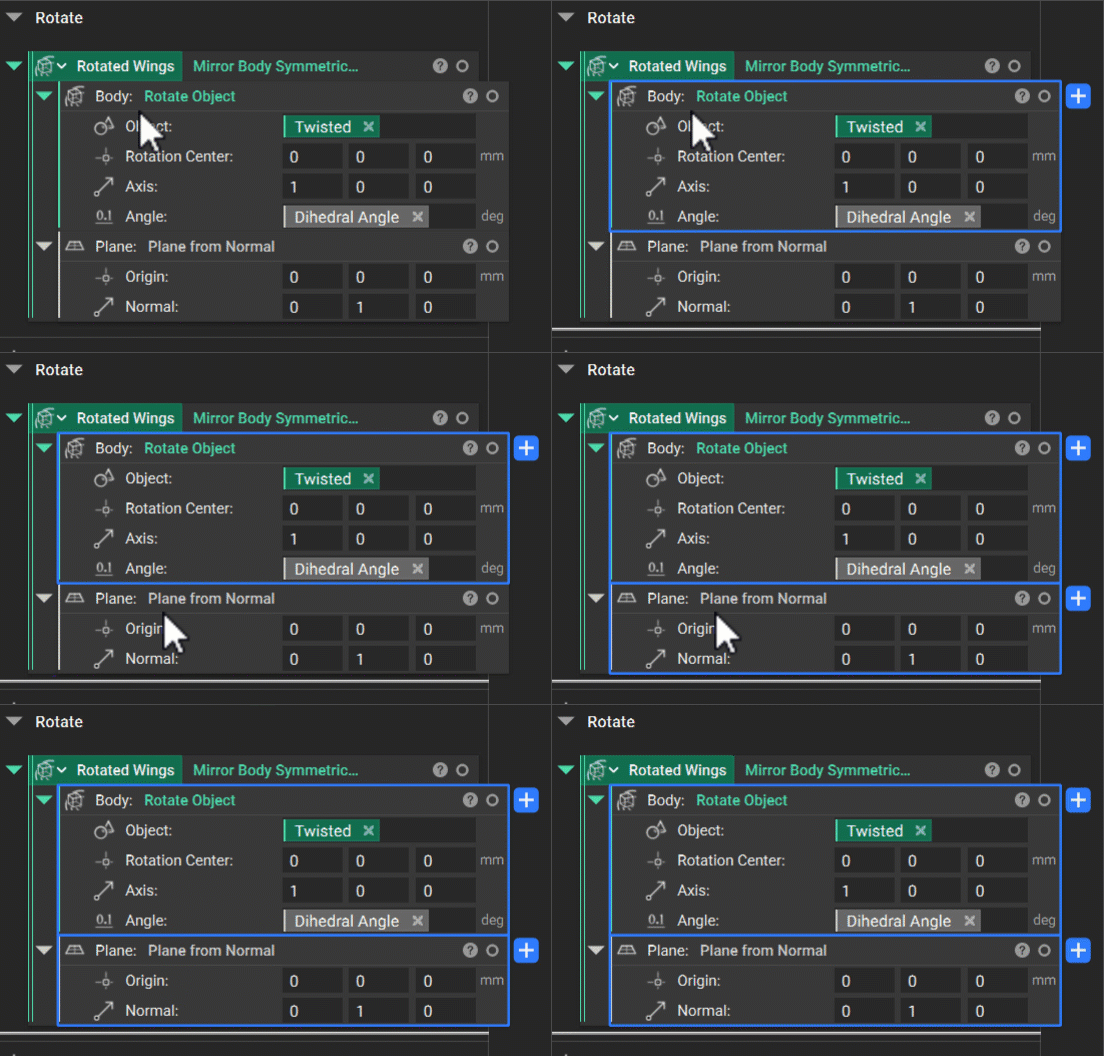 *You can multi-select blocks by holding the Ctrl key*
If the blocks you copied reference other blocks, use 'Paste with References' or *Ctrl + Alt + V*. It pastes all dependencies along with your selection, so nothing arrives with a broken reference. 'Paste' or *Ctrl + V* brings only the blocks you selected.
These options live in the Edit menu, in the right-click menu on a block 'Copy ', and on the hotkeys *Ctrl + X / Ctrl + C / Ctrl + V*. Right-clicking a dividing line between blocks also offers 'Paste' and 'Paste with References', which lets you place the blocks exactly where you want them.
*You can multi-select blocks by holding the Ctrl key*
If the blocks you copied reference other blocks, use 'Paste with References' or *Ctrl + Alt + V*. It pastes all dependencies along with your selection, so nothing arrives with a broken reference. 'Paste' or *Ctrl + V* brings only the blocks you selected.
These options live in the Edit menu, in the right-click menu on a block 'Copy ', and on the hotkeys *Ctrl + X / Ctrl + C / Ctrl + V*. Right-clicking a dividing line between blocks also offers 'Paste' and 'Paste with References', which lets you place the blocks exactly where you want them.
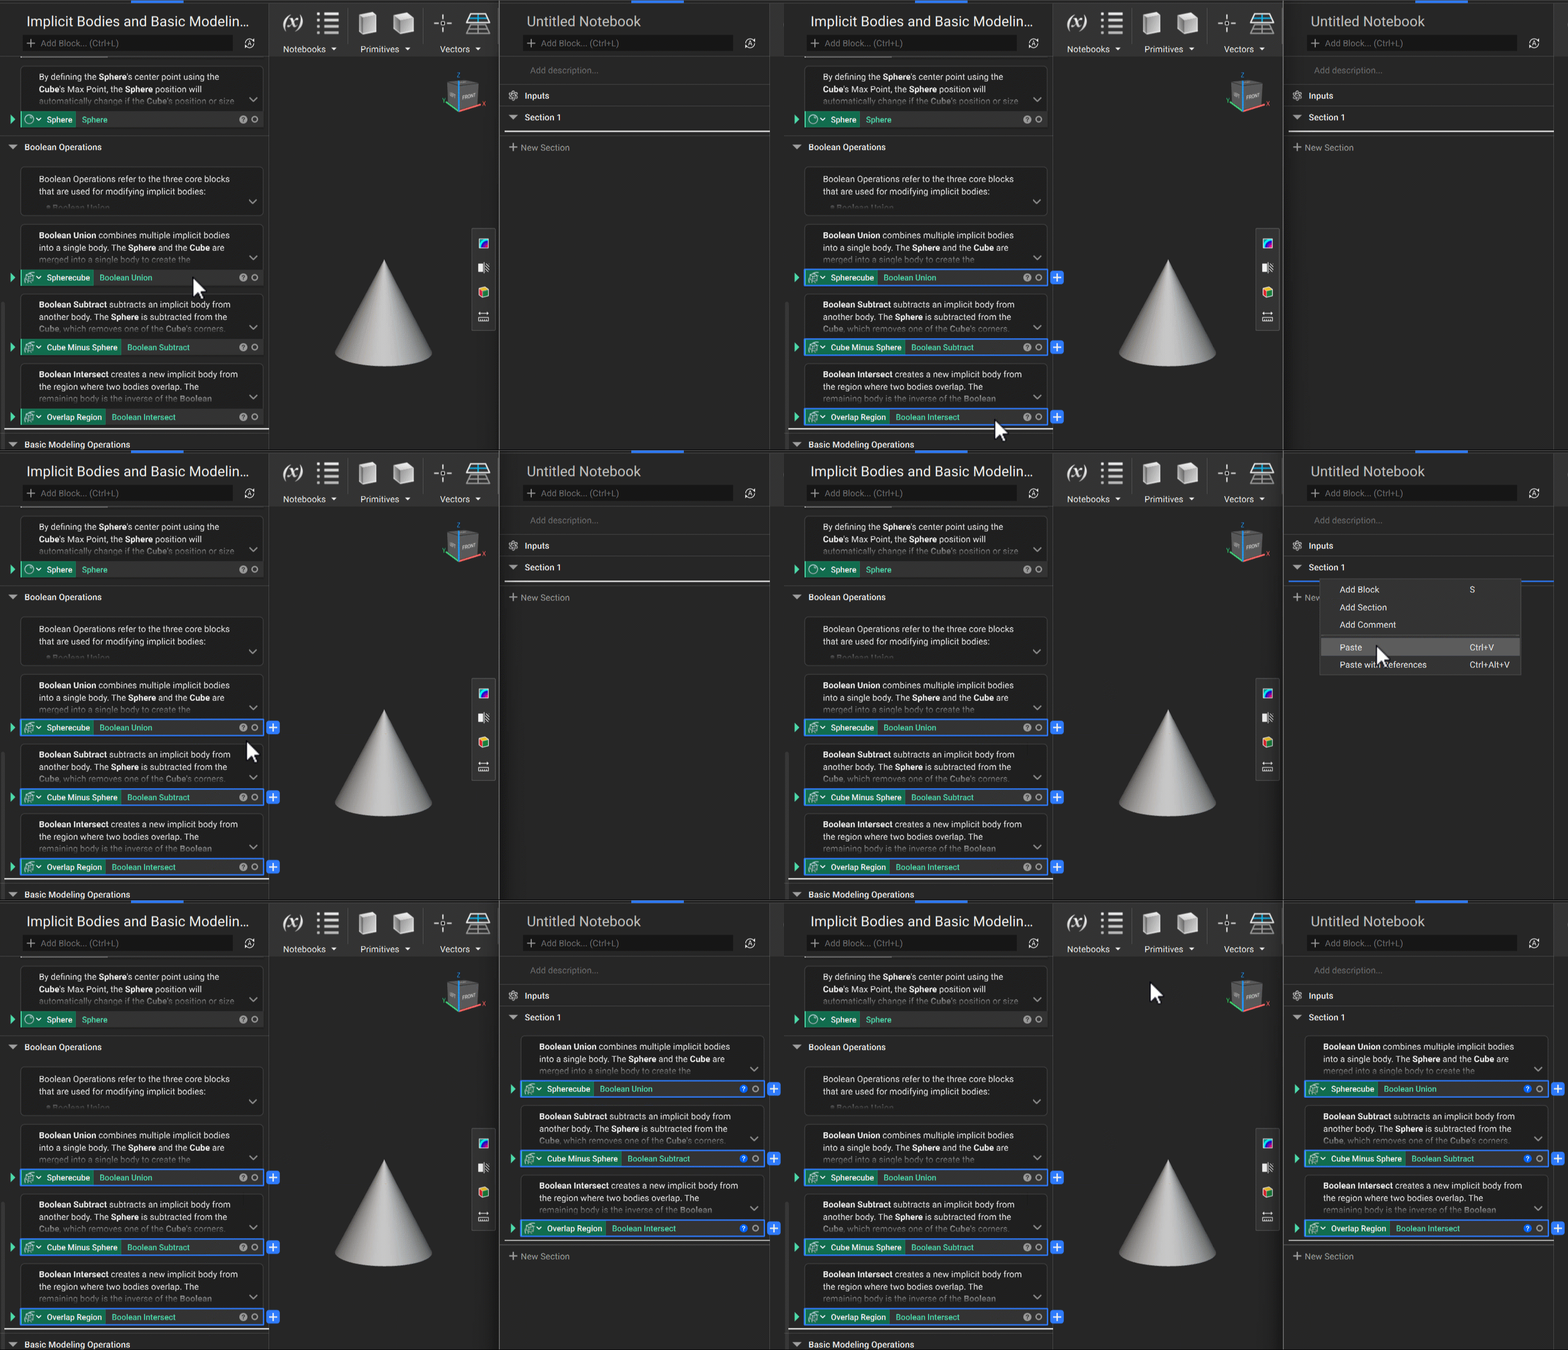 *You can copy blocks from one notebook to another using Copy and Paste*
**Note** **on using Duplicate/Duplicate with References:** Duplicate and Duplicate with References only work inside a single Notebook. Copy and Paste is how you move work between two Notebooks, and the only one of these options that can paste directly into a block input. Cut removes the original, which Duplicate never does—use it to relocate a block rather than copy it.
#### Deleting Blocks
To remove a block, select it and then press the *Delete* key or right-click and select 'Delete' from the menu:
*You can copy blocks from one notebook to another using Copy and Paste*
**Note** **on using Duplicate/Duplicate with References:** Duplicate and Duplicate with References only work inside a single Notebook. Copy and Paste is how you move work between two Notebooks, and the only one of these options that can paste directly into a block input. Cut removes the original, which Duplicate never does—use it to relocate a block rather than copy it.
#### Deleting Blocks
To remove a block, select it and then press the *Delete* key or right-click and select 'Delete' from the menu:
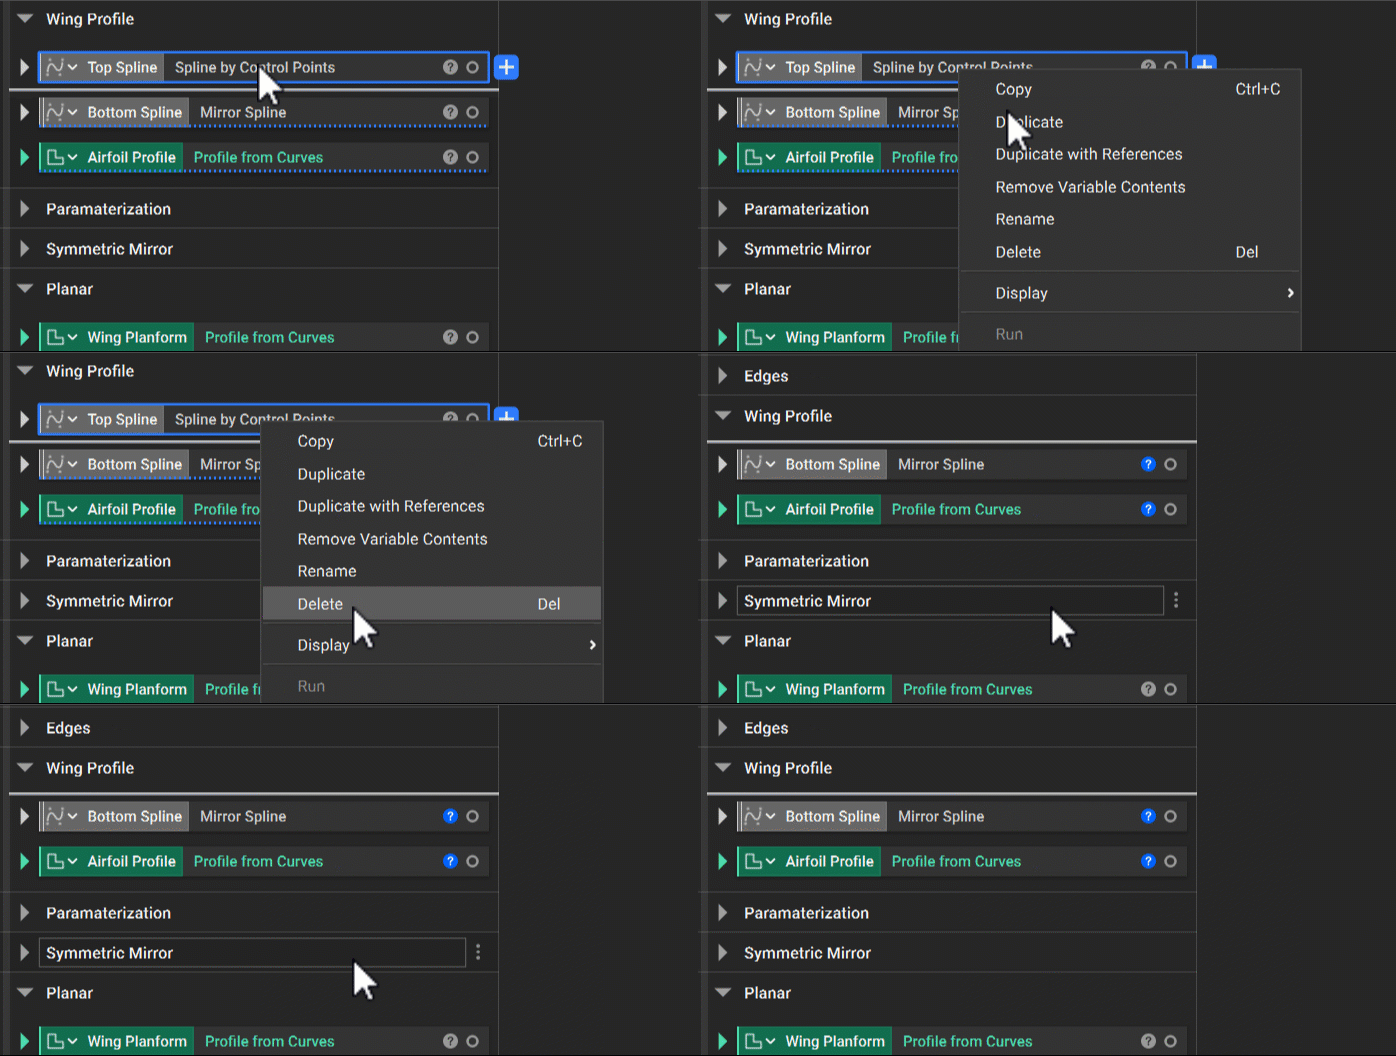 *An example of using the right-click menu to Delete a block*
### 3. Organizing
#### Sections
Sections are the chapters of your engineering Notebook. Use them to organize your workflow into logical groups and give each a clear, descriptive name. Collapse sections you're not working on to keep your Notebook organized and quickly navigate to the part of the workflow you want to modify.
1. Add a section with '+ New Section', located at the end of your Notebook
*An example of using the right-click menu to Delete a block*
### 3. Organizing
#### Sections
Sections are the chapters of your engineering Notebook. Use them to organize your workflow into logical groups and give each a clear, descriptive name. Collapse sections you're not working on to keep your Notebook organized and quickly navigate to the part of the workflow you want to modify.
1. Add a section with '+ New Section', located at the end of your Notebook
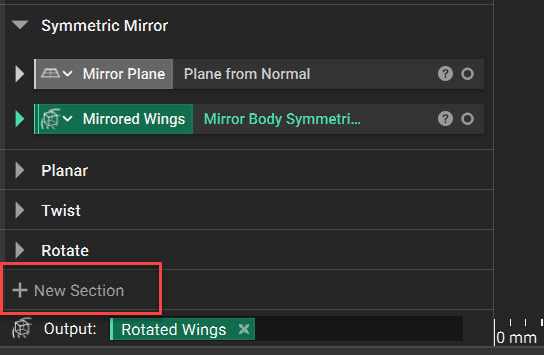 *The New Section button appears after the last section in your Notebook*
2. Collapse and expand a section using the chevron to the left of the section name
*The New Section button appears after the last section in your Notebook*
2. Collapse and expand a section using the chevron to the left of the section name
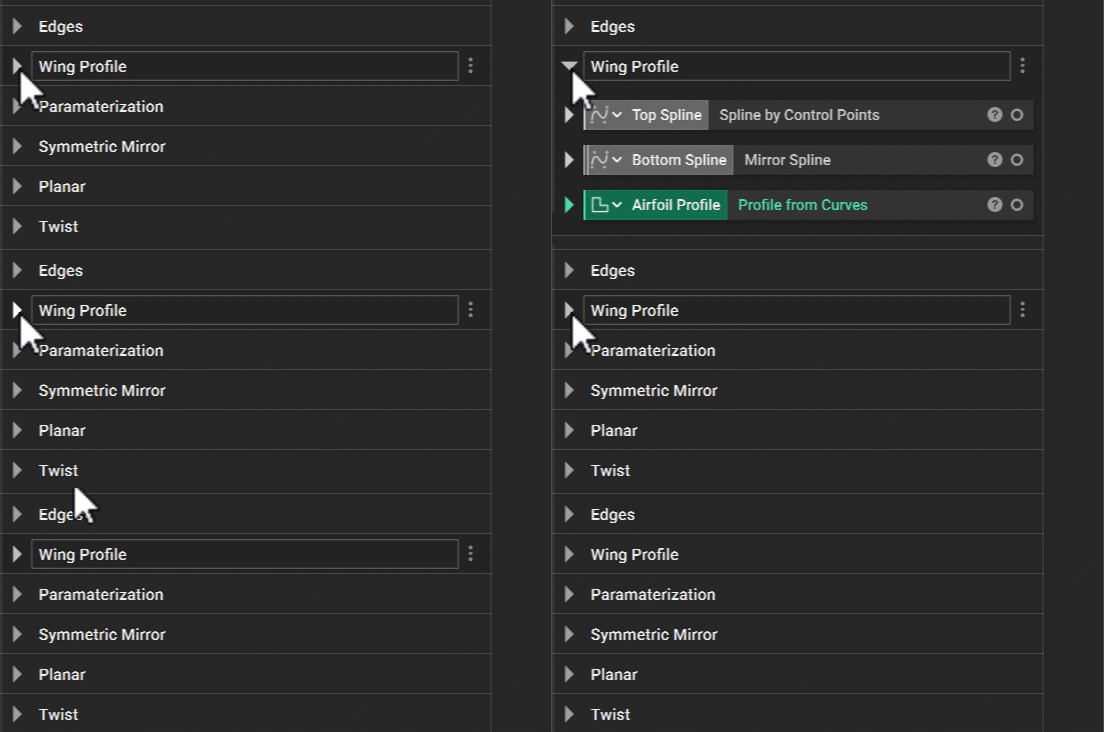 *Collapse/Expand sections using the chevron icon next to their name*
3. Rename a section by double-clicking its name.
*Collapse/Expand sections using the chevron icon next to their name*
3. Rename a section by double-clicking its name.
 *Double-clicking a section name allows yout to edit it*
4. Move a section by left-clicking on the right side of the section name and dragging. A blue line shows where it will land.
*Double-clicking a section name allows yout to edit it*
4. Move a section by left-clicking on the right side of the section name and dragging. A blue line shows where it will land.
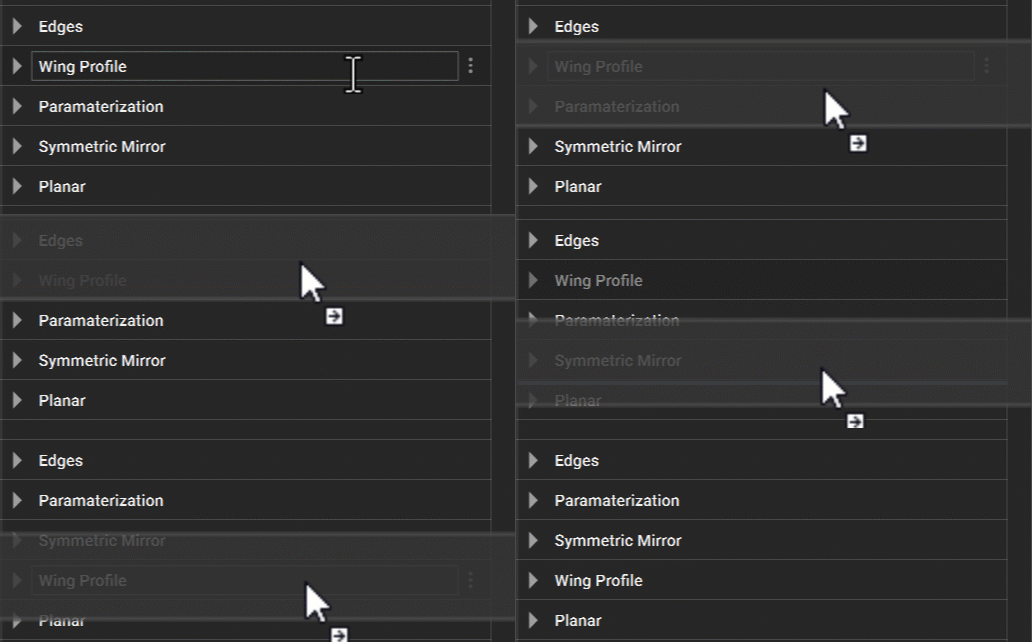 *You can reorder sections by dragging them*
5. Hover over a Section Name and select the three vertical dots to open the Section Menu, which holds 'Add section', 'Move up', 'Move down', 'Rename section', and 'Delete' section.
*You can reorder sections by dragging them*
5. Hover over a Section Name and select the three vertical dots to open the Section Menu, which holds 'Add section', 'Move up', 'Move down', 'Rename section', and 'Delete' section.
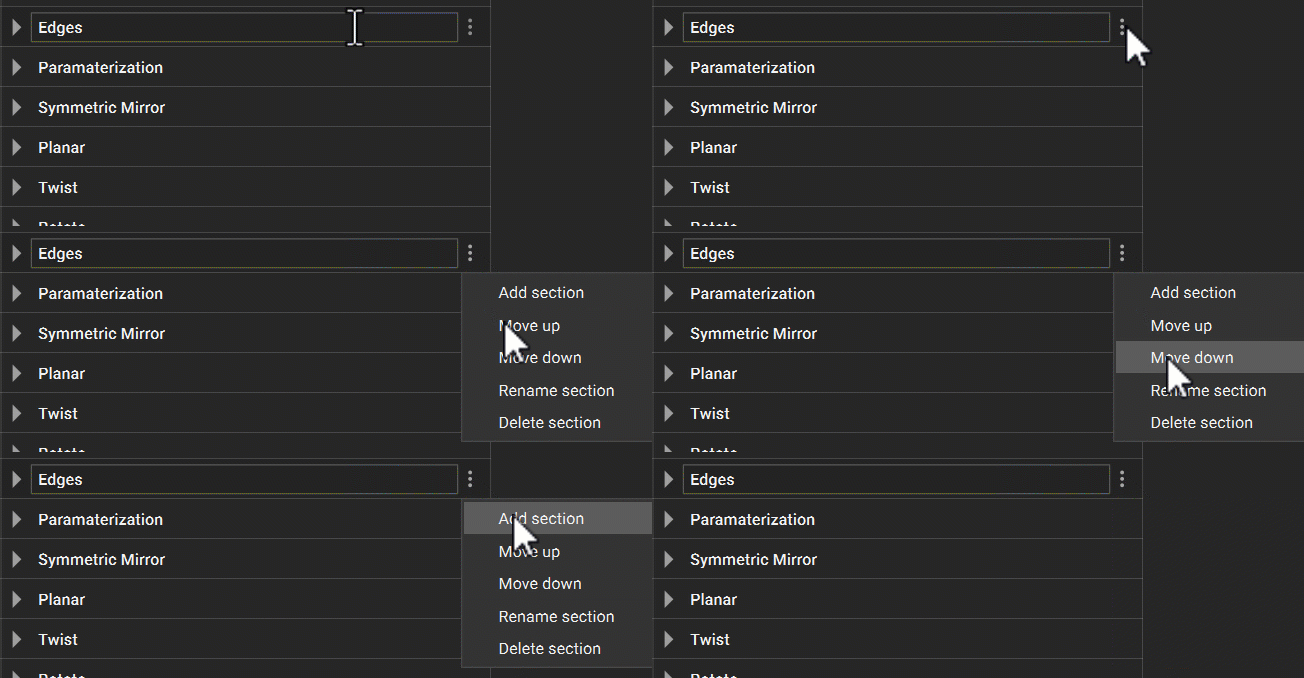 *Open the Section Menu using the 3 dots icon*
**Note:** Deleting a section deletes every block inside it.
#### Variables
You can make any block or parameter in the Notebook a Variable, making it easy to reuse and modify throughout your workflow. Variables remain visible in the Notebook rather than being nested within other blocks, helping keep workflows organized and easy to understand.
A block made into a variable looks different from a regular block: its name appears on the left over the block color. To create one, right-click the block and select 'Make Variable'. Double-click the Variable name to rename it.
*Open the Section Menu using the 3 dots icon*
**Note:** Deleting a section deletes every block inside it.
#### Variables
You can make any block or parameter in the Notebook a Variable, making it easy to reuse and modify throughout your workflow. Variables remain visible in the Notebook rather than being nested within other blocks, helping keep workflows organized and easy to understand.
A block made into a variable looks different from a regular block: its name appears on the left over the block color. To create one, right-click the block and select 'Make Variable'. Double-click the Variable name to rename it.
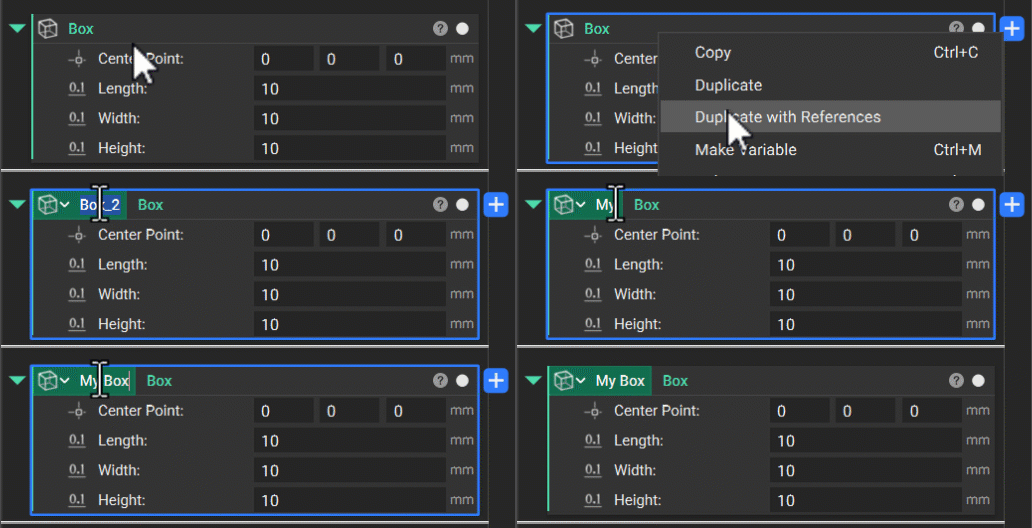 *Creating a block variable and renaming it*
To make a parameter a Variable, hover over it, right-click, and select 'Make Variable'. The new Variable appears above the block, while the original input is replaced by a Variable chip. A parameter Variable makes it easy to identify and quickly change a specific input within a block.
*Creating a block variable and renaming it*
To make a parameter a Variable, hover over it, right-click, and select 'Make Variable'. The new Variable appears above the block, while the original input is replaced by a Variable chip. A parameter Variable makes it easy to identify and quickly change a specific input within a block.
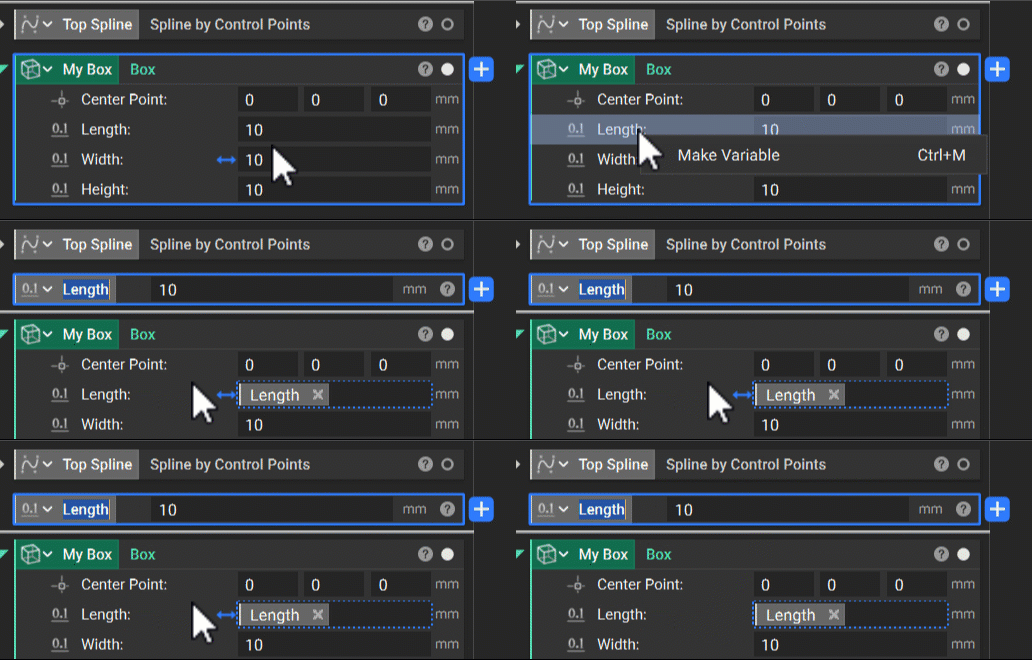 *You can also create variables from parameters*
Two additional operations that save time later:
* Hold *Ctrl* and drag a variable chip that is already in an input to reuse it in another input.
*You can also create variables from parameters*
Two additional operations that save time later:
* Hold *Ctrl* and drag a variable chip that is already in an input to reuse it in another input.
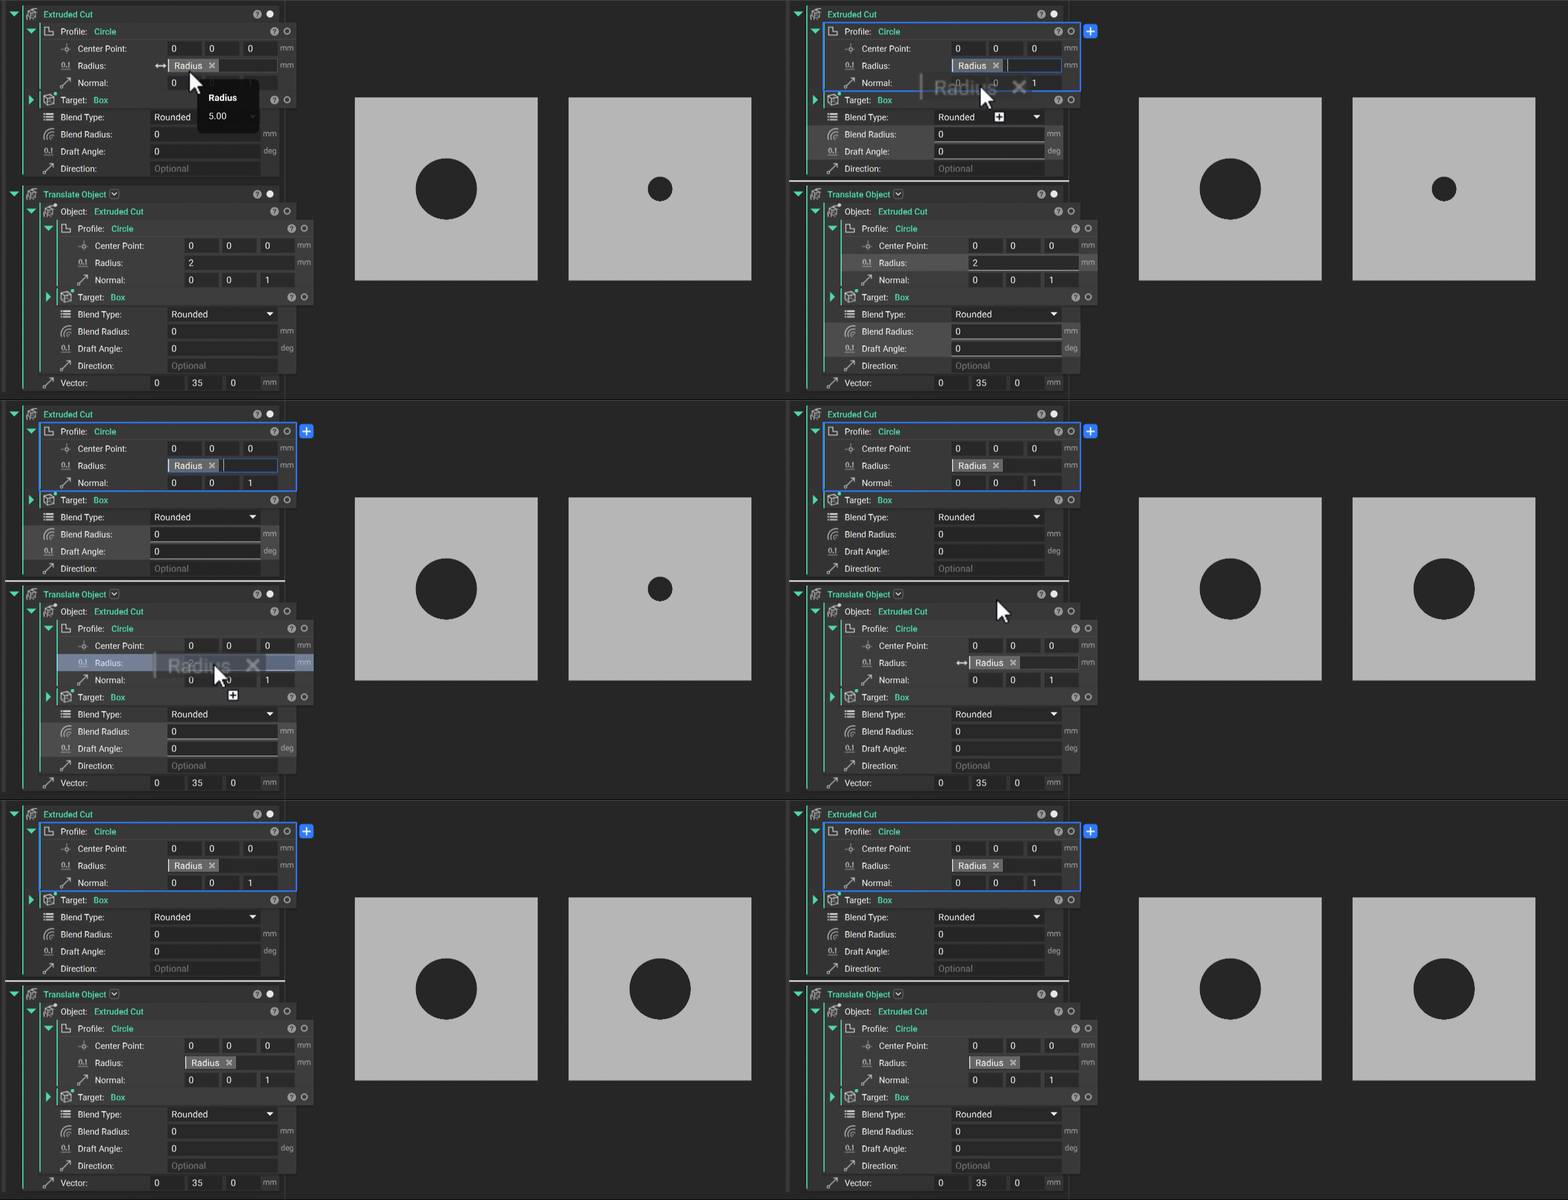 *Ctrl dragging a variable input chip allows you to reuse it without removing it from the original input*
* Right-click a variable and choose 'Remove Variable Contents' to empty it while leaving every chip in place. This is how you swap what a variable holds without rewiring the blocks that use it.
*Ctrl dragging a variable input chip allows you to reuse it without removing it from the original input*
* Right-click a variable and choose 'Remove Variable Contents' to empty it while leaving every chip in place. This is how you swap what a variable holds without rewiring the blocks that use it.
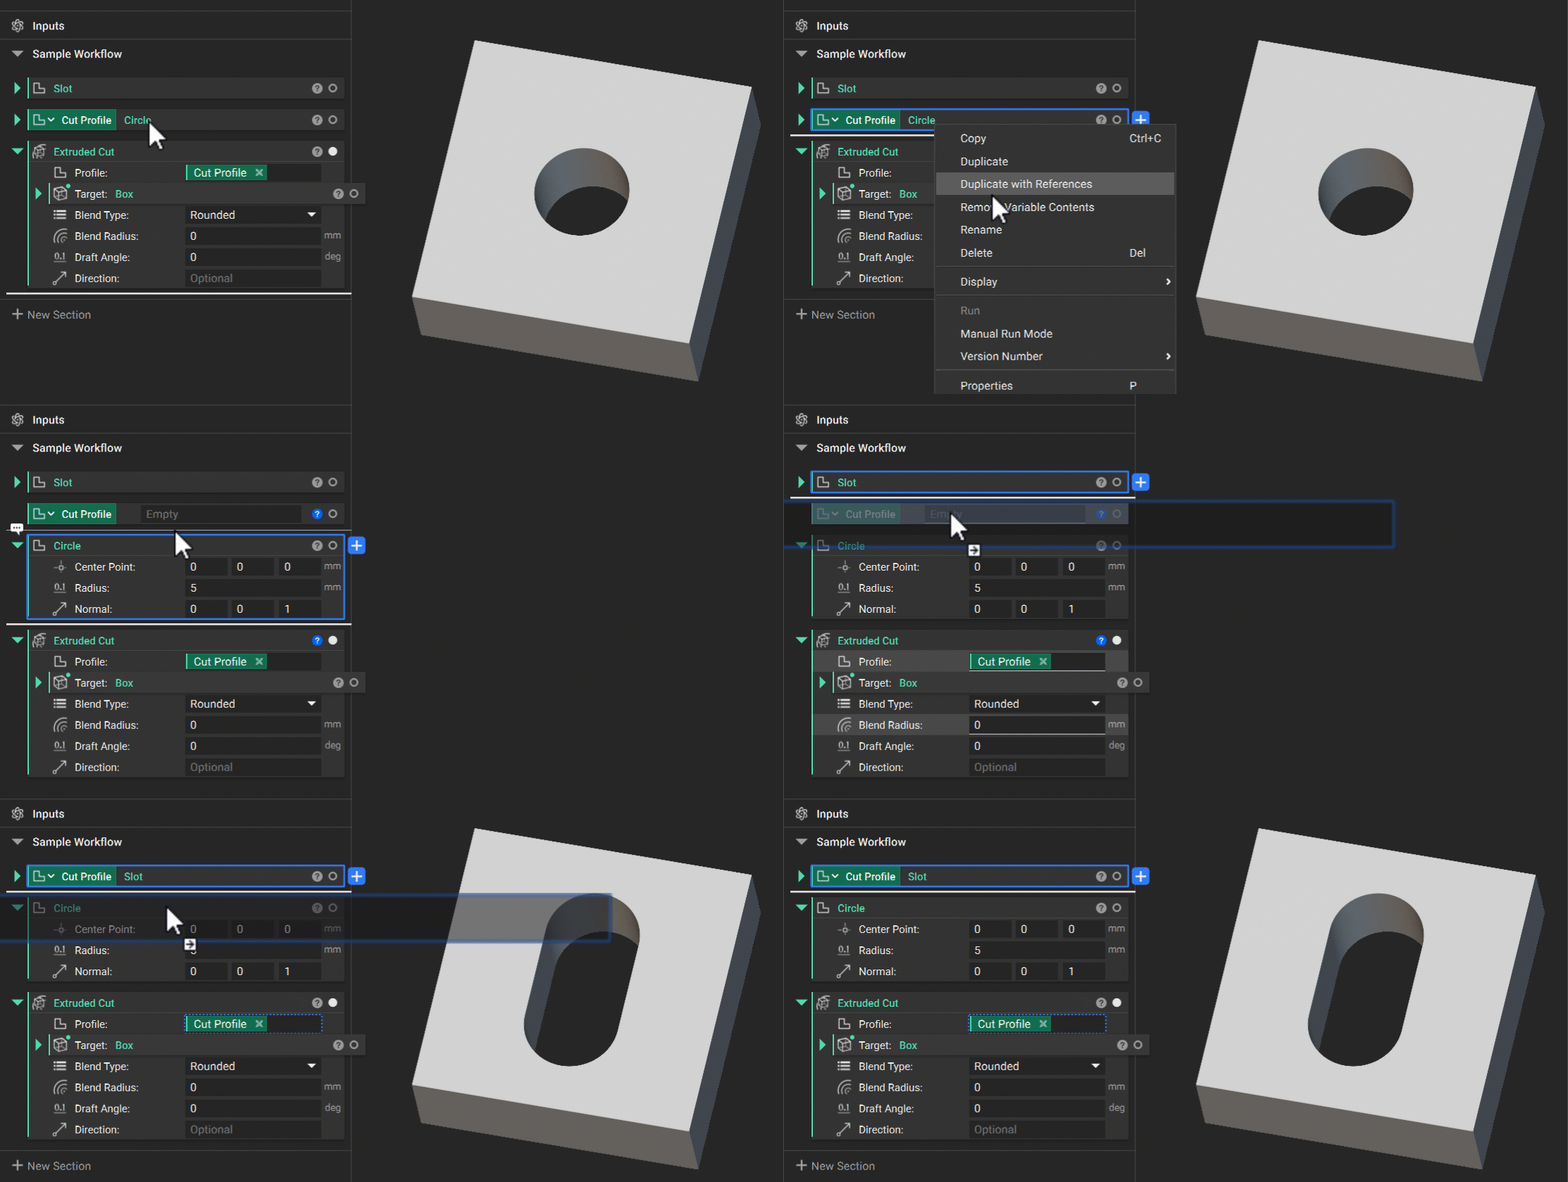 *Using Remove Variable Contents to change the variable profile*
#### Input and Output Sections
The Input and Output sections are located at the top and bottom of your Notebook. They are primarily used to create Custom Blocks and run nTop automation workflows, both covered in later courses. The Input section defines the inputs to the Custom Block or workflow, while the Output section defines what it returns.
To add a block or parameter variable to the Input section, right-click it and select Make Notebook Input, or drag it directly into the section.
*Using Remove Variable Contents to change the variable profile*
#### Input and Output Sections
The Input and Output sections are located at the top and bottom of your Notebook. They are primarily used to create Custom Blocks and run nTop automation workflows, both covered in later courses. The Input section defines the inputs to the Custom Block or workflow, while the Output section defines what it returns.
To add a block or parameter variable to the Input section, right-click it and select Make Notebook Input, or drag it directly into the section.
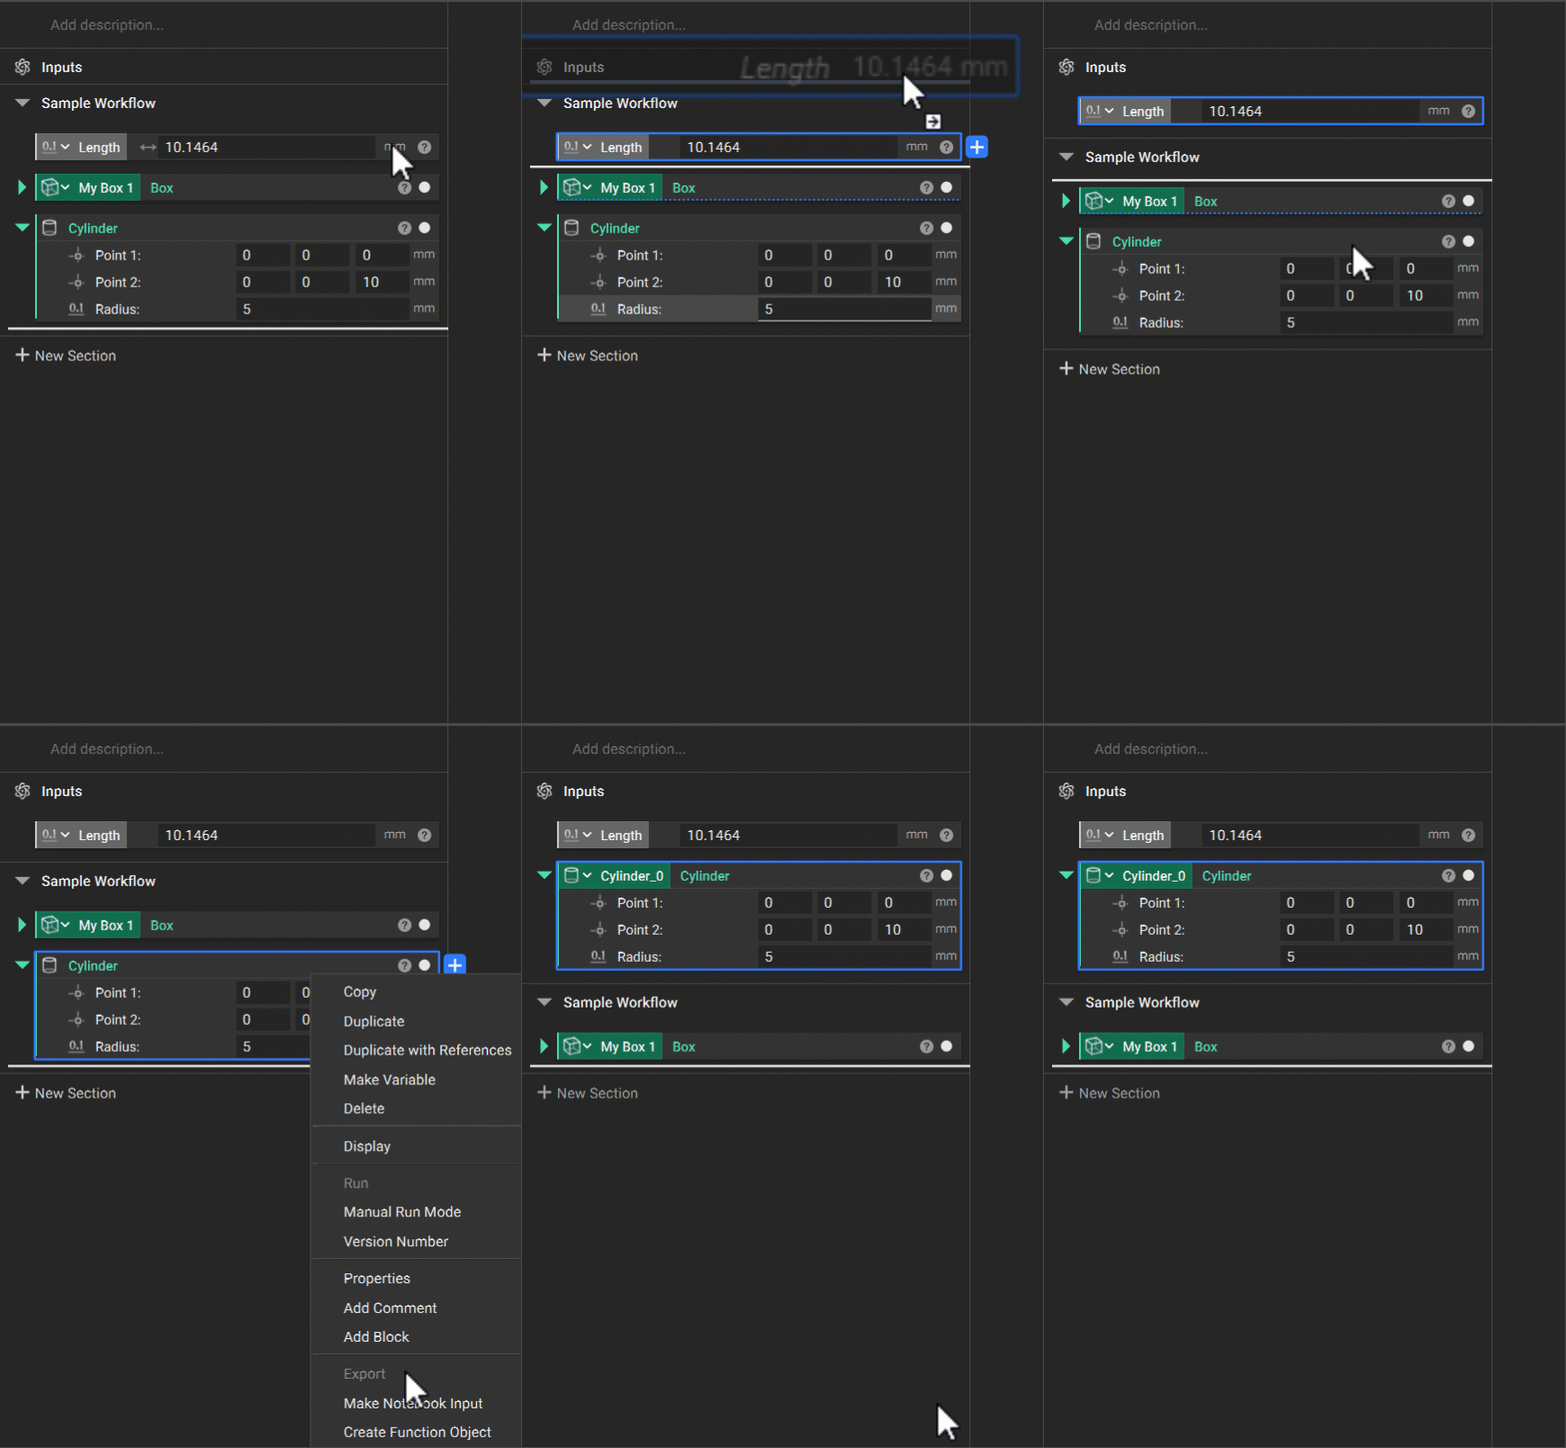 *A demo of making inputs by dragging or using the right-click menu*
To define an output, drag the desired block into the Output section.
*A demo of making inputs by dragging or using the right-click menu*
To define an output, drag the desired block into the Output section.
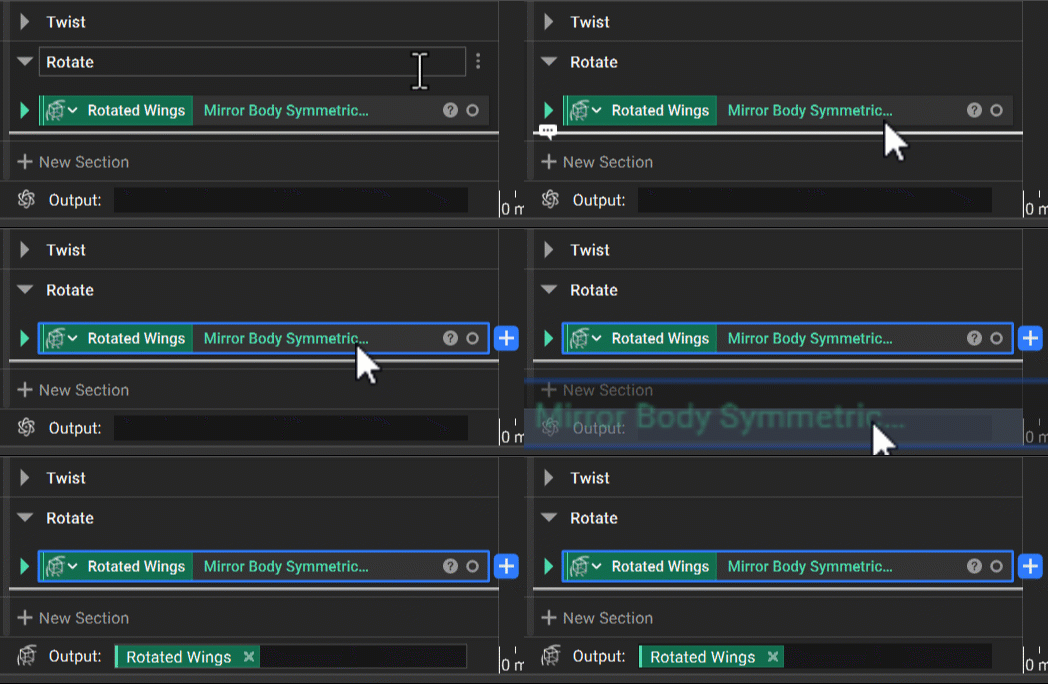 *Drag and drop your desired Output block into the Output Section*
#### Comments
A comment is a note attached to a block or placed in the Notebook. Click the speech bubble icon that appears when you hover above a block, right-click a dividing line between blocks, or open the Comment tab in Block Details (more on block details later in this lesson) to add a comment.
*Drag and drop your desired Output block into the Output Section*
#### Comments
A comment is a note attached to a block or placed in the Notebook. Click the speech bubble icon that appears when you hover above a block, right-click a dividing line between blocks, or open the Comment tab in Block Details (more on block details later in this lesson) to add a comment.
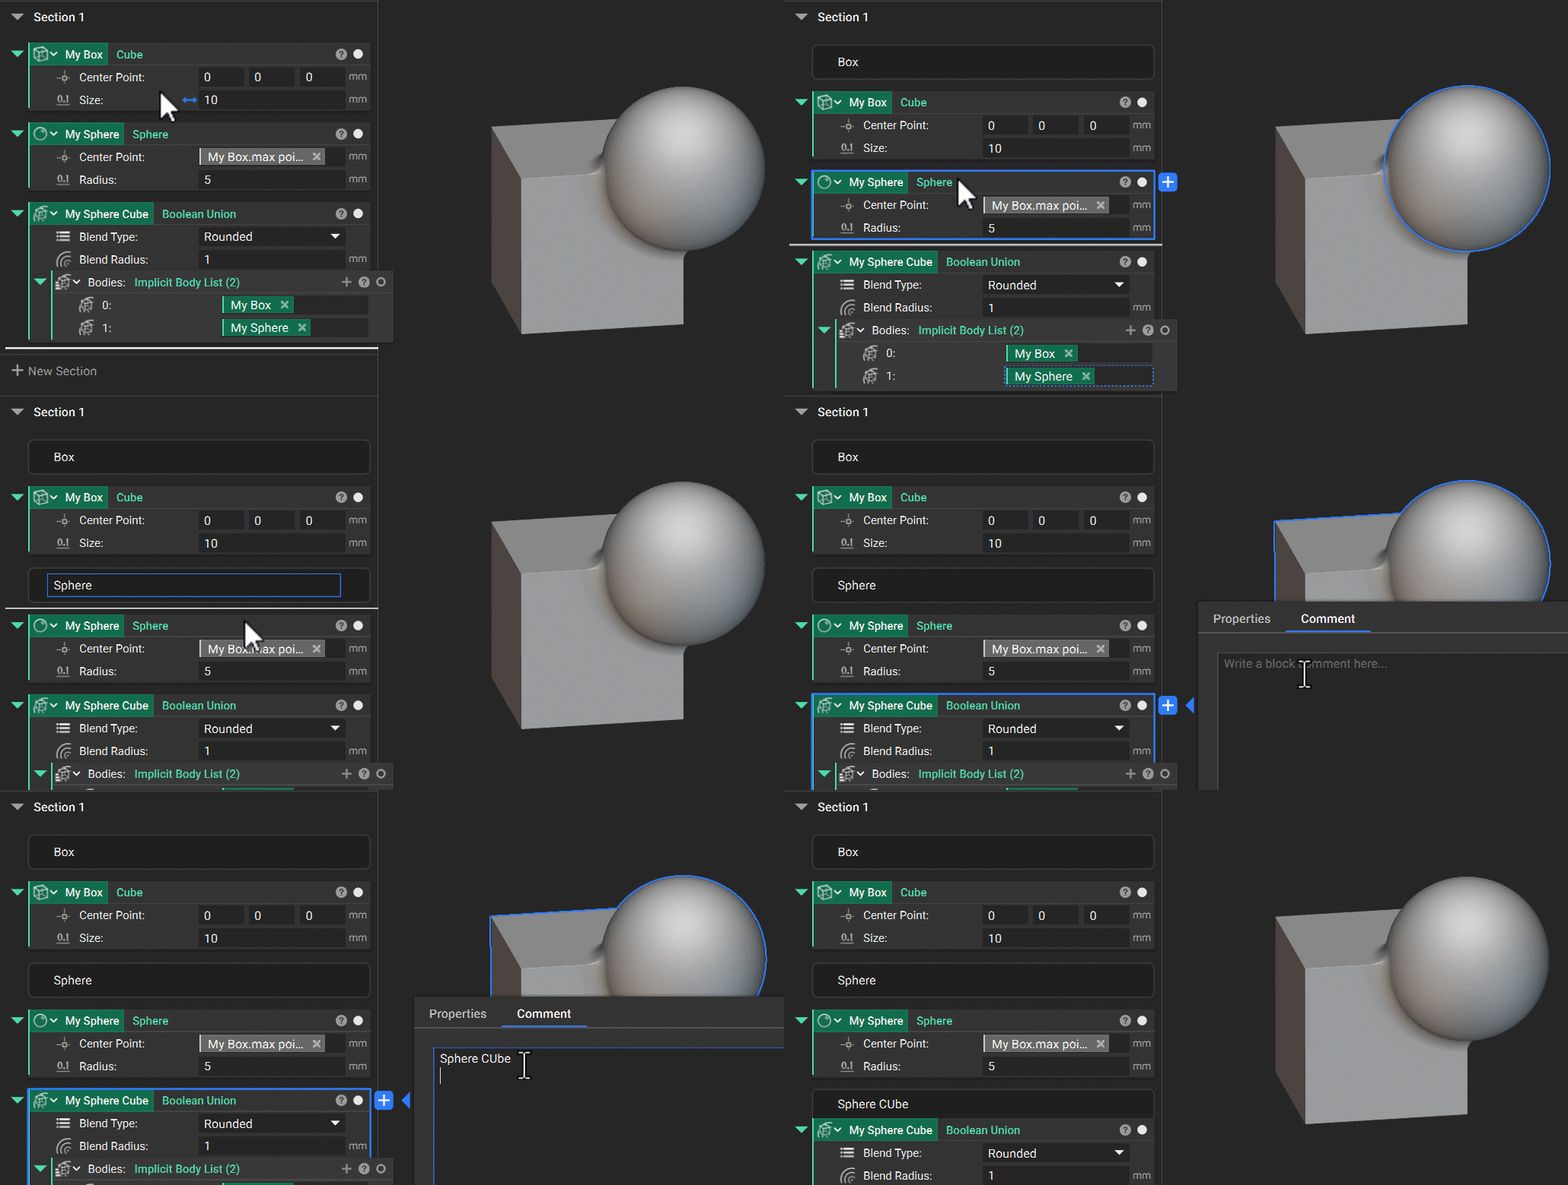 *You can attach comments directly to blocks or position them between blocks in the Notebook*
A few behaviors worth knowing:
* Block comments belong to the block. Move the block within the Notebook, and the comment moves with it. If a block is free standing in the notebook, it will not move unless dragged separately.
* If the block gets nested inside another block, its comment is nested as well, and an icon appears to indicate this.
*You can attach comments directly to blocks or position them between blocks in the Notebook*
A few behaviors worth knowing:
* Block comments belong to the block. Move the block within the Notebook, and the comment moves with it. If a block is free standing in the notebook, it will not move unless dragged separately.
* If the block gets nested inside another block, its comment is nested as well, and an icon appears to indicate this.
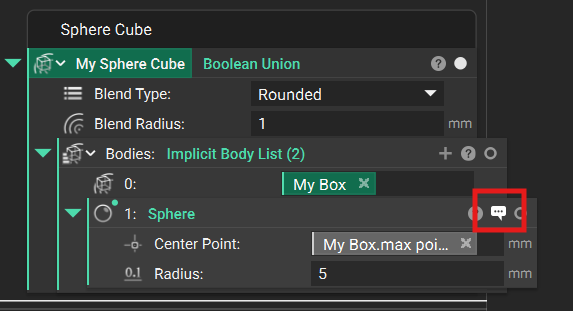 *Nested blocks with comments will have a speech bubble icon next to their visibility toggle*
* Comments are searchable. Notebook search *Ctrl + F* filters on comment text, so a well-commented Notebook is navigable.
### 4. Running and Checking
#### Toggle Autorun + Manual Run Mode
1. Toggle Autorun – Controls whether blocks automatically rebuild when an input changes. When Autorun is on, a block rebuilds whenever one of its inputs or an upstream block changes. When Autorun is off, affected blocks wait until you run them manually or turn Autorun back on. Turn Autorun off when making a series of computationally expensive edits. Toggle Autorun is to the right of the search bar and can be toggled by clicking.
*Nested blocks with comments will have a speech bubble icon next to their visibility toggle*
* Comments are searchable. Notebook search *Ctrl + F* filters on comment text, so a well-commented Notebook is navigable.
### 4. Running and Checking
#### Toggle Autorun + Manual Run Mode
1. Toggle Autorun – Controls whether blocks automatically rebuild when an input changes. When Autorun is on, a block rebuilds whenever one of its inputs or an upstream block changes. When Autorun is off, affected blocks wait until you run them manually or turn Autorun back on. Turn Autorun off when making a series of computationally expensive edits. Toggle Autorun is to the right of the search bar and can be toggled by clicking.
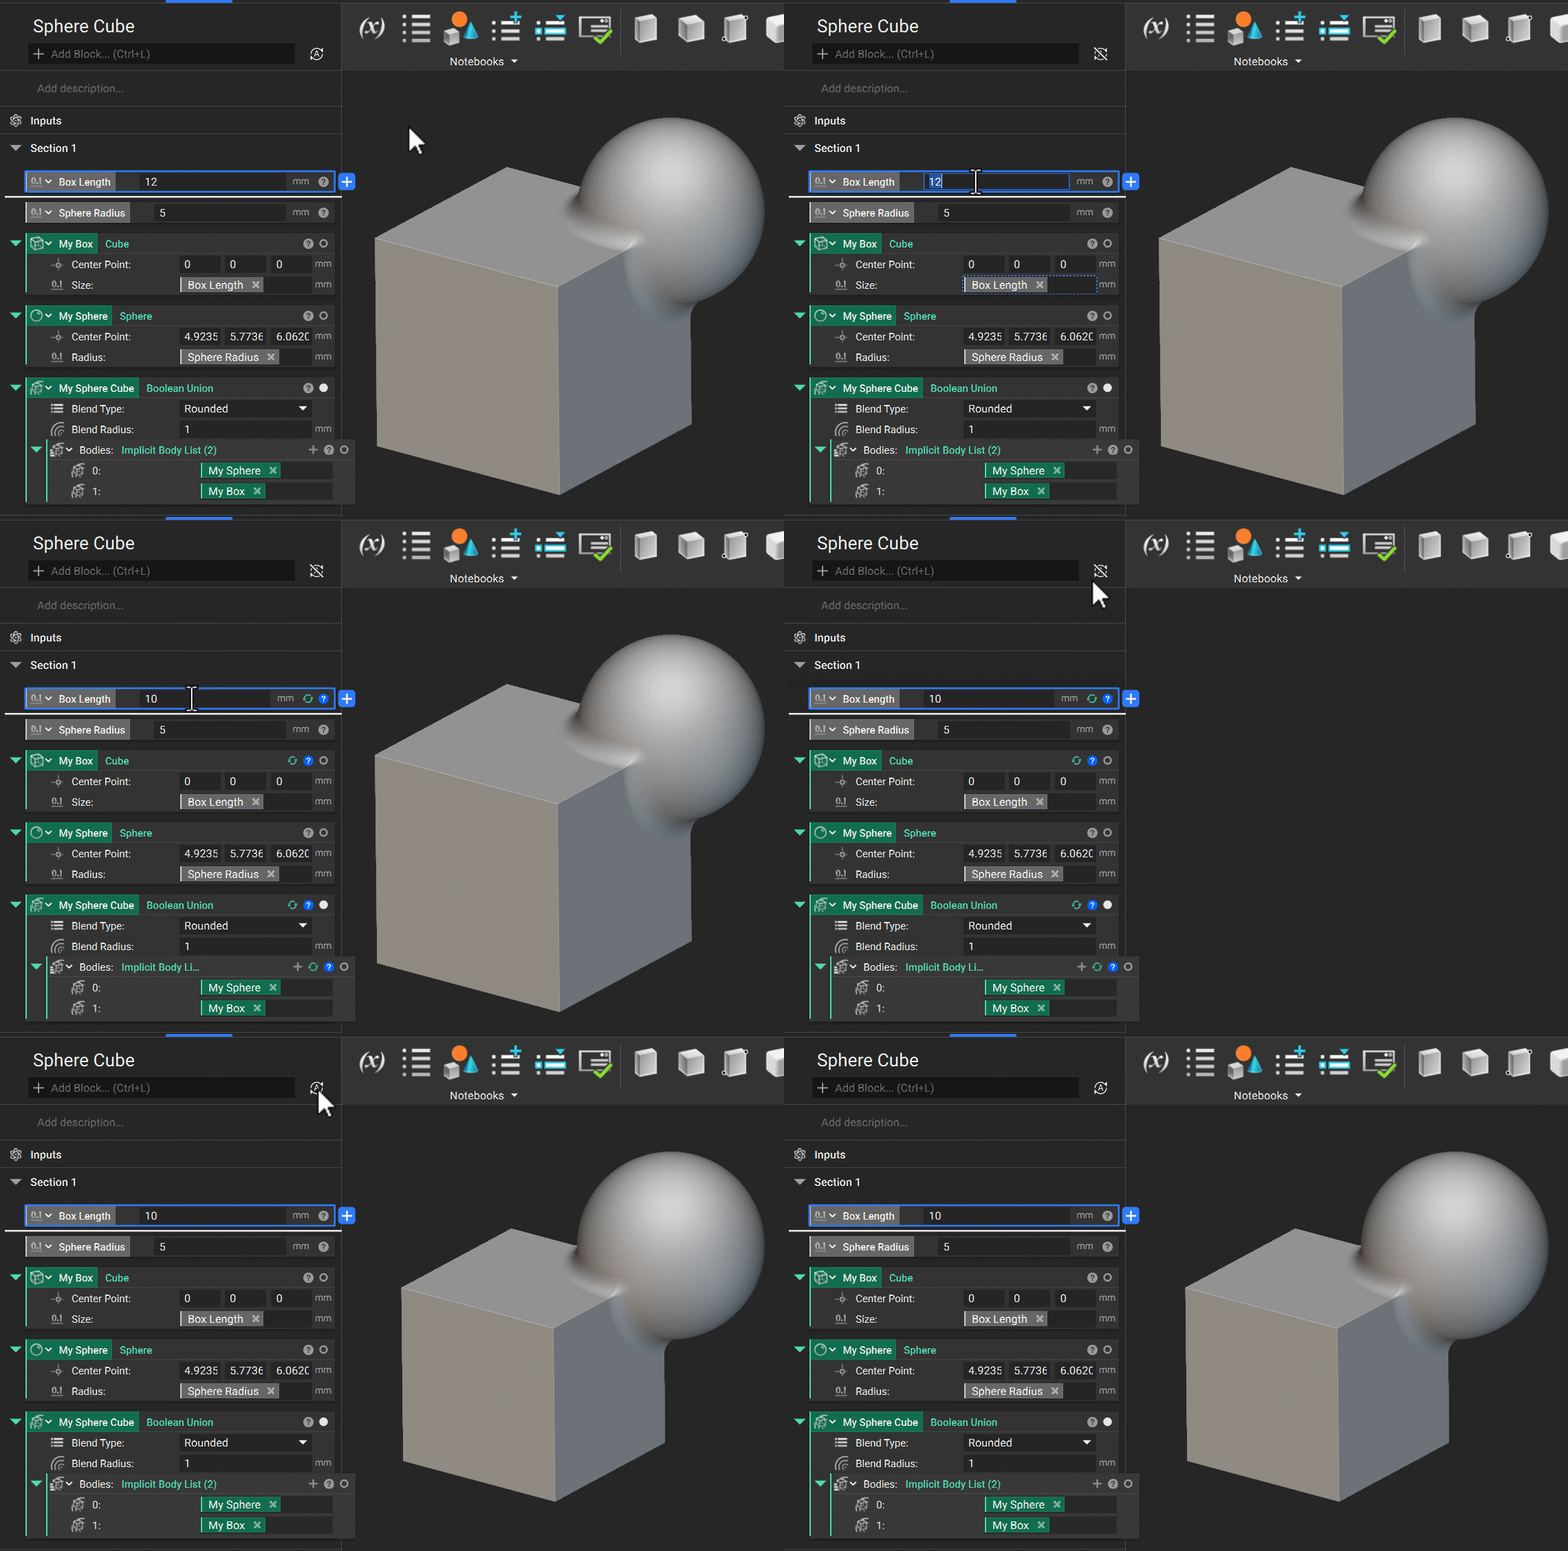 *Toggling Autorun will compute all built blocks*
2. Manual Run Mode – Controls whether blocks automatically rebuild when an input or any upstream block affecting them changes. With Manual Run Mode on, a run icon appears on affected blocks, letting you choose when to rebuild them. This is useful when testing a specific area or changing multiple inputs without spending computation time rebuilding downstream operations. To toggle Manual Run Mode for a block, right-click the block and select Manual Run Mode.
*Toggling Autorun will compute all built blocks*
2. Manual Run Mode – Controls whether blocks automatically rebuild when an input or any upstream block affecting them changes. With Manual Run Mode on, a run icon appears on affected blocks, letting you choose when to rebuild them. This is useful when testing a specific area or changing multiple inputs without spending computation time rebuilding downstream operations. To toggle Manual Run Mode for a block, right-click the block and select Manual Run Mode.
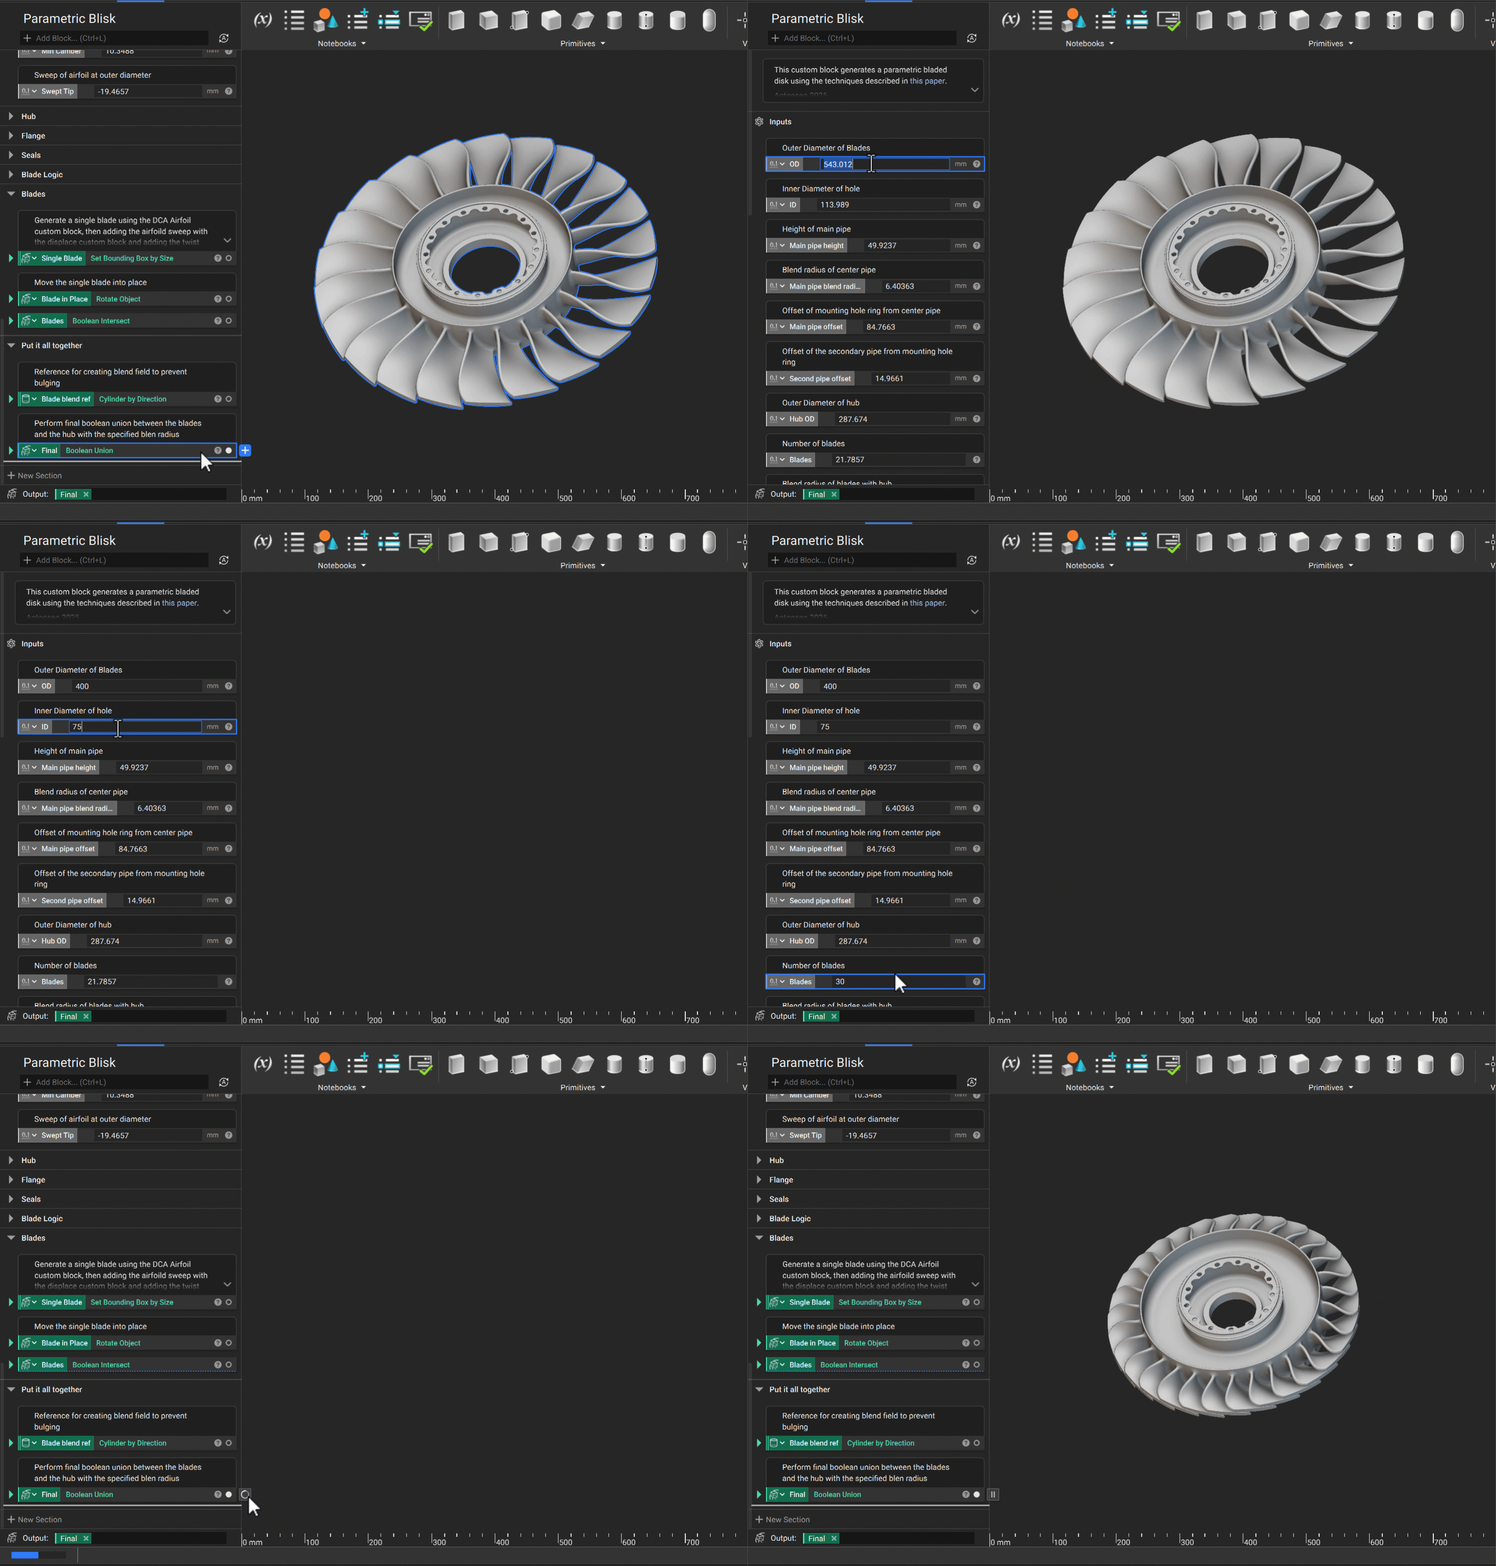 *Manual Run Mode is helpful when you need to change multiple input values before you want a block to compute*
#### Rebuild Block
Reruns a block that failed, was canceled, or did not run because Toggle Autorun was off. Select the icon shown on the block below to rebuild it. Select the Icon to rebuild the block.
*Manual Run Mode is helpful when you need to change multiple input values before you want a block to compute*
#### Rebuild Block
Reruns a block that failed, was canceled, or did not run because Toggle Autorun was off. Select the icon shown on the block below to rebuild it. Select the Icon to rebuild the block.
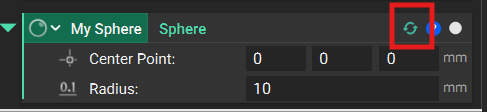 *The Rebuild Block button will appear next to the question mark icon*
#### Error Indicator and Error Log
A red icon in the Notebook's top right corner means a block has an error. Select it to open the Error Log, which lists every error in the Notebook; clicking an entry navigates you to the block causing it.
*The Rebuild Block button will appear next to the question mark icon*
#### Error Indicator and Error Log
A red icon in the Notebook's top right corner means a block has an error. Select it to open the Error Log, which lists every error in the Notebook; clicking an entry navigates you to the block causing it.
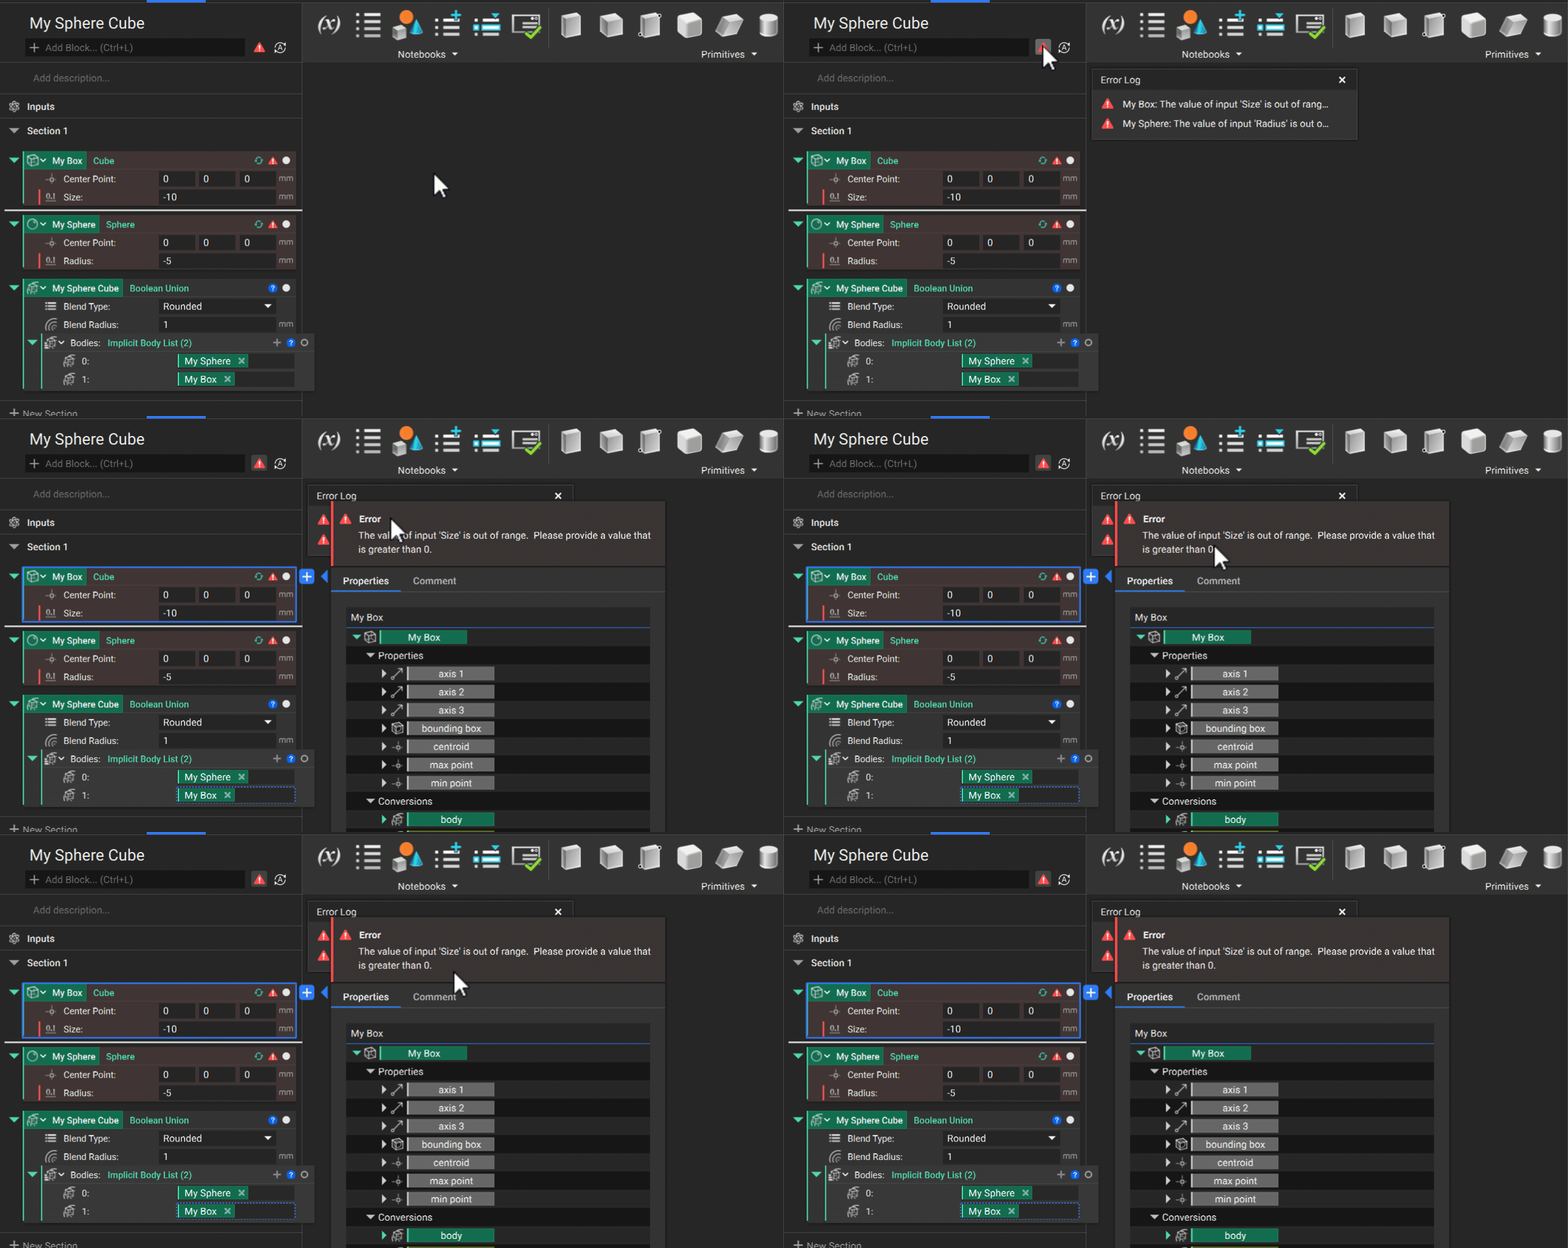 *You can view the full error message by selecting the error in the Error Log*
### Notebook Best Practices
Your Notebook documents your work. Months from now, you or a colleague should be able to open it and quickly understand what the workflow does, how it is organized, and what can be changed. A few simple habits make your Notebook easier to understand, maintain, and reuse.
* Name and describe your Notebook. Use a name that clearly communicates what the workflow does and matches the file name. Add a description that provides additional context. If the Notebook becomes a Custom Block, this description becomes the block description.
* Organize your workflow into Sections. Name Sections after the steps in your process. This lets someone understand the workflow structure before inspecting individual blocks.
* Comment where context is needed. You do not need to comment every block. Add comments where you made an important decision, assumption, or choice that may not be obvious later.
* Make important inputs Variables. Turn parameters that you expect to change into clearly named Variables so they are easy to find and adjust.
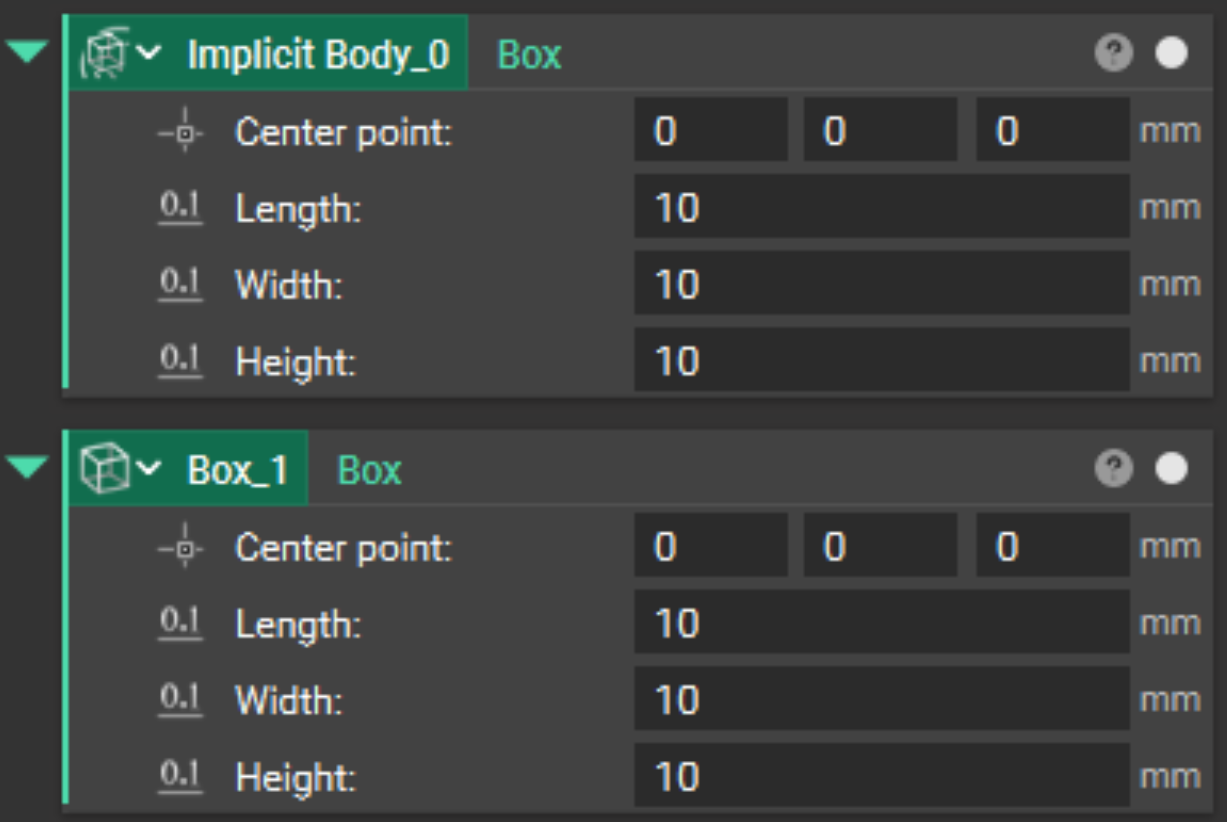
* Rename important blocks. Give key blocks meaningful Object Names that describe their role in the workflow. “outer\_shell” is much easier to understand later than “Implicit Body\_0”.
* Collapse what you are not using. Collapse blocks whose parameters don't need to remain visible, and collapse completed Sections. This reduces clutter and makes the active parts of your workflow easier to scan.
* Not everything needs to be a Variable. Too many Variables can make a Notebook as difficult to understand as too few. As a general guideline, create a Variable when a value represents a design decision, is used in multiple locations, or may need to be modified when you reuse the workflow. Assign each Variable a clear, descriptive name. If a value is only an intermediate result, leave it nested and collapse the block.
* In Course 2, you will use Variables to parameterize relationships between geometry, allowing changes to automatically drive the rest of the workflow.
## Block Overview
### Output Types, Block Types, and Block Colors
Every block has an Output type and a block type. The Output type defines what the block produces and is indicated by its color.
*You can view the full error message by selecting the error in the Error Log*
### Notebook Best Practices
Your Notebook documents your work. Months from now, you or a colleague should be able to open it and quickly understand what the workflow does, how it is organized, and what can be changed. A few simple habits make your Notebook easier to understand, maintain, and reuse.
* Name and describe your Notebook. Use a name that clearly communicates what the workflow does and matches the file name. Add a description that provides additional context. If the Notebook becomes a Custom Block, this description becomes the block description.
* Organize your workflow into Sections. Name Sections after the steps in your process. This lets someone understand the workflow structure before inspecting individual blocks.
* Comment where context is needed. You do not need to comment every block. Add comments where you made an important decision, assumption, or choice that may not be obvious later.
* Make important inputs Variables. Turn parameters that you expect to change into clearly named Variables so they are easy to find and adjust.
* Rename important blocks. Give key blocks meaningful Object Names that describe their role in the workflow. “outer\_shell” is much easier to understand later than “Implicit Body\_0”.
* Collapse what you are not using. Collapse blocks whose parameters don't need to remain visible, and collapse completed Sections. This reduces clutter and makes the active parts of your workflow easier to scan.
* Not everything needs to be a Variable. Too many Variables can make a Notebook as difficult to understand as too few. As a general guideline, create a Variable when a value represents a design decision, is used in multiple locations, or may need to be modified when you reuse the workflow. Assign each Variable a clear, descriptive name. If a value is only an intermediate result, leave it nested and collapse the block.
* In Course 2, you will use Variables to parameterize relationships between geometry, allowing changes to automatically drive the rest of the workflow.
## Block Overview
### Output Types, Block Types, and Block Colors
Every block has an Output type and a block type. The Output type defines what the block produces and is indicated by its color.
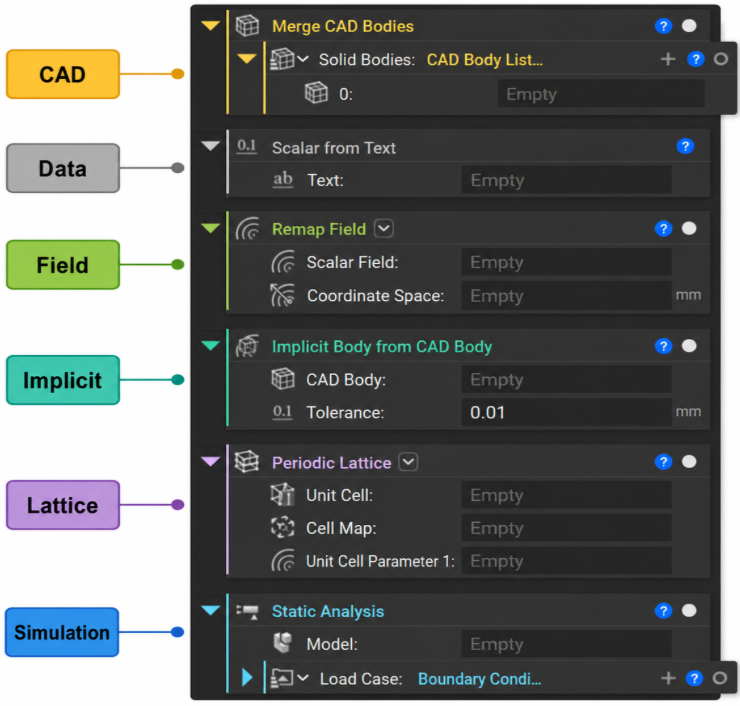 *Block types are best distinguished by their colors and icons*
Output Types fall into six categories:
| **Category** | **What it covers** |
| - | - |
| CAD | Imported CAD geometry |
| Data | Numbers and values — Scalar and Integer are both Data sub-categories |
| Field | Scalar, vector, and other fields |
| Implicit | Implicit bodies |
| Lattice | Lattice and graph geometry |
| Simulation | Analysis setup and results |
Some categories contain subcategories, and each Output Type can include many block types. Because there are far more block types than Output types, color tells you what a block produces, while its icon identifies the block type. See the full list in block types in the nTop Product Documentation.
Some blocks also support Overloads, meaning the same block can have multiple configurations and, in some cases, return different Output types. Blocks that support Overloads have a drop-down beside the Block Name for selecting a different configuration. For example, with the Add block, a user can select the following overloads for both inputs *Operand A* and *Operand B*. Below are the overloads for the **Add** block.
*Block types are best distinguished by their colors and icons*
Output Types fall into six categories:
| **Category** | **What it covers** |
| - | - |
| CAD | Imported CAD geometry |
| Data | Numbers and values — Scalar and Integer are both Data sub-categories |
| Field | Scalar, vector, and other fields |
| Implicit | Implicit bodies |
| Lattice | Lattice and graph geometry |
| Simulation | Analysis setup and results |
Some categories contain subcategories, and each Output Type can include many block types. Because there are far more block types than Output types, color tells you what a block produces, while its icon identifies the block type. See the full list in block types in the nTop Product Documentation.
Some blocks also support Overloads, meaning the same block can have multiple configurations and, in some cases, return different Output types. Blocks that support Overloads have a drop-down beside the Block Name for selecting a different configuration. For example, with the Add block, a user can select the following overloads for both inputs *Operand A* and *Operand B*. Below are the overloads for the **Add** block.
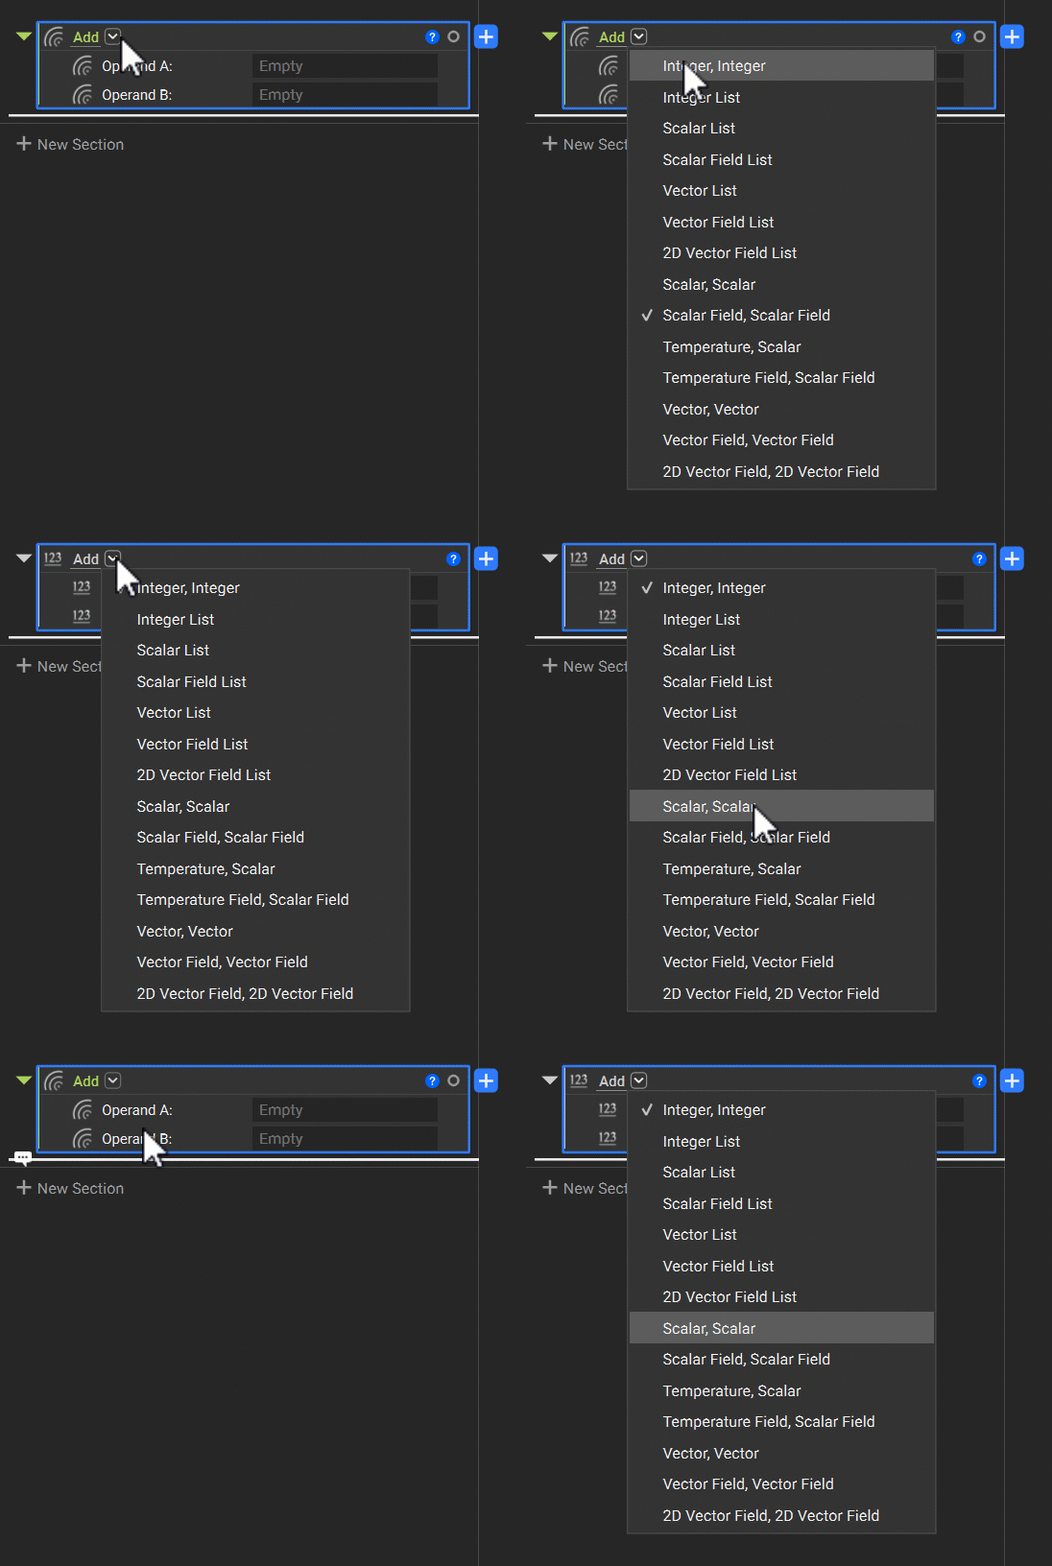 *Blocks that have one or several overloads available will have the chevron drop-down next to the block name*
You may also encounter Variants. A Variant is a block whose type can change based on the block, Variable, or value provided in the input. This allows the same input to accept multiple compatible types. In this example below, the same Box is a valid input for both an implicit body variable and a box variable.
*Blocks that have one or several overloads available will have the chevron drop-down next to the block name*
You may also encounter Variants. A Variant is a block whose type can change based on the block, Variable, or value provided in the input. This allows the same input to accept multiple compatible types. In this example below, the same Box is a valid input for both an implicit body variable and a box variable.
 *A Box block can be both a Box type and an Implicit Body type*
The Chevron Icon beside the Block Icon changes the Block Type.
*A Box block can be both a Box type and an Implicit Body type*
The Chevron Icon beside the Block Icon changes the Block Type.
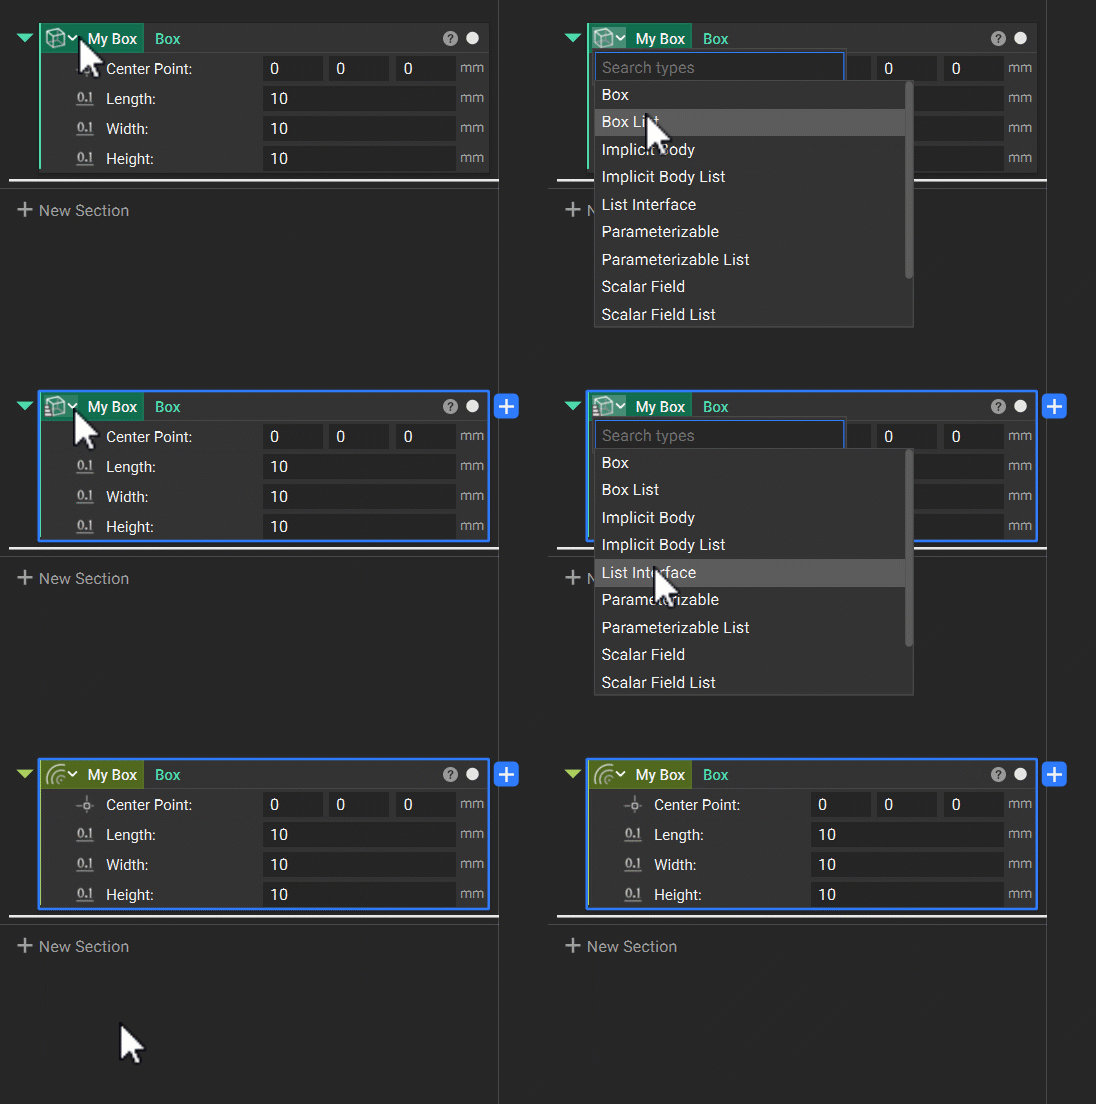 *Use the chevron drop-down menu on the block icon to change the block type*
Together, Overloads and Variants let blocks adapt to different inputs and outputs, reducing the need for separate blocks that perform closely related operations.
### Block Anatomy
*Use the chevron drop-down menu on the block icon to change the block type*
Together, Overloads and Variants let blocks adapt to different inputs and outputs, reducing the need for separate blocks that perform closely related operations.
### Block Anatomy
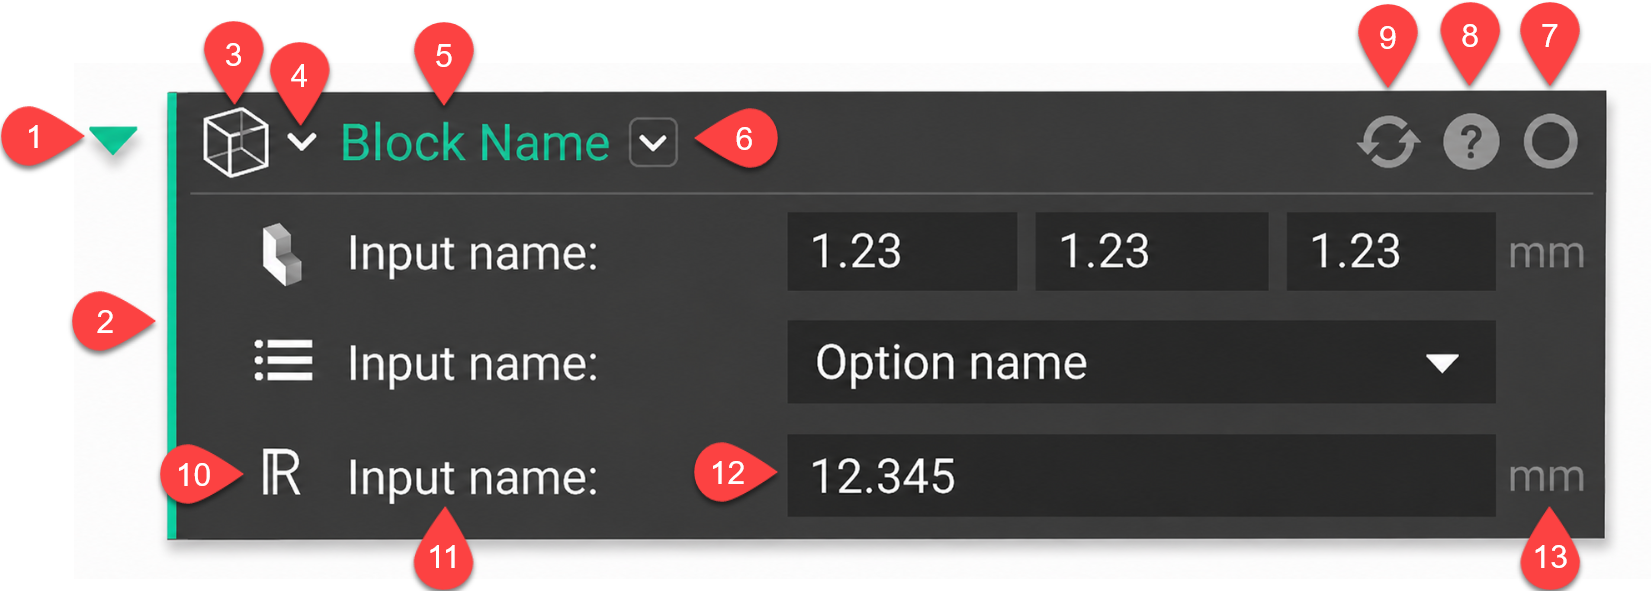 *A labeled diagram of a block*
The chevron on the left expands or collapses the block. Hotkey: Spacebar
The bar down the left side. It is the Output Type.
The Block Type. A list icon layered over it means the block is a list.
The chevron beside the Block Icon, where a block's type can be changed.
The name of the function, e.g., Boolean Union. This is the name you type into the Search bar or look for in the Ribbon.
The chevron to the right of the Block Name, which overloads the block's inputs.
A solid circle means the output is visible in the Viewport; an empty circle means it is hidden. Toggle with V.
The question mark icon opens the Block Details panel. Its appearance indicates the block's current state: blue for an unbuilt block, grey for a successfully built block, and a different icon for a yellow warning or red error.
* Error (red): Must be resolved before the block can run. The block is tinted red, an error indicator appears in the Notebook's upper-right corner, and Block Details explains the issue and how to resolve it. Some errors also include a Learn More button.
* Warning (yellow): Does not prevent the block from running, but may affect the output.
* Alert (blue): Must be resolved before the block can run. Typically indicates missing or incomplete information, such as an empty required input.
Note: Only errors appear in the Error Log. If an error occurs inside a collapsed section, an error icon appears beside the section so you can locate it without expanding the Notebook.
Appears when the block needs to be rerun. Click it to rebuild.
Each input carries an icon showing the Output Type it accepts.
What the input is for.
Click in it to type a value or a block name. Typing a name opens a search that lists blocks already in your Notebook first, then other blocks that satisfy the input type. You can also drag and drop a block into an input. An unacceptable input is outlined in red.
Shown to the right of the input where applicable.
### Three kinds of blocks look different from the rest:
* Variables: Their name appears on the left over the block color.
*A labeled diagram of a block*
The chevron on the left expands or collapses the block. Hotkey: Spacebar
The bar down the left side. It is the Output Type.
The Block Type. A list icon layered over it means the block is a list.
The chevron beside the Block Icon, where a block's type can be changed.
The name of the function, e.g., Boolean Union. This is the name you type into the Search bar or look for in the Ribbon.
The chevron to the right of the Block Name, which overloads the block's inputs.
A solid circle means the output is visible in the Viewport; an empty circle means it is hidden. Toggle with V.
The question mark icon opens the Block Details panel. Its appearance indicates the block's current state: blue for an unbuilt block, grey for a successfully built block, and a different icon for a yellow warning or red error.
* Error (red): Must be resolved before the block can run. The block is tinted red, an error indicator appears in the Notebook's upper-right corner, and Block Details explains the issue and how to resolve it. Some errors also include a Learn More button.
* Warning (yellow): Does not prevent the block from running, but may affect the output.
* Alert (blue): Must be resolved before the block can run. Typically indicates missing or incomplete information, such as an empty required input.
Note: Only errors appear in the Error Log. If an error occurs inside a collapsed section, an error icon appears beside the section so you can locate it without expanding the Notebook.
Appears when the block needs to be rerun. Click it to rebuild.
Each input carries an icon showing the Output Type it accepts.
What the input is for.
Click in it to type a value or a block name. Typing a name opens a search that lists blocks already in your Notebook first, then other blocks that satisfy the input type. You can also drag and drop a block into an input. An unacceptable input is outlined in red.
Shown to the right of the input where applicable.
### Three kinds of blocks look different from the rest:
* Variables: Their name appears on the left over the block color.
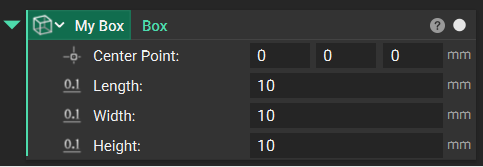 *An example of a Box block variable*
* List blocks carry a list icon over the Block Icon and show the list size in brackets after the name; add inputs with the '+' in the upper right, remove one with the '-' that appears when you hover. (More on working with Lists in Course 2)
*An example of a Box block variable*
* List blocks carry a list icon over the Block Icon and show the list size in brackets after the name; add inputs with the '+' in the upper right, remove one with the '-' that appears when you hover. (More on working with Lists in Course 2)
 *An example of a block list*
* Custom blocks have a double line down the left side, indicating a full workflow underneath. (More on working with Custom Blocks in Course 3)
*An example of a block list*
* Custom blocks have a double line down the left side, indicating a full workflow underneath. (More on working with Custom Blocks in Course 3)
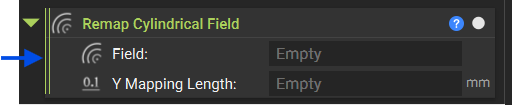 *Custom blocks have a double line symbol*
### Block properties
Blocks carry more information than what appears in their inputs. Click the question mark icon on a block to open Block Details, which contains Properties and Comment tabs. We already covered Comments, so here we will focus on Properties.
The Properties tab contains values the block computes automatically, such as a body's bounding box or a mesh's element count. Properties appear as chips that you can drag into another block's input or expand to view nested properties.
*Custom blocks have a double line symbol*
### Block properties
Blocks carry more information than what appears in their inputs. Click the question mark icon on a block to open Block Details, which contains Properties and Comment tabs. We already covered Comments, so here we will focus on Properties.
The Properties tab contains values the block computes automatically, such as a body's bounding box or a mesh's element count. Properties appear as chips that you can drag into another block's input or expand to view nested properties.
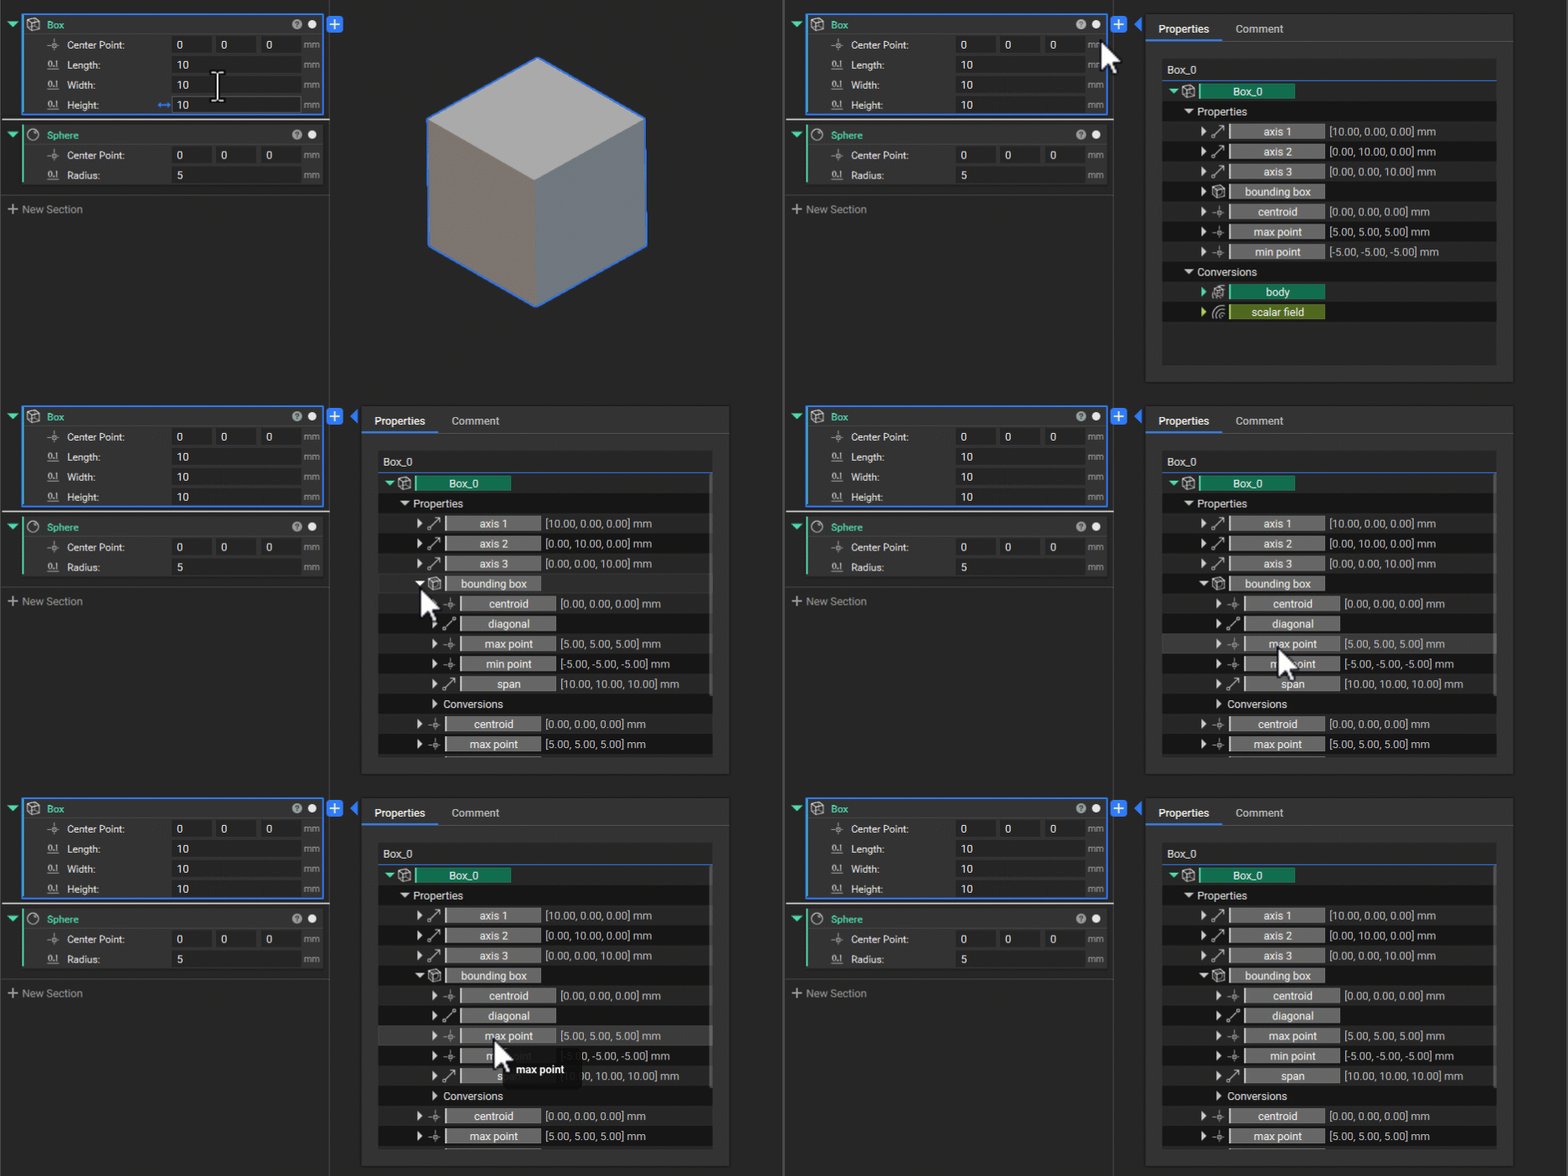 *Clicking the question mark icon opens a block's Properties Panel*
Properties help create parametric relationships. For example, instead of entering a fixed offset distance, you can drive it with a dimension from the geometry's bounding box. As the geometry changes, the offset updates automatically. The simple example below shows a sphere's center point updating automatically because it is driven by the cube's *Max Point* property.
*Clicking the question mark icon opens a block's Properties Panel*
Properties help create parametric relationships. For example, instead of entering a fixed offset distance, you can drive it with a dimension from the geometry's bounding box. As the geometry changes, the offset updates automatically. The simple example below shows a sphere's center point updating automatically because it is driven by the cube's *Max Point* property.
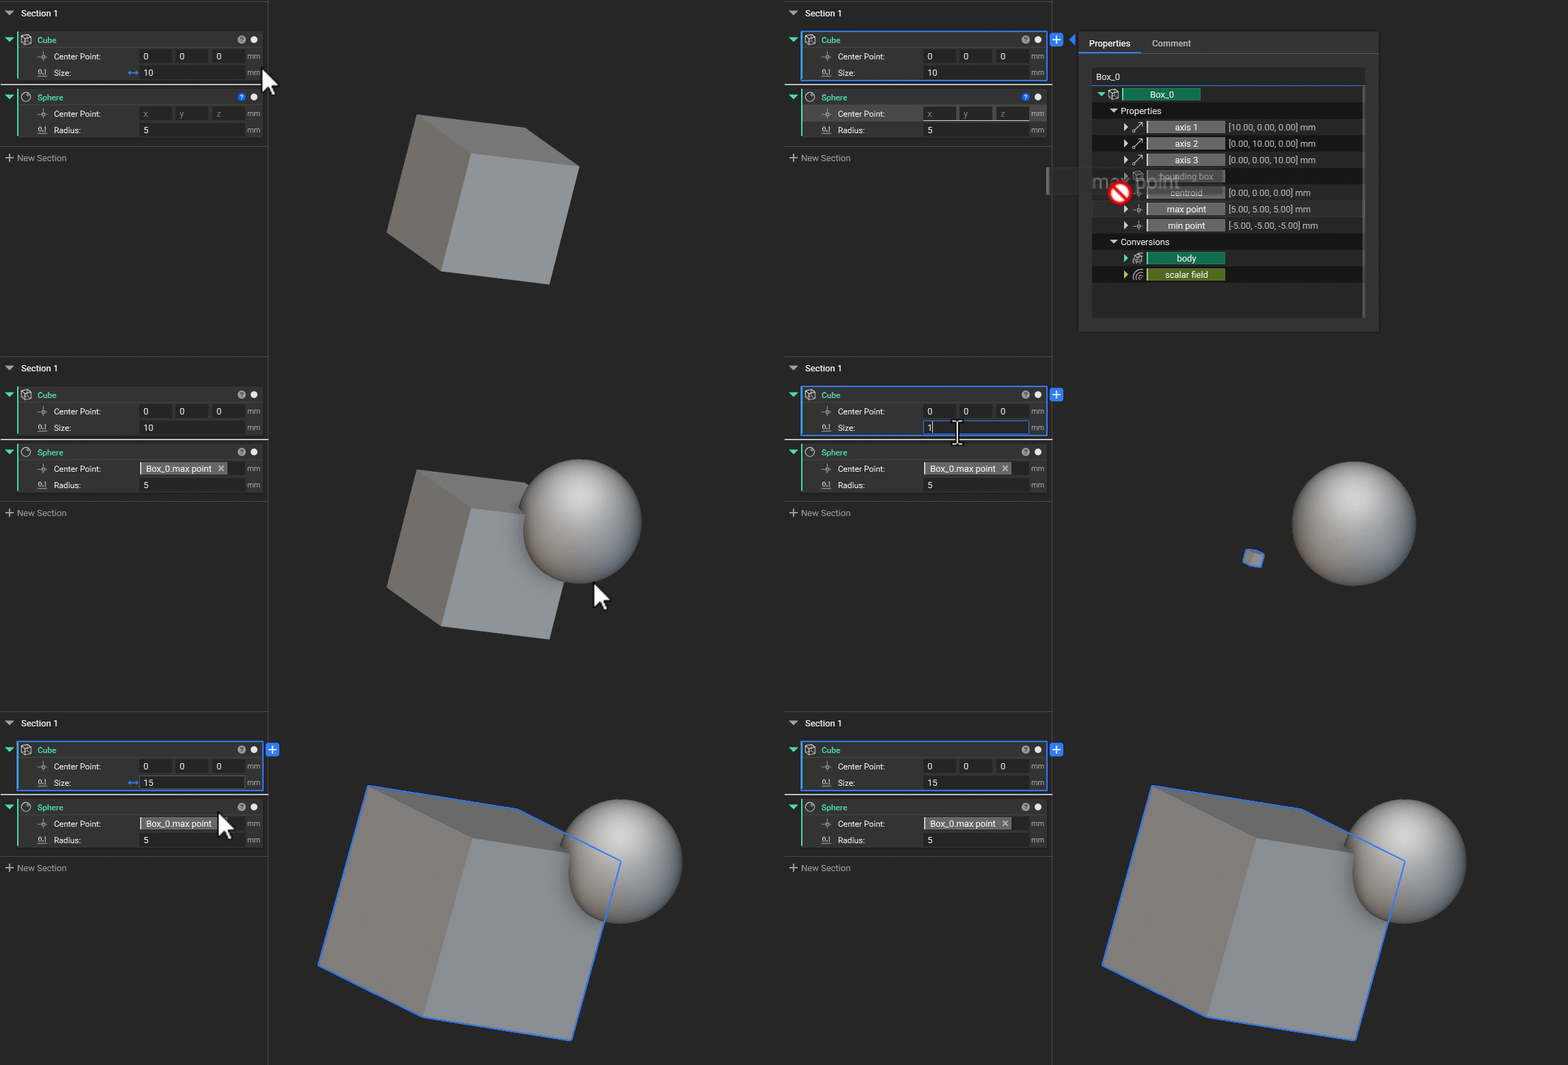 *Parameterizing blocks using block properties allows them to adapt as the design changes*
Dragging a property into the Notebook creates a Variable linked to its source block. In Course 2, we will use Variables and Block Properties together to parameterize relationships between geometry.
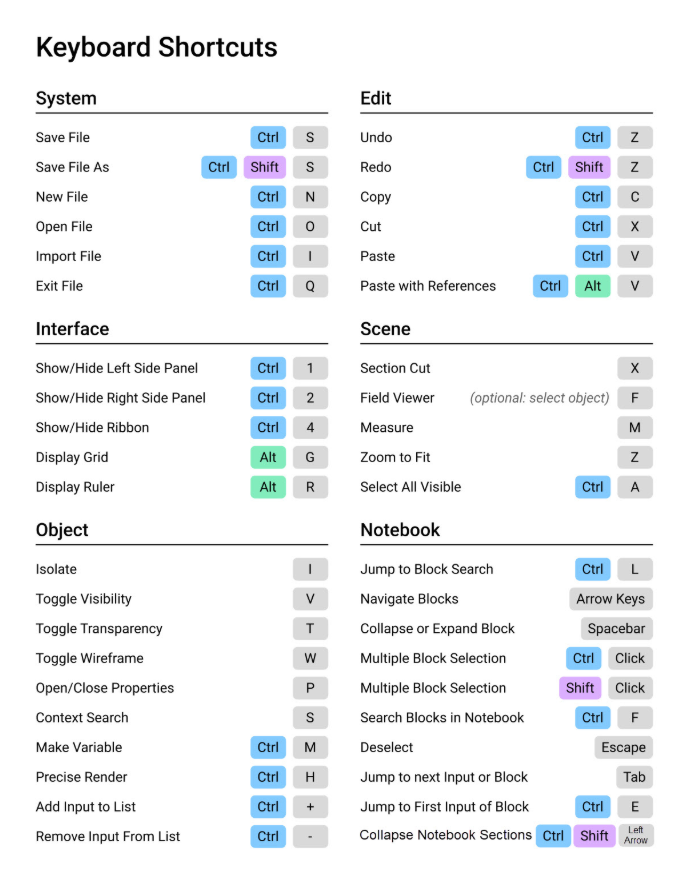
## Keyboard Shortcuts
| **Control** | **Mouse Action** |
| - | - |
| Left-click | Select |
| Right-click | Object context menu |
| Right-click + drag | Rotate camera |
| Right-click + drag + Shift, or middle mouse button + drag | Pan camera |
| Right-click + drag + Ctrl, or middle mouse button + scroll | Zoom camera |
| Ctrl + left-click | Select multiple blocks |
| Ctrl + drag | Create an identical, linked instance of a block |
**Note:** Ctrl + drag is not the same as Duplicate. It creates an *identical instance*, so changing an input on one affects the other. Duplicate makes an independent copy. Use Ctrl + drag when you want the two to stay in step, and Duplicate when you don't.
**Note:** nTop also supports a 3Dconnexion Space Mouse for navigating in 3D, though you can't map specific actions to its buttons.
| **Shortcut** | **Action** |
| - | - |
| Ctrl + L | Jump to the Search bar |
| S | Context Search on a selected block; Search in Place on a dividing line |
| Ctrl + F | Open the Left Side Panel and start a Notebook search |
| Ctrl + 1 | Open or close the Left Side Panel |
| Ctrl + 2 | Open or close the Right Side Panel |
| Ctrl + 3 | Open or close the bottom panel |
| Ctrl + D | Show or hide the Ribbon |
| Spacebar | Collapse or expand the selected block |
| Ctrl + Shift + Left Arrow | Collapse all sections |
| F2 | Rename the selected block |
| P | Open the properties panel for the selected block |
| Ctrl + M | Make the selected block a variable |
| Ctrl + A | Select all visible blocks |
| Delete | Delete the selected block |
| Esc | Exit the search |
| **Shortcut** | **Action** |
| - | - |
| Z | Zoom to the selected block's object |
| V | Toggle the selected block's visibility |
| T | Toggle the selected block's transparency |
| I | Isolate — hide everything except the selected block |
| F | Open the Field Viewer |
| X | Open Section Cut |
| M | Open the Measure tool |
| Alt + G | Toggle the grid |
| Alt + R | Toggle the ruler |
| Ctrl + H | Precise Render |
| **Shortcut** | **Action** |
| - | - |
| Ctrl + N / Ctrl + O / Ctrl + S | New / Open / Save |
| Ctrl + Shift + S | Save As |
| Ctrl + I | Import |
| Ctrl + Z / Ctrl + Shift + Z | Undo / Redo |
| Ctrl + X / Ctrl + C / Ctrl + V | Cut / Copy / Paste |
| Ctrl + Alt + V | Paste with References |
| Ctrl + Q | Exit nTop |
*Parameterizing blocks using block properties allows them to adapt as the design changes*
Dragging a property into the Notebook creates a Variable linked to its source block. In Course 2, we will use Variables and Block Properties together to parameterize relationships between geometry.
## Keyboard Shortcuts
| **Control** | **Mouse Action** |
| - | - |
| Left-click | Select |
| Right-click | Object context menu |
| Right-click + drag | Rotate camera |
| Right-click + drag + Shift, or middle mouse button + drag | Pan camera |
| Right-click + drag + Ctrl, or middle mouse button + scroll | Zoom camera |
| Ctrl + left-click | Select multiple blocks |
| Ctrl + drag | Create an identical, linked instance of a block |
**Note:** Ctrl + drag is not the same as Duplicate. It creates an *identical instance*, so changing an input on one affects the other. Duplicate makes an independent copy. Use Ctrl + drag when you want the two to stay in step, and Duplicate when you don't.
**Note:** nTop also supports a 3Dconnexion Space Mouse for navigating in 3D, though you can't map specific actions to its buttons.
| **Shortcut** | **Action** |
| - | - |
| Ctrl + L | Jump to the Search bar |
| S | Context Search on a selected block; Search in Place on a dividing line |
| Ctrl + F | Open the Left Side Panel and start a Notebook search |
| Ctrl + 1 | Open or close the Left Side Panel |
| Ctrl + 2 | Open or close the Right Side Panel |
| Ctrl + 3 | Open or close the bottom panel |
| Ctrl + D | Show or hide the Ribbon |
| Spacebar | Collapse or expand the selected block |
| Ctrl + Shift + Left Arrow | Collapse all sections |
| F2 | Rename the selected block |
| P | Open the properties panel for the selected block |
| Ctrl + M | Make the selected block a variable |
| Ctrl + A | Select all visible blocks |
| Delete | Delete the selected block |
| Esc | Exit the search |
| **Shortcut** | **Action** |
| - | - |
| Z | Zoom to the selected block's object |
| V | Toggle the selected block's visibility |
| T | Toggle the selected block's transparency |
| I | Isolate — hide everything except the selected block |
| F | Open the Field Viewer |
| X | Open Section Cut |
| M | Open the Measure tool |
| Alt + G | Toggle the grid |
| Alt + R | Toggle the ruler |
| Ctrl + H | Precise Render |
| **Shortcut** | **Action** |
| - | - |
| Ctrl + N / Ctrl + O / Ctrl + S | New / Open / Save |
| Ctrl + Shift + S | Save As |
| Ctrl + I | Import |
| Ctrl + Z / Ctrl + Shift + Z | Undo / Redo |
| Ctrl + X / Ctrl + C / Ctrl + V | Cut / Copy / Paste |
| Ctrl + Alt + V | Paste with References |
| Ctrl + Q | Exit nTop |
 ## What to Take Away
* Treat the Notebook as a reusable engineering workflow, not simply a record of geometry creation.
* Give the Notebook a descriptive name that matches the file name, and add a brief description explaining its purpose.
* Organize blocks into clearly named Sections that reflect the workflow's major stages.
* Use meaningful names for key blocks and Variables so their roles are immediately clear.
* Create Variables for important design inputs that will be reused or adjusted, while leaving intermediate values nested.
* Add comments to document important decisions, assumptions, or non-obvious logic. Comments are searchable and make the Notebook easier to navigate.
* Use Autorun and Manual Run Mode strategically to avoid unnecessary computation while making or testing expensive changes.
* Choose duplication and copy-and-paste methods carefully to preserve references and dependencies where needed.
## What's Next
Now that you know how to navigate the Notebook, work with blocks, and inspect their outputs, the next lesson will look at one of the core ideas behind how nTop creates geometry: signed distance fields, or SDFs.
This documentation is built and hosted on [Mintlify](https://mintlify.com), a developer documentation platform.
## What to Take Away
* Treat the Notebook as a reusable engineering workflow, not simply a record of geometry creation.
* Give the Notebook a descriptive name that matches the file name, and add a brief description explaining its purpose.
* Organize blocks into clearly named Sections that reflect the workflow's major stages.
* Use meaningful names for key blocks and Variables so their roles are immediately clear.
* Create Variables for important design inputs that will be reused or adjusted, while leaving intermediate values nested.
* Add comments to document important decisions, assumptions, or non-obvious logic. Comments are searchable and make the Notebook easier to navigate.
* Use Autorun and Manual Run Mode strategically to avoid unnecessary computation while making or testing expensive changes.
* Choose duplication and copy-and-paste methods carefully to preserve references and dependencies where needed.
## What's Next
Now that you know how to navigate the Notebook, work with blocks, and inspect their outputs, the next lesson will look at one of the core ideas behind how nTop creates geometry: signed distance fields, or SDFs.
This documentation is built and hosted on [Mintlify](https://mintlify.com), a developer documentation platform.