 The Notebook is on the left of the Viewport. You can click and drag the Notebook elsewhere in the window to change its position. Drag the Notebook back to the left hand of the screen, and it will snap back into its original place.
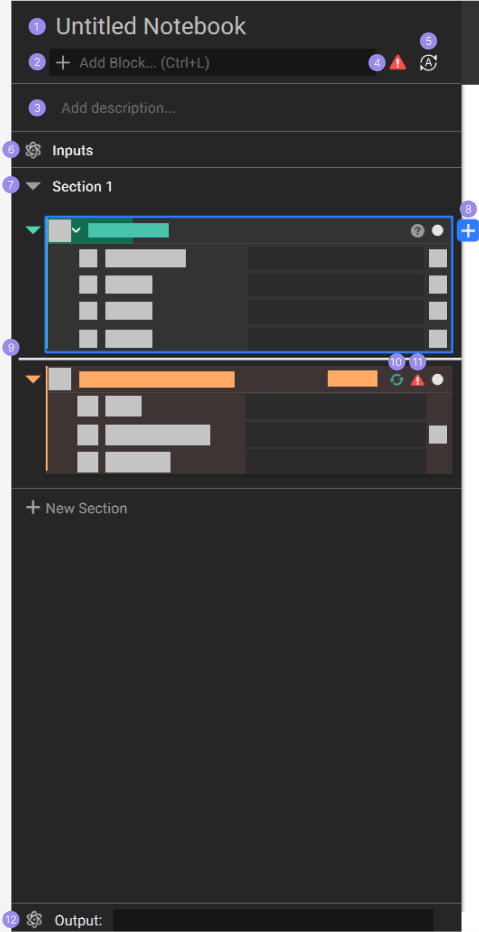
- Notebook Name
- Double-click on ‘Untitled Notebook’ to give your Notebook a name. We suggest using a unique and memorable Notebook name.
- Search bar
- The Search bar is a quick way to add blocks to your Notebook. It searches through the entire database by using the Block Name.
- Click in the Search bar (or use CTRL+L) and start typing the name of the block you are looking to use.
- The search brings up blocks that start with the letter you input. Search results have their Block Color on the left and the Block Name. A tooltip pops up when you hover over a Block Name, which shows you the name, description, and Output Type for that block.
- Notebook Description
- Double-click on ‘Add description’ to give your Notebook a description. Descriptions help you remember the Notebook’s purpose and make it clear what the Notebook is accomplishing when you share it with others.
- Error Log
- An error icon pops up in the top right corner of the Notebook when a block encounters an error. Select the icon to open up the Error Log. Read more here.
- Auto-Update
- This button toggles the Auto-Update feature on or off.
- Toggled On: When turned on, blocks added to the Notebook update automatically when an input is changed, or any upstream block is updated.
- Toggled Off: When turned off, blocks won’t update automatically. You need to select the update button on each block to run the block.
- This button toggles the Auto-Update feature on or off.
- Input Section
- This section creates Inputs for making a Custom Block from your Notebook. Read more here.
- Sections
- All blocks in the Notebook belong to a section. Sections allow you to organize your Notebook by organizing blocks and minimizing sections. Read more here.
- Context Search
- This feature enables searching for blocks within the Notebook. Read more here.
- Placement Highlight
- This highlight indicates your place within the Notebook. New blocks are added to the location of the Placement Highlight.
- Change the Placement Highlight by moving your cursor over the blocks and selecting above or below them.
- Rebuild Block
- This button reruns a block that has failed or been canceled by the user.
- Error Indicator
- Indicates which block has an error.
- Output
- The Output is only needed if you create a Custom Block with your Notebook. Read more here.
- There can only be one Output per Notebook.