

Introduction
Earlier in this learning path, the Automating Workflows and AI Applications lesson introduced nTop’s Command Line Interface (CLI), also known as its headless interface. A Notebook functions as a reusable computational workflow: once its Inputs and Outputs are defined, an external process can provide input values and collect the resulting outputs without requiring manual interaction in nTop.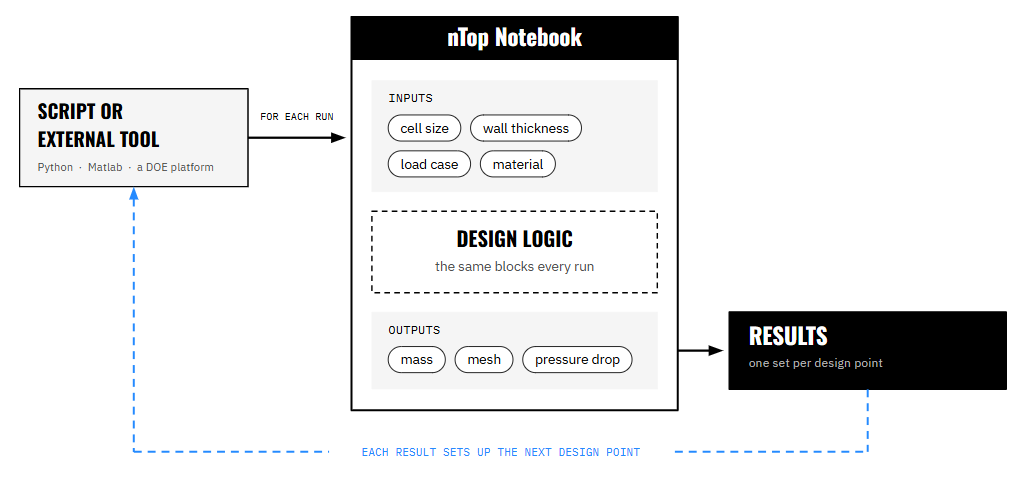
- Prepare a parametric Notebook for headless execution.
- Run a Notebook from the command line with a single set of inputs.
- Use JSON to execute a Notebook across multiple sets of inputs.
- Understand how tools such as Python can further scale and automate these workflows.
Requirements and Setup
Installation and Access
nTop’s Command Line Interface, nTop Automate, is installed as a separate executable alongside the nTop application. On Windows, the executable is typically located at: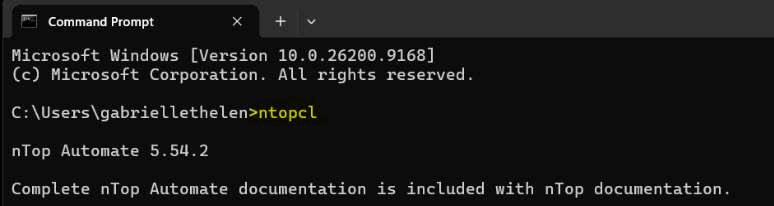
Python Development Environment
If you plan to follow along, download one of the following free software:- Spyder — used throughout this lesson
- Thonny — recommended for beginners
- Visual Studio Code
JSON File Editor
nTop Automate uses JSON files to supply input values to a Notebook and write its output values to a specified file. JSON files are lightweight, text-based files used to store and transport data. They are language-independent, so most programming languages, like Python and C++, can read and write them. To view and edit these files, download Notepad++ or use another text editor that supports JSON formatting. The examples throughout this lesson use Notepad++.Setting up and Running nTop Automate
For the following sections, download and work from the provided nTop File Downloadable Files: Example File Download This file was last updated in nTop 6.03Preparing Your Notebook
A Notebook must have defined Inputs and a single Output before it can communicate with a process outside nTop. This is the same requirement used when packaging a Notebook as a Custom Block. Like a Custom Block, nTop Automate treats the Notebook as a self-contained function: you can supply values designated as Inputs externally, and the value designated as the Output is returned when the workflow finishes executing.Note: Avoid spaces when naming Notebook files and folders in your working directory. If a file or folder name contains spaces, you must enclose its path in quotation marks when entering commands.
Inputs
Convert each variable you want to control during execution into a Notebook Input. You can do this by dragging the variable into the Inputs section at the top of the Notebook or by right-clicking it and selecting Make Notebook Input. Each Notebook Input becomes a parameter that nTop Automate can assign through the command line or an input JSON file.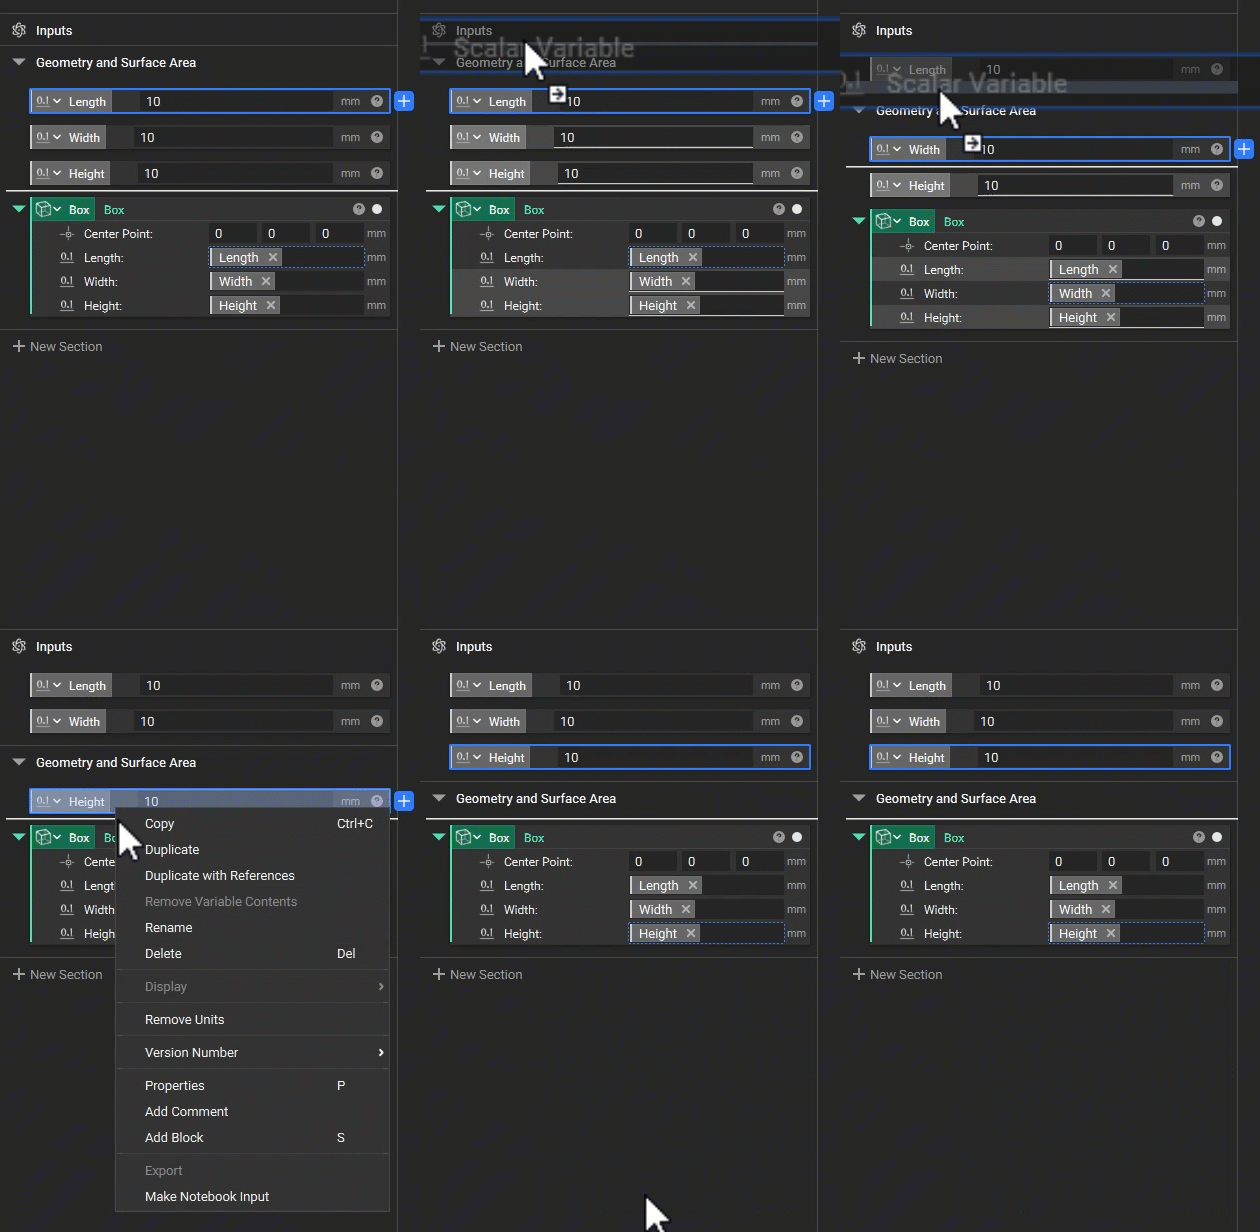
Output
Because this follows the Custom Block mechanism, a Notebook can have only one declared Output. Drag the block or property you want nTop Automate to return into the Output section, or enter its name directly in the Output field.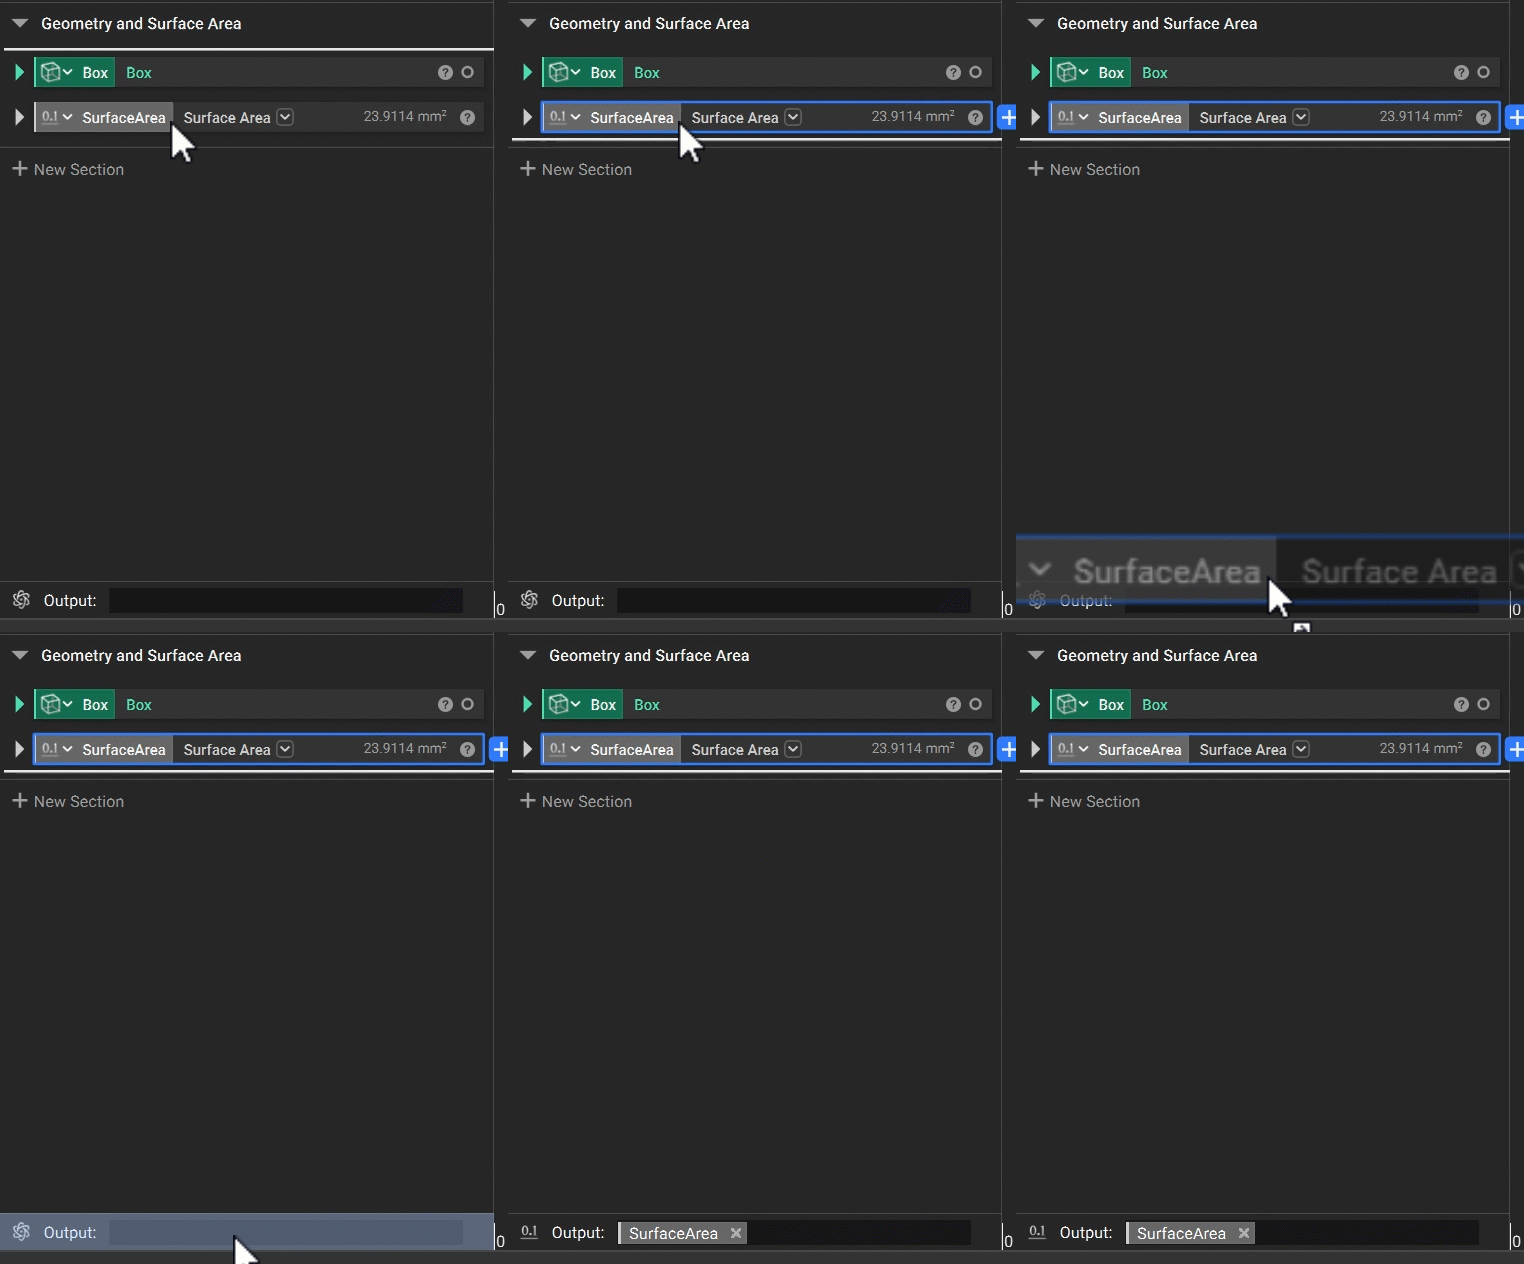
Workflow Validation
Before running the Notebook with nTop Automate, verify that the complete workflow evaluates successfully using the test inputs currently defined in the Notebook.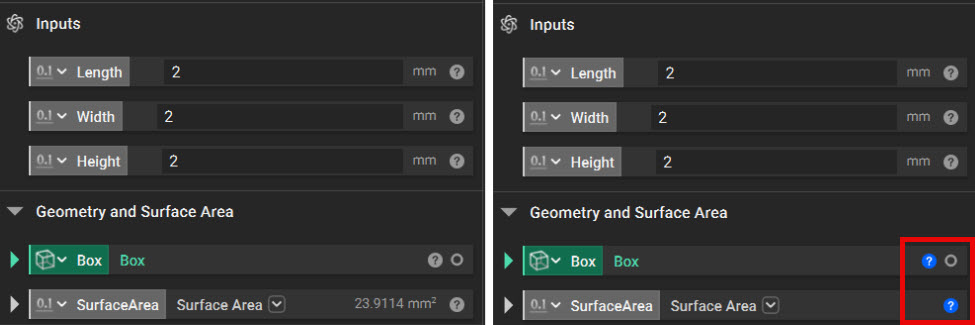
- Every block evaluates successfully, with no unresolved blue question mark (?) icons or error messages. nTop Automate cannot execute a workflow that does not run successfully in the nTop interface.
- The Notebook filename and working-directory path do not contain spaces. Although spaces are supported when the path is enclosed in quotation marks, avoiding them reduces the likelihood of command-line and scripting errors.
Running a Command
There are two ways to provide inputs when executing a Notebook with nTop Automate: directly through the command line or through an input JSON file. JSON is recommended for most workflows because it supports more input types and makes input values easier to identify, modify, and reuse. Entering inputs directly can still be useful for simple workflows and for understanding the structure of an nTop Automate command. To view the available command-line arguments and options, enter the following command in PowerShell or Command Prompt:Method 1: Provide Inputs Through the Command Line
For a simple Notebook, you can enter values directly in the execution command. This method supports only Scalar and Text inputs. Use the -i flag once for each Notebook Input. Values must be provided in the same order in which the Inputs appear in the Notebook: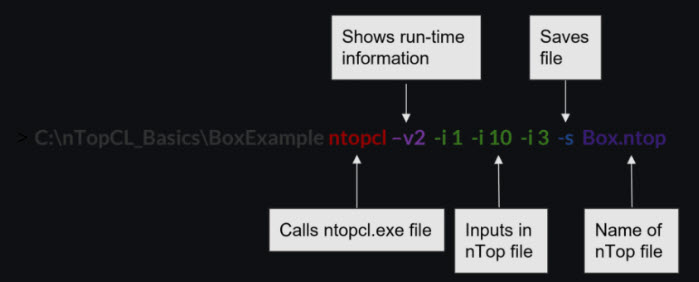
Method 2: Use an Input JSON File (Recommended)
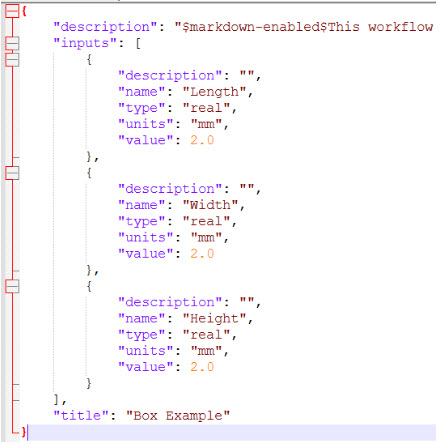
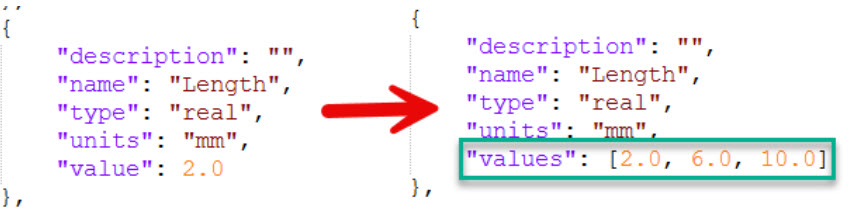
For more complex workflows, use a JSON file to define the input values. This method supports Boolean, Integer, Scalar, Text, File Path, Vector, Point, and Enum input types. Additional information about each type is available in nTop under Documentation → Using nTop Automate → Input. To generate JSON templates for the Notebook, use the -t flag: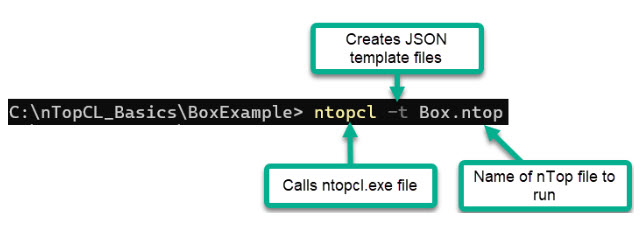

Additional Execution and Troubleshooting Options
The following options can help you test, save, and troubleshoot the workflow:- Run the command with ntop instead of ntopcl to open the Notebook in the nTop interface with the specified inputs. This allows you to inspect the workflow and confirm that it behaves as intended.
- Add the -s flag to save the executed Notebook. This overwrites the existing Notebook file.
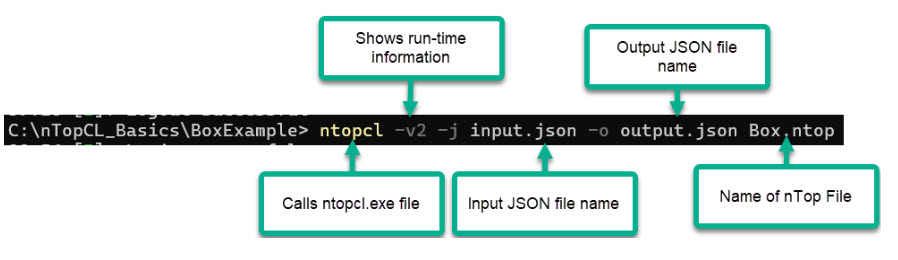
- Add -v2 to enable level 2 verbose logging. The default verbosity level is 1, which displays errors and warnings. Level 2 also displays runtime information that can help identify where a workflow is encountering an issue.
- Add –logfile <LogFile>.txt to save the execution messages to a text file.
Note: In Windows File Explorer, hold Shift, right-click inside the working-directory folder, and select Open PowerShell window here. This opens PowerShell in the correct directory, eliminating the need to navigate there manually.
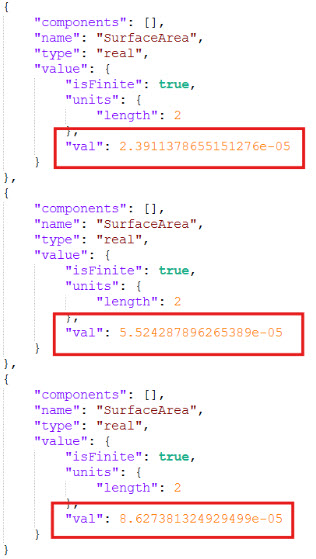
Note: The values in the image above are printed in meters, while the Surface Area block in the file reports the values in mm
Best Practices and Troubleshooting
Before scaling a workflow for automation or integration, verify each stage independently.Verify Your Setup
- Confirm that nTop Automate is installed. Run ntopcl without any arguments:
- Prepare the nTop Notebook. Configure the required input and output variables according to the recommendations in the Preparing Your Notebook section.
- Generate the JSON templates.
- Test the workflow with verbose logging. Adding -v2 instructs nTop Automate to display detailed runtime information. Modify the input JSON file with the desired values, and then run:
- Verify the results. Open Output JSON file and compare its values with those produced by the same inputs in the nTop GUI. If the results differ or the workflow fails, use the troubleshooting guidance below.
Troubleshooting
Example commands and scripts may behave differently depending on the operating environment, licensing configuration, and Notebook setup.Licensing Issues
When using a cloud license, nTop Automate automatically reuses the cached credentials from an active nTop login. If the machine is not already authenticated, credentials can be supplied directly:Error Messages and Logging
If an error message does not clearly identify the problem, add -v2 to display detailed runtime information:Input Issues
If an input does not appear to be reaching the Notebook, replace ntopcl with ntop to open the Notebook in the GUI with the specified inputs applied:Exporting Additional Files
Export blocks write files to the specified directory each time the Notebook executes. Use these blocks when the workflow needs to generate files in addition to returning its declared Notebook Output. For example, combine Text from Scalar with Export Text to write the Notebook Output or other calculated values to a .txt file during each nTop Automate execution. You can also use one or more Concatenate Text blocks with property chips to incorporate relevant input values into exported filenames. This makes it easier to identify files produced by different input configurations. For guidance on converting and combining scalar values as text, refer to this Help Center article. You can use the same approach to construct a complete output path dynamically. Define each level of the folder structure as a separate Notebook Input, and then concatenate those values to create the desired path.Note: Export blocks, such as Export STL and Export Text, execute during every run regardless of which value is designated as the Notebook Output. Use them for any additional files that should be written to disk with each execution.
Scaling nTop Automate Workflows with Python
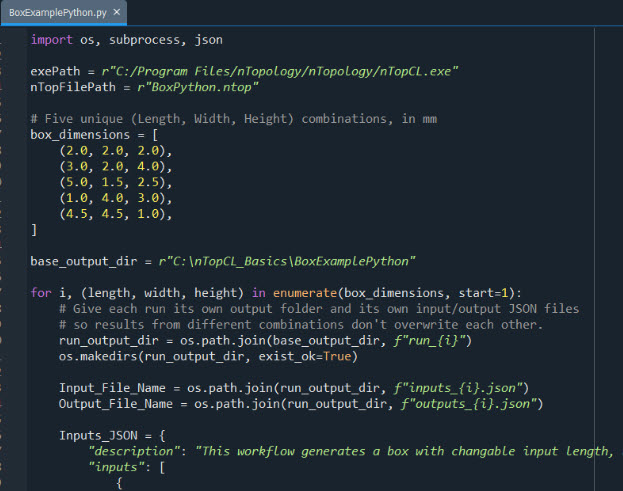
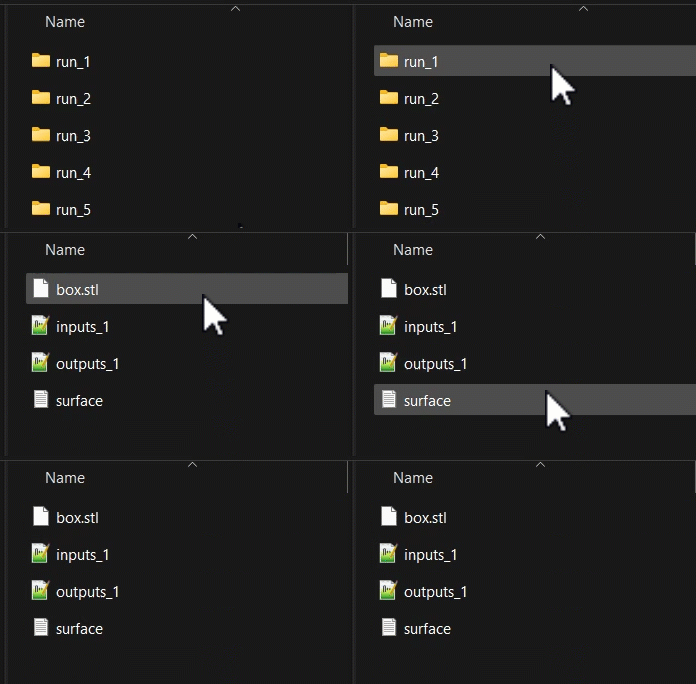
After completing the five-step validation process outlined in the Best Practices and Troubleshooting section, you can use Python or another scripting language to batch-process the workflow or integrate it with external software. The provided nTop Notebook and Python script will serve as the reference files for this section. The Notebook, BoxPython.ntop, includes an Output File Generation section that demonstrates how Export blocks can generate additional files alongside the declared Notebook Output. For guidance on converting scalar values to text and combining them for filenames or file paths, refer to this Help Center article. Downloadable Files: nTop File Download This file was last updated in nTop 6.03 Python File: BoxExamplePython.py The Python script executes BoxPython.ntop five times through nTop Automate, using a different combination of Length, Width, and Height for each run. For every combination, the script:- Creates a numbered subfolder, from run_1 through run_5, within the designated output directory.
- Writes the input and output JSON files to the corresponding run folder.
- Executes the Notebook with the specified dimensions.
- Saves the generated STL and surface-area text file in the same run folder.
- Prints the command-line output and any errors after each execution.
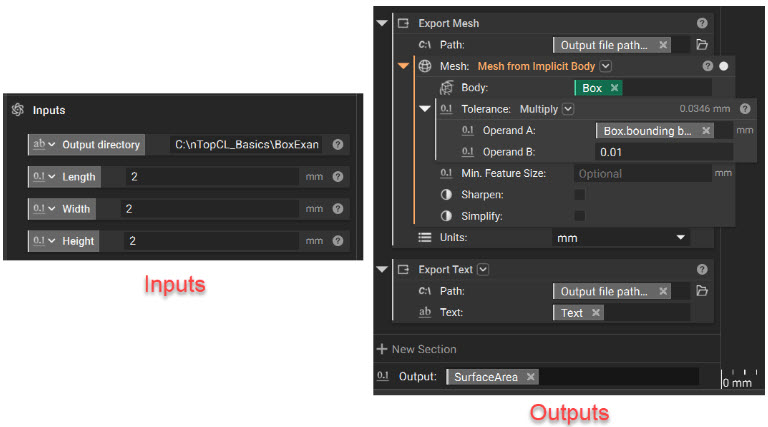
- Prepare the nTop Notebook. Define the following values as Notebook Inputs:
- Length
- Width
- Height
- Output Directory
Note: Replace the sample output-directory path in the provided nTop file with a valid directory on your computer. The existing path is provided only as an example and will not work in your local environment.
- Generate the JSON templates. Use the -t flag with nTop Automate to generate the input_template.json and output_template.json files for the Notebook:

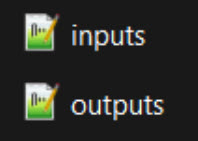
Note: In this example, input_template.json and output_template.json are renamed inputs.json and outputs.json, respectively, as shown in the image below.
- Open and run the Python script. Open your preferred Python code editor and create a .py file for the script that will generate the input JSON files and execute the Notebook with multiple sets of input values. For this example, open the provided .py file and run it from your code editor.
- An STL file of the generated box
- A text file containing the calculated surface area
- The input JSON file used for the iteration
- The output JSON file returned by nTop Automate
What to Take Away
- nTop Automate enables headless execution of nTop Notebooks. Once a Notebook has defined Inputs and a single Output, external processes can supply parameters and collect results without manual interaction in nTop.
- JSON files are the recommended way to supply inputs. They support a wider range of input types, clearly associate values with their parameters, and can be reused for multiple design configurations.
- Validate the workflow before scaling it. Confirm that the Notebook evaluates successfully in nTop, generate and test its JSON templates, and compare nTop Automate results with those produced in the nTop interface.
- Logging and diagnostic options simplify troubleshooting. Commands such as -v2, –logfile, and ntop help identify execution errors, inspect applied inputs, and verify workflow behavior.
- Export blocks can generate additional files during every execution. Use them to write files such as STL and text outputs alongside the Notebook’s single declared Output.
- Python can scale and integrate nTop Automate workflows. A Python script can automate multiple design iterations, organize and collect their results, and connect nTop workflows with external tools, data sources, simulation software, or broader engineering processes.