

Automation and Custom Blocks
Utilizing nTop’s automation capabilities can significantly lower the time to create your designs. If you are working with a design you plan to implement across multiple parts, it is very easy to automate and package that workflow across those designs. The key concepts to consider when automating your process are utilizing custom blocks, list processing, and nTop Automate. In this course, we will focus on creating custom blocks (CBs) and list processing to repeat workflows across multiple nTop files and to run through iterations. The process for using a custom block is as follows:
Benefits of Using Custom Blocks
- Readability: CBs are easier for a user to digest.
- Repeatability: If you use the same process multiple times, you can use a CB instead of repeating those steps.
- Controlling the areas a user can change: If you share a workflow, you may only want a colleague to change a few parameters. Using a CB will yield a gated view of a workflow.
Overloads
Certain blocks in nTop have what is called an Overload, which means they have multiple input configurations and may have the option to return different Output types. Not every block function has an overload. If an overload exists, a chevron icon will appear next to the block’s name. Clicking this icon will open a drop-down menu that contains the block’s overloads to choose from. For example, the Add block has several overload configurations to choose from for both Operand A and Operand B inputs. The gif below demonstrates selecting different overloads for the Add block.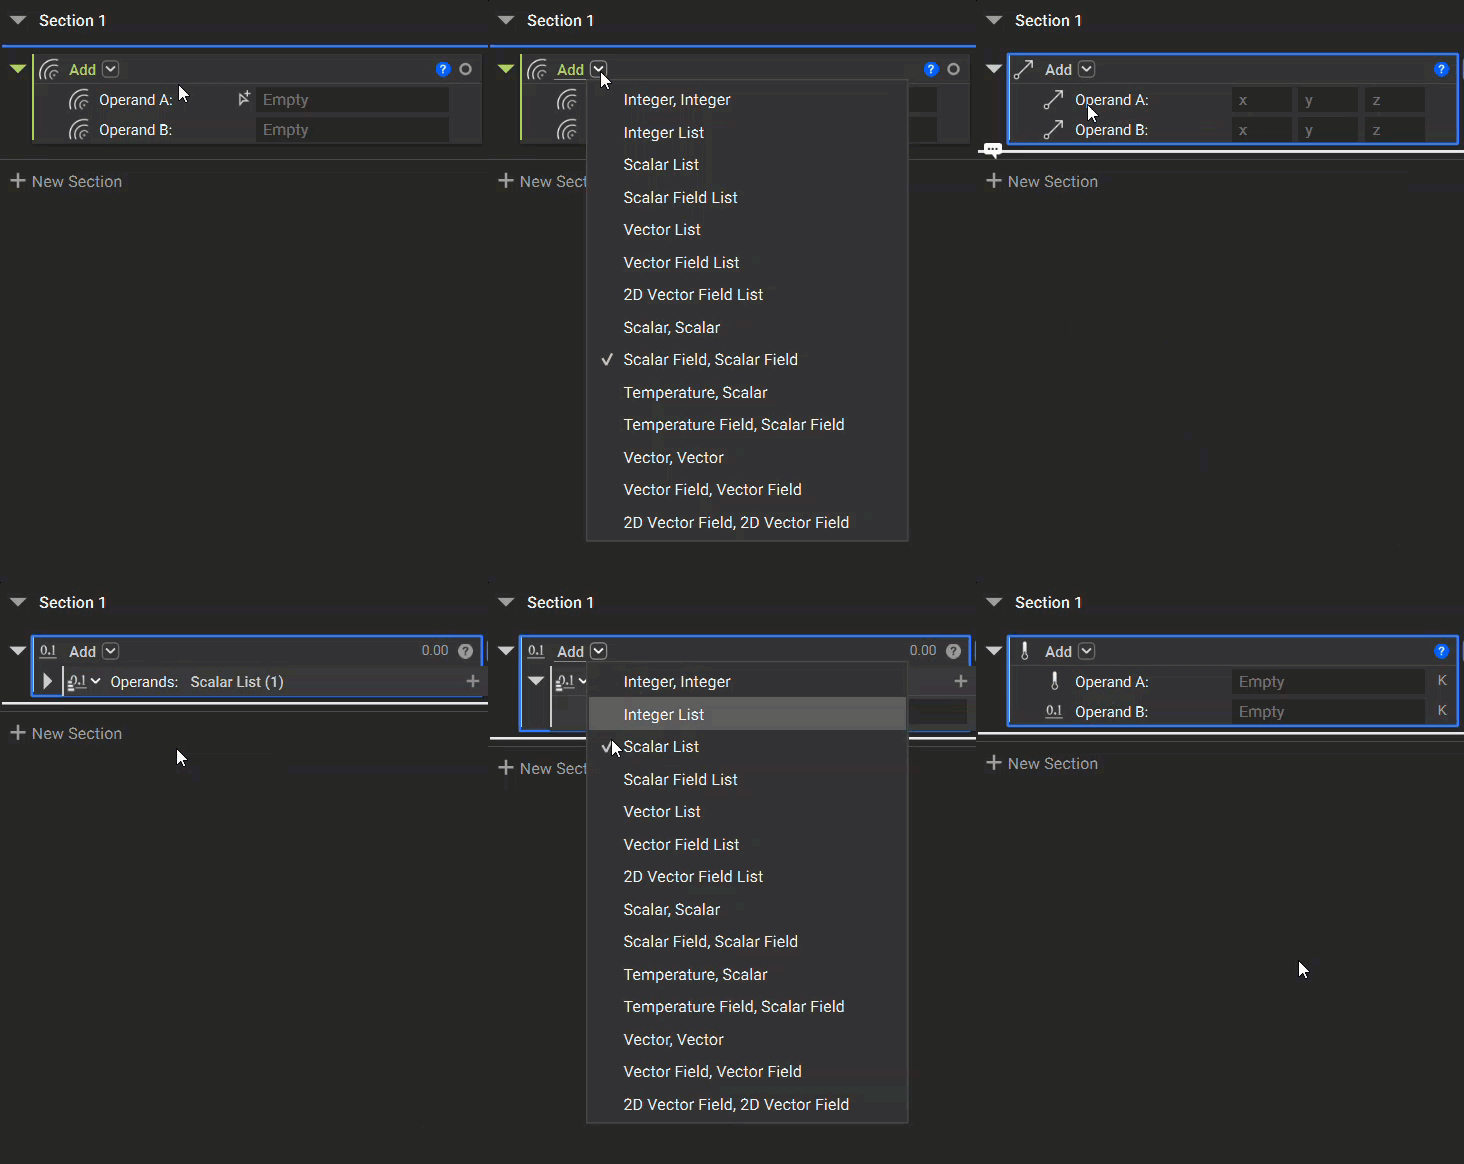
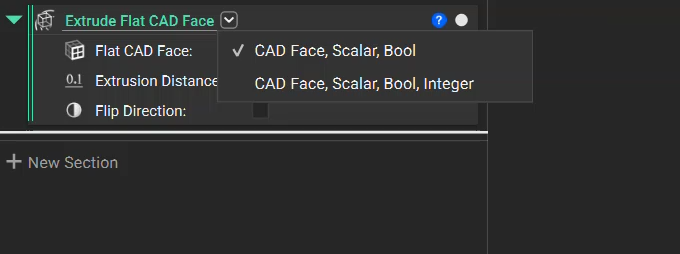
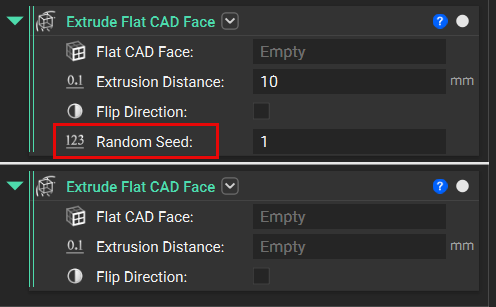
Note: In the upcoming sections, we will explain how to create your own Custom Block and Overloads.
Creating a Custom Block
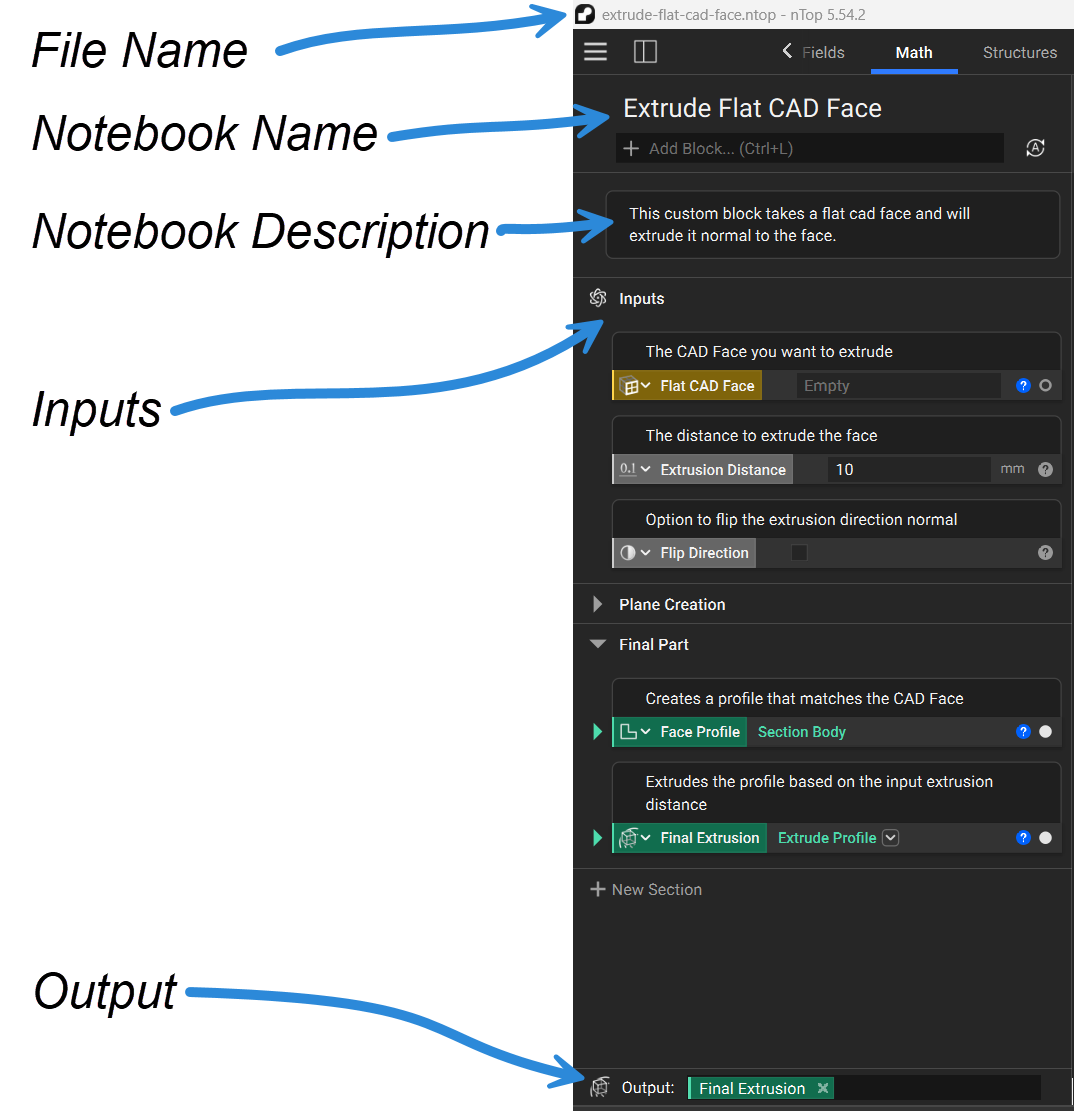
The process overview for creating a CB is shown below. First, create the nTop workflow as you normally would. We recommend saving this workflow before you create your CB, because once you begin to create the CB, you may be altering the workflow.
Notebook Title and Description
The name and description of the custom block are taken directly from the notebook’s name and description. We recommend naming your custom block based on its functionality and purpose. We also recommend writing a description to help you or your colleagues understand what the CB does.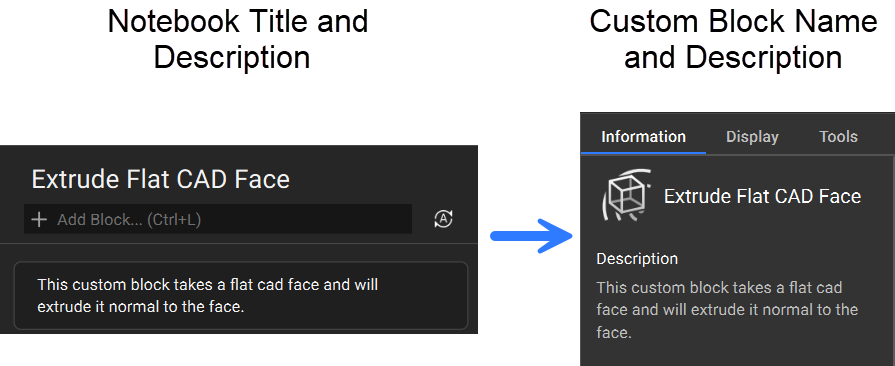
Defining Inputs
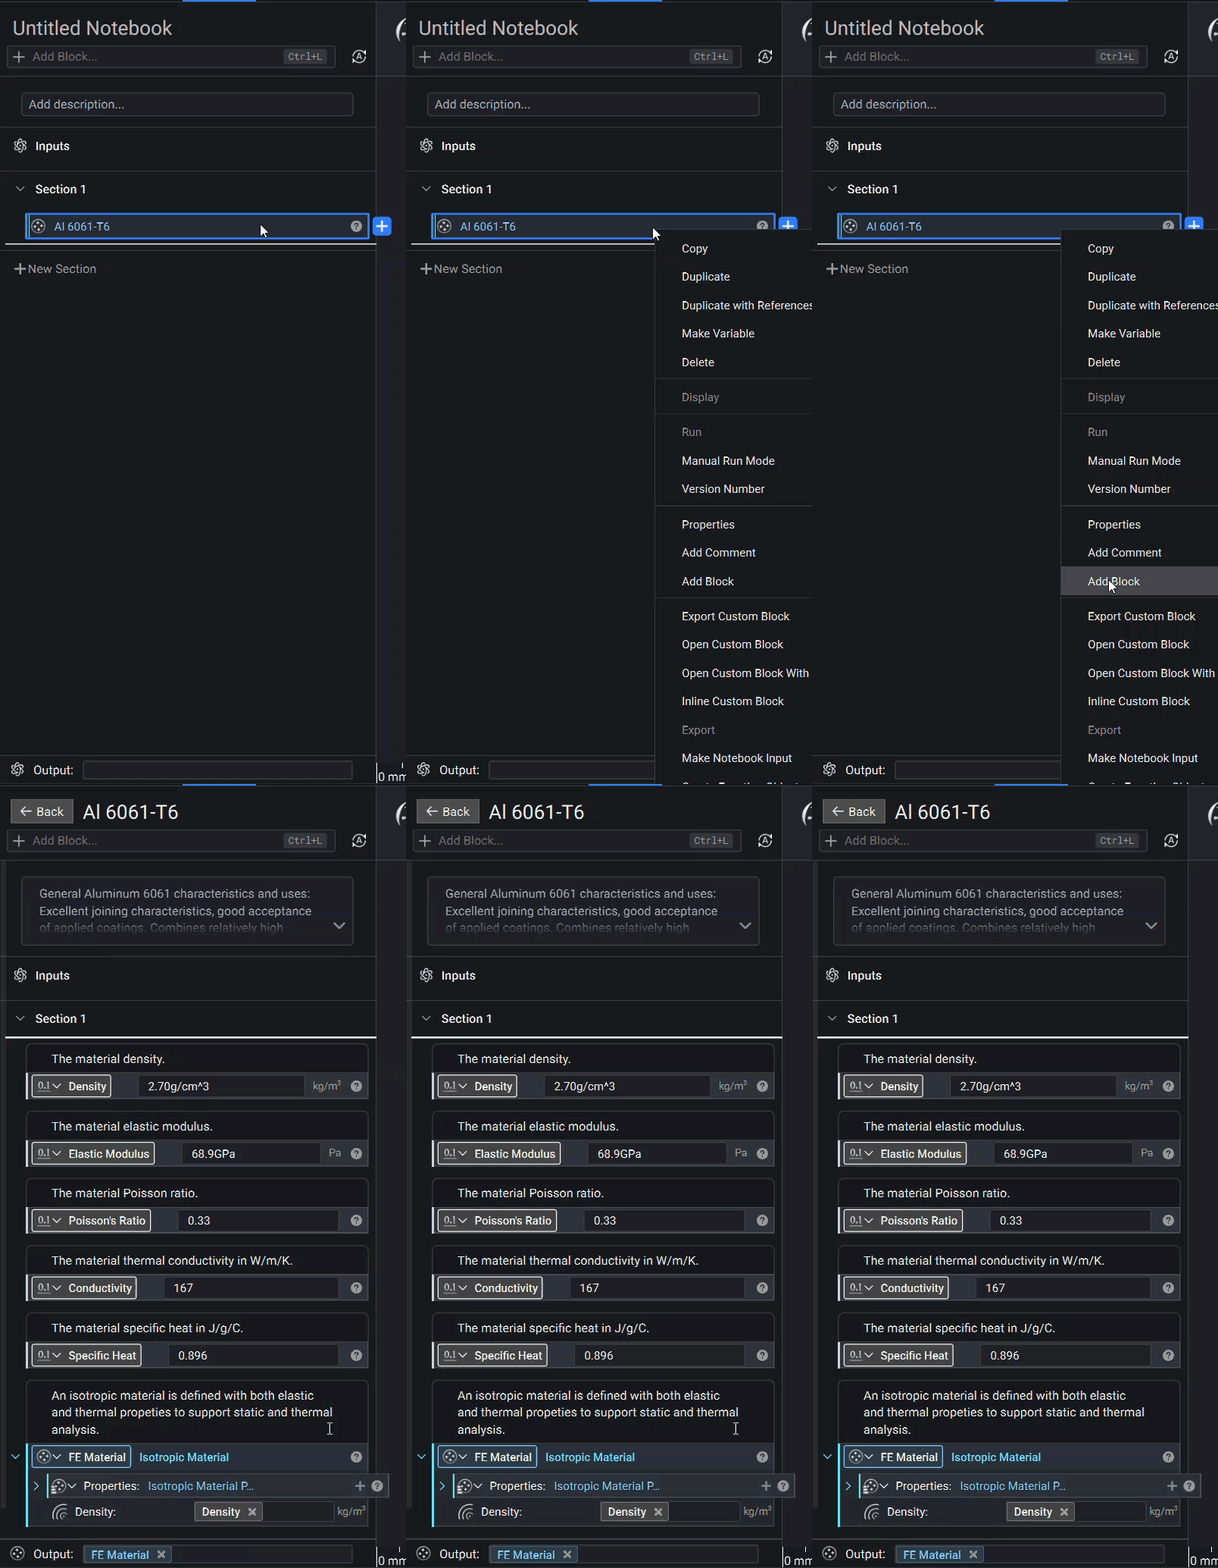
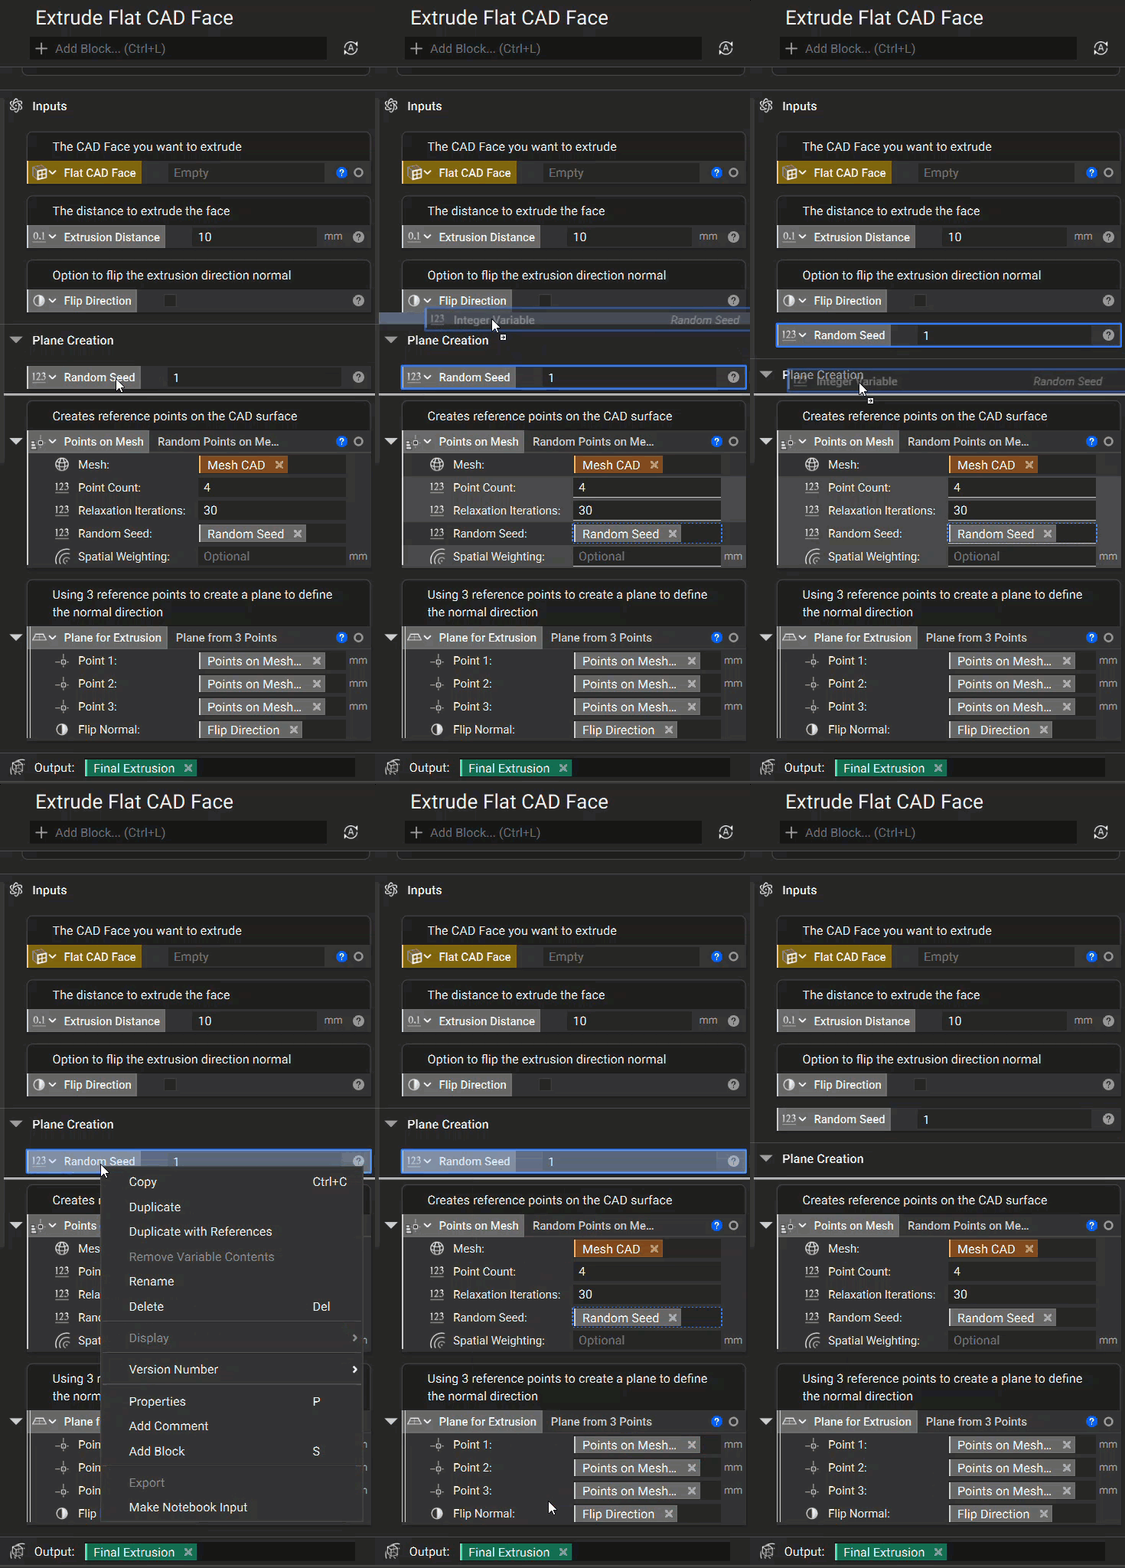
To define the parameters of the CB, we need to place those variables in the Inputs section of the notebook.- Identify the parameters that you want to define as inputs for the CB.
- Turn those parameters into named variables (Right-click -> select Make Variable, or Ctrl+M).
- Move those named variables into the Inputs section of your notebook (drag and drop, or right-click -> select Make Notebook Input).
Block Type
Before importing your CB into another notebook, you could change the block type of your inputs. For instance, Spatial Weighting is a scalar variable in the example below. However, if you intend to have varying spatial weighting and uniform values, you must change the block type to a scalar field. To do this, click the chevron icon and change it to the desired block type. Once you export this notebook, you will not be able to change that type, so we recommend changing the variable type to the broadest option.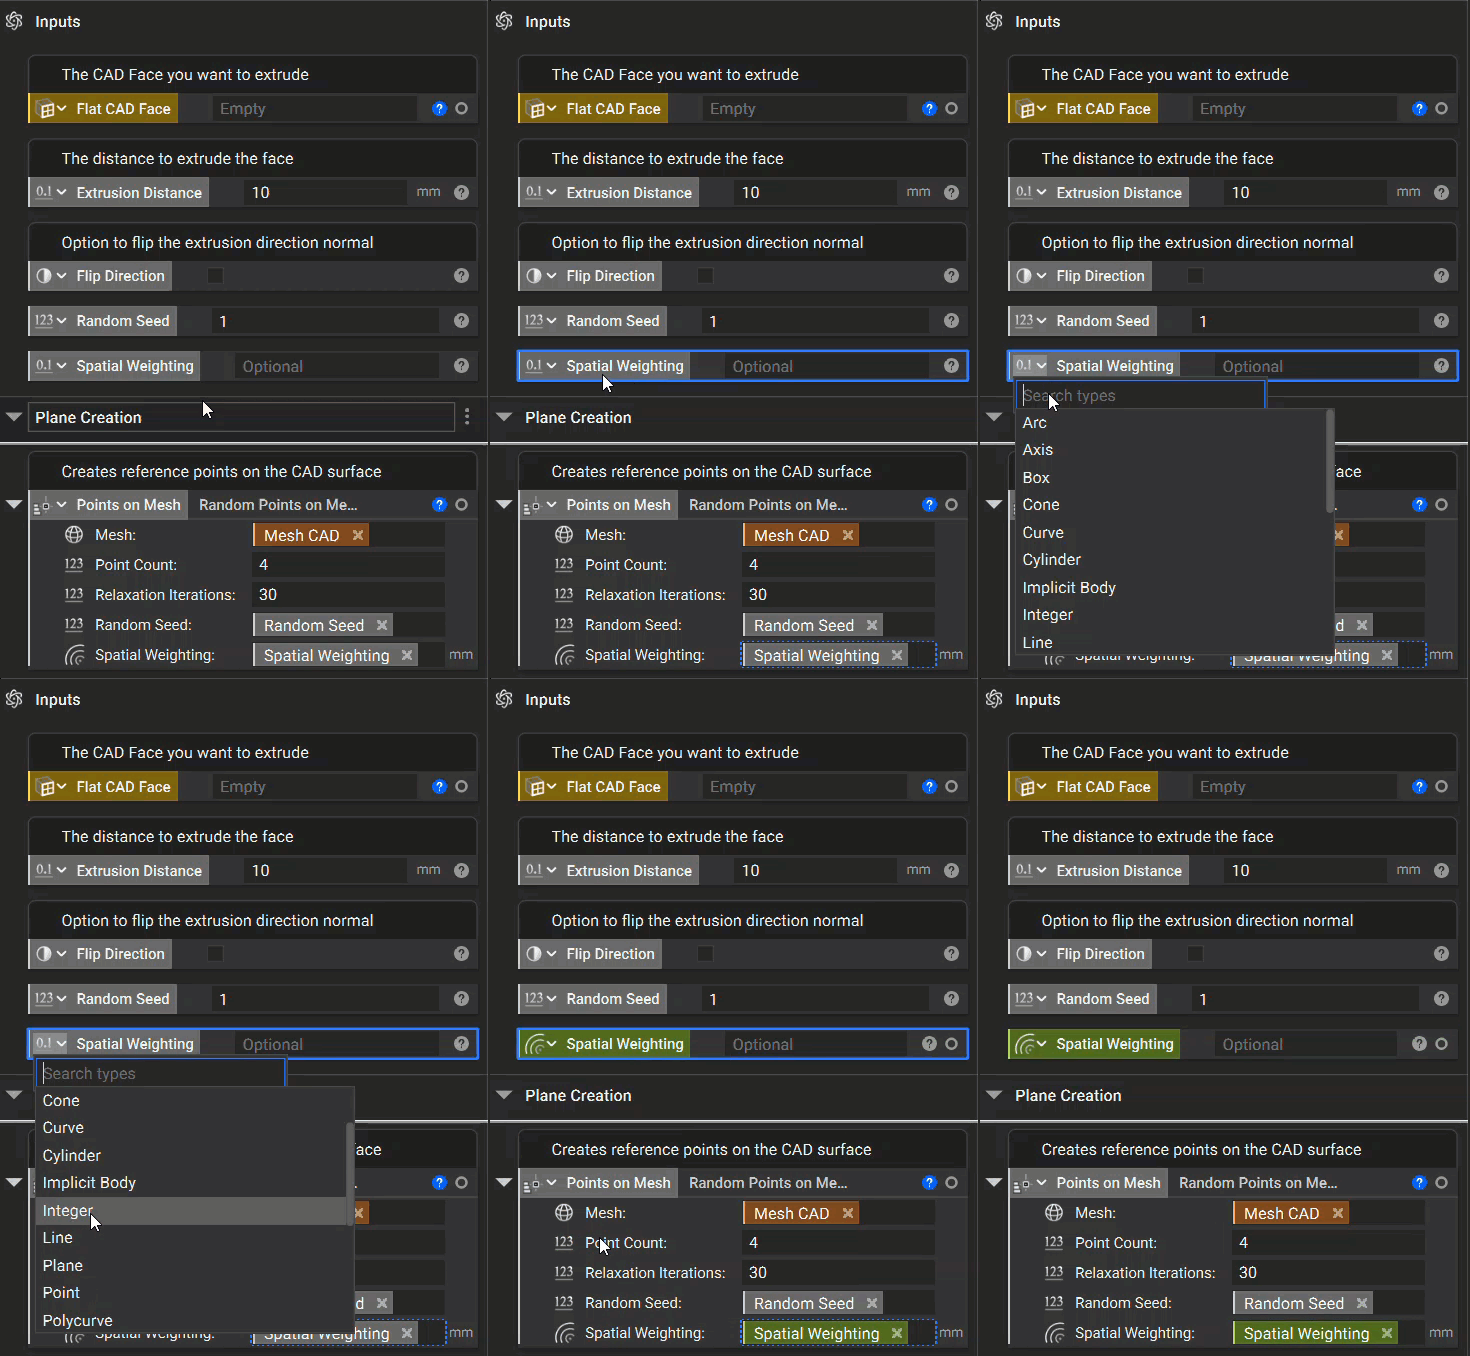
Commenting
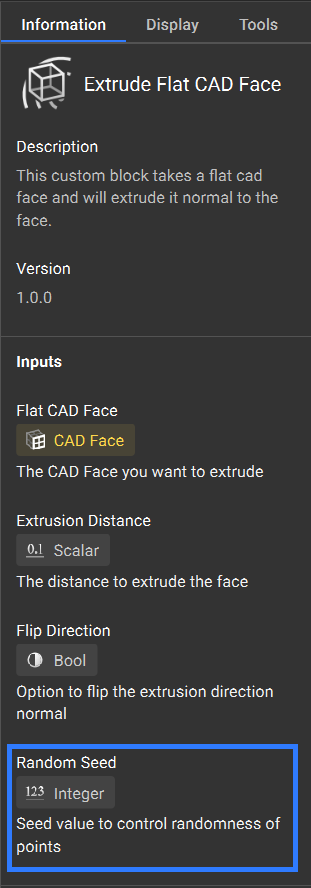
The custom block input name and descriptions will be taken from the notebook’s input name and description. Before exporting, we also recommend adding comments to your inputs. This will help others understand key information regarding those inputs in your CB, whether that is a longer description of the input or a recommended range of values for that input. To add a comment, right-click the variable and select “Add Comment”.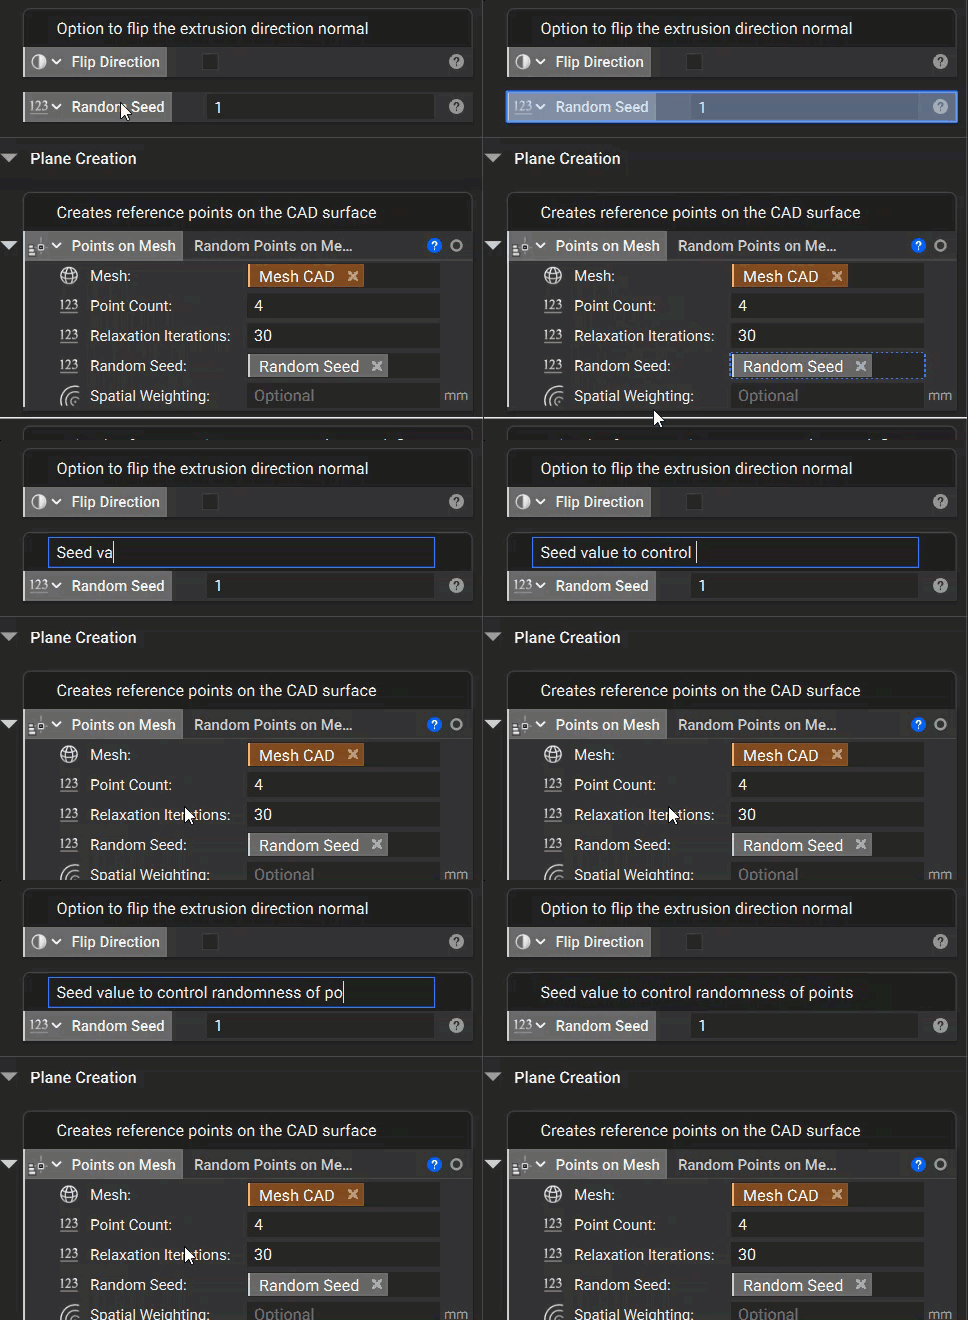
Defining an Output
The other key area when creating a CB is the Output. Any notebook with a defined output can be repackaged into a single, customized block, complete with custom inputs and descriptions. To add an output, simply drag the block into the Output section of the notebook.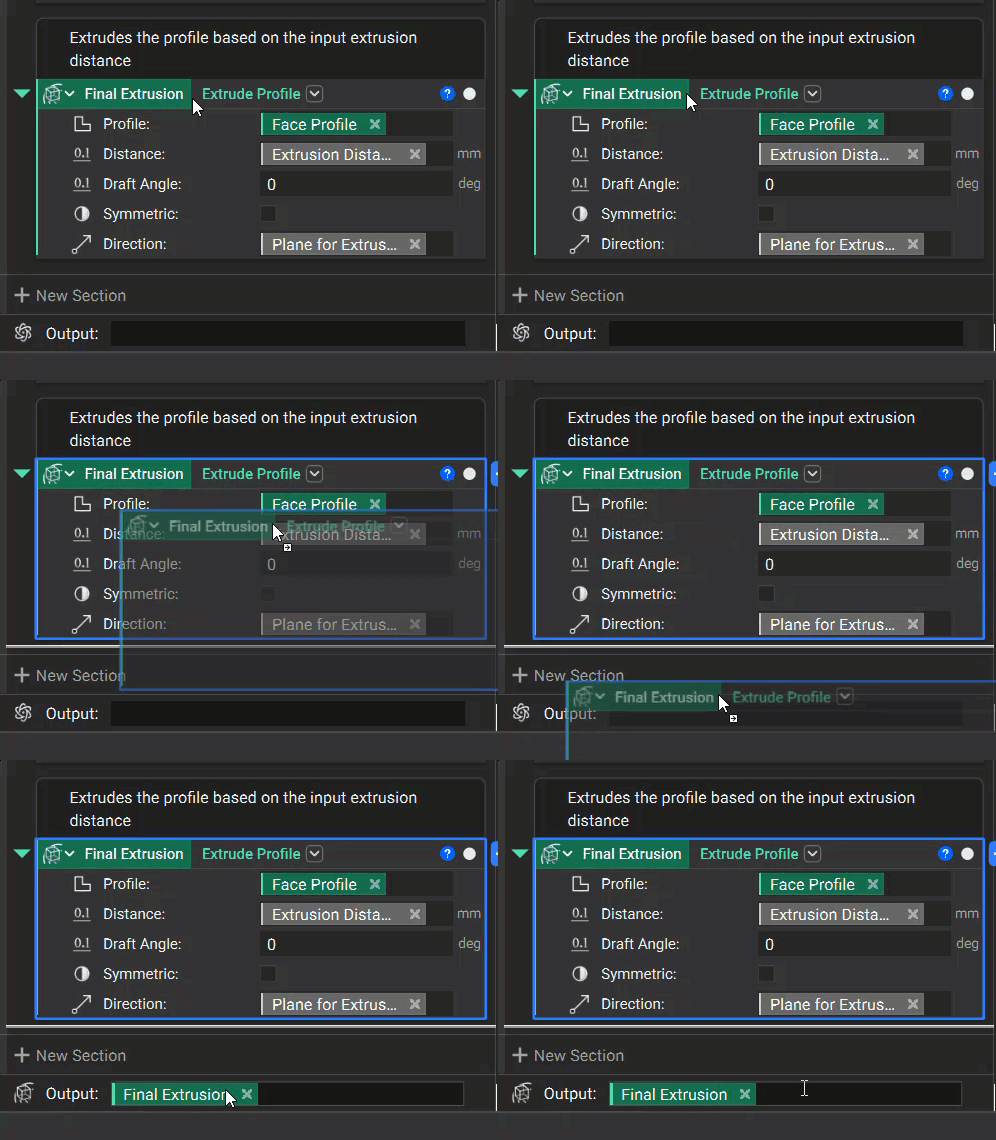
Creating a Custom Block Overload
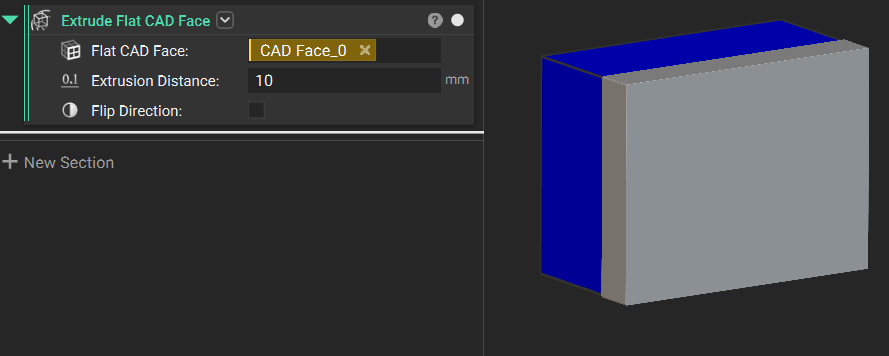
- Create a valid custom block. For this example, we will use Extrude Flat CAD Face.
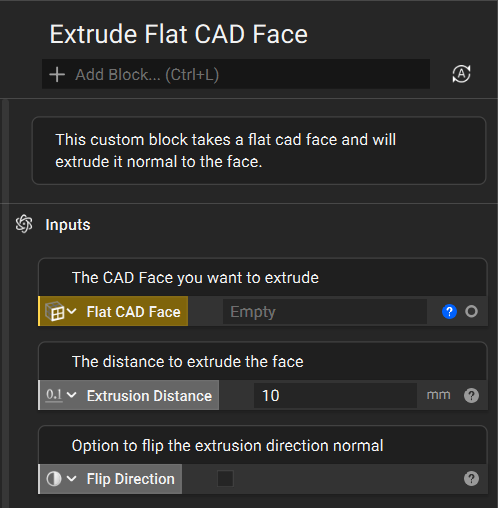
- Open the folder where the file is saved. Copy and paste the file in the same folder

- Open the copy of the custom block, make the change you would like for the overload function, and save it. For this example, we are adding the Random Seed input.
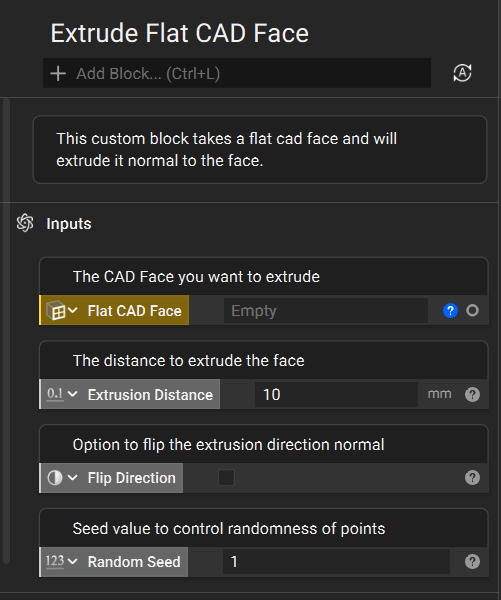
- Your custom block is now set up for an Overload. To test that it functions correctly, you will need to import both versions of the block and verify that the chevron icon appears next to the block’s name. The gif below shows our new CB with a working Overload.
Note: The next section will teach you how to import custom blocks so that you can test it yourself.
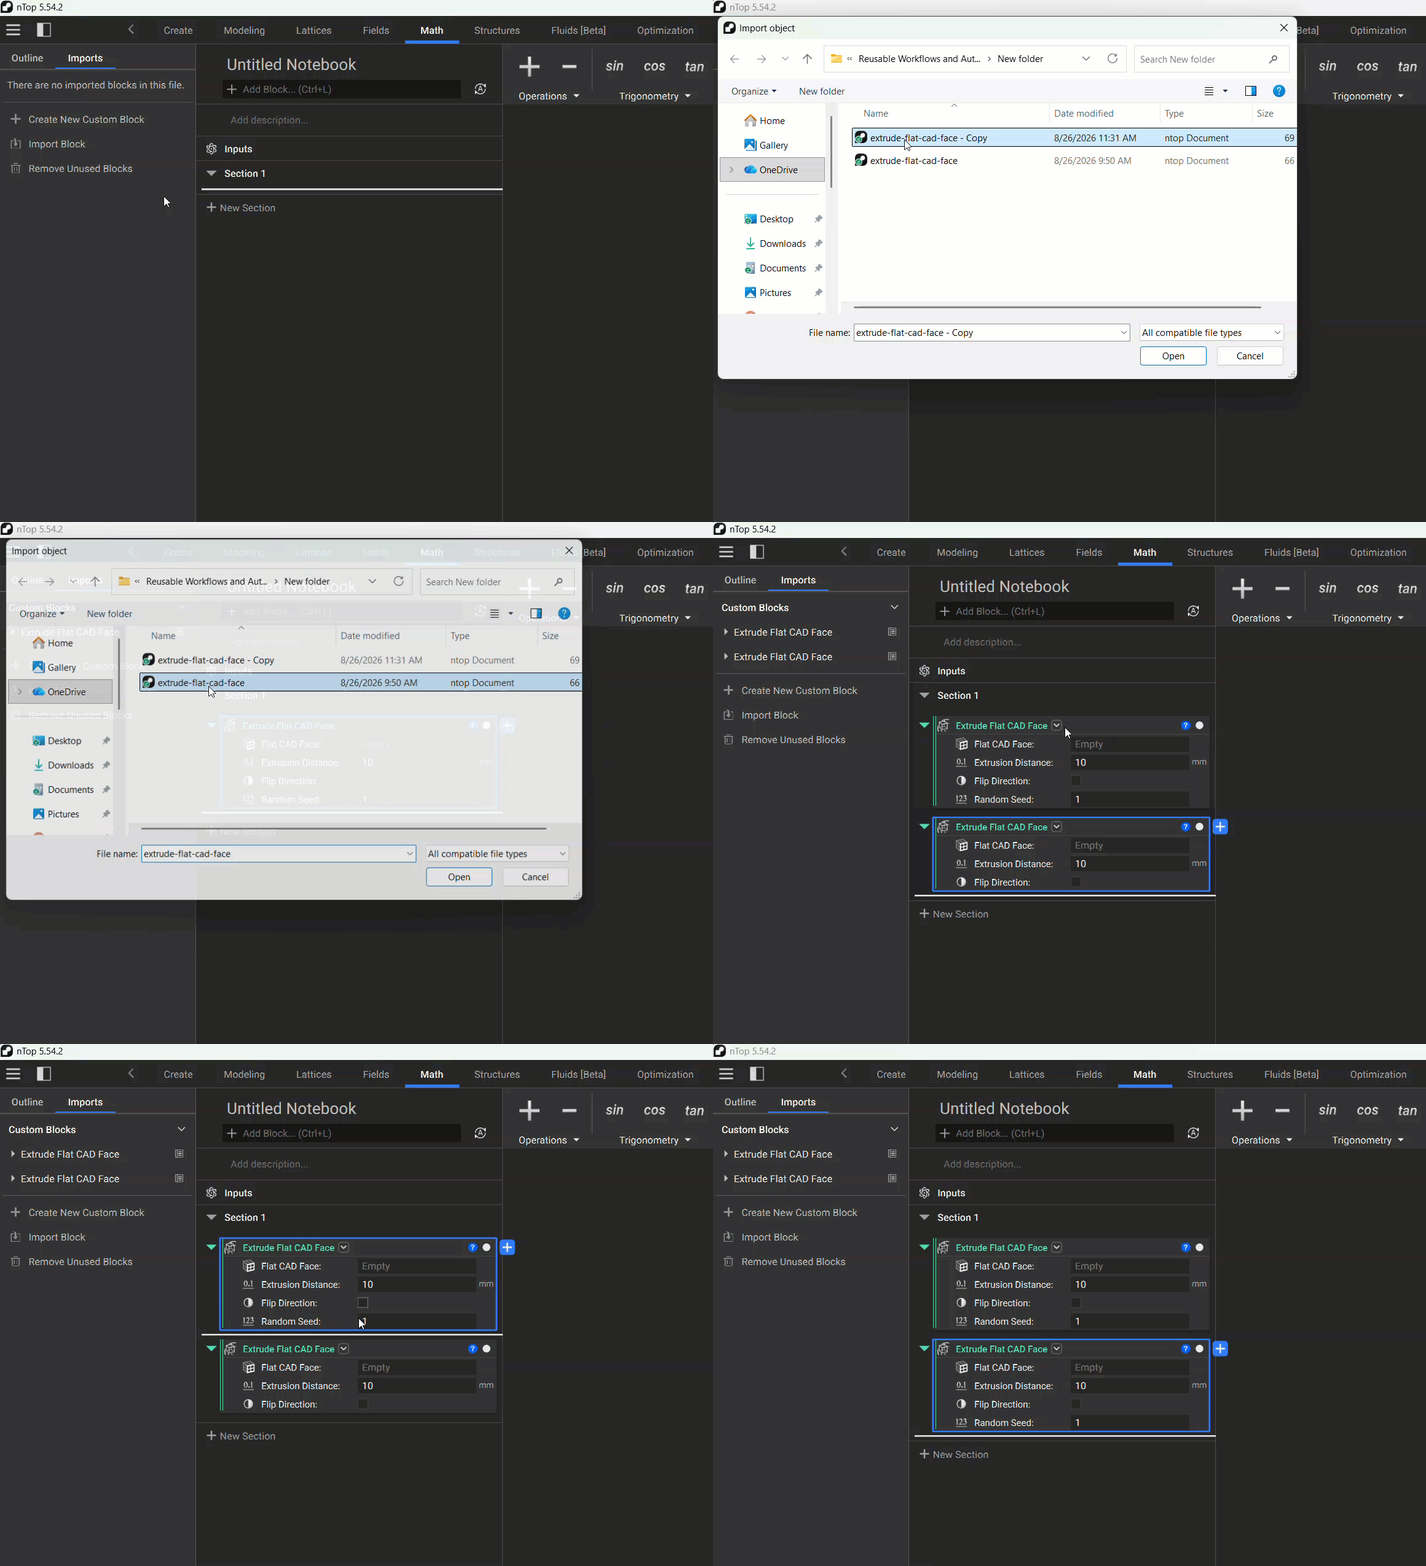
Importing a Custom Block
Once you have created a custom block, the next step is to implement it in another workflow in a separate nTop file. There are a few ways to import a CB into your notebook:- Importing the CB by going to the nTop menu icon → File → Import or use the shortcut Ctrl+I and selecting the corresponding nTop file
- Saving the CB in My Blocks Folder
- Open the Left Panel → Select the Import tab → Import Block
My Blocks Folder
If you use a CB frequently, we recommend saving it in your My blocks folder as shown below (file path blurred). The default folder is in the nTop folder under Myblocks. Once the block is saved in this folder, it will automatically be imported into your notebooks and available for use. Simply search for the block in the search bar to add it to your workflow.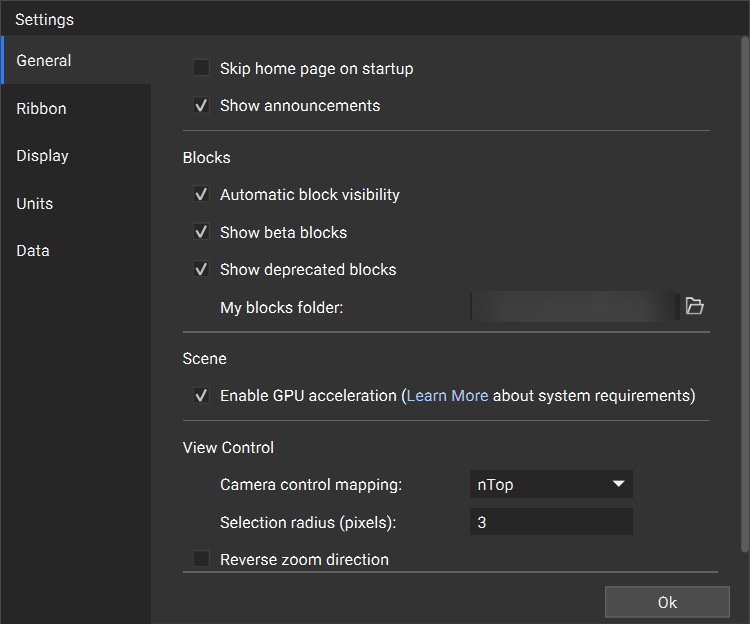
Import using the Left Panel
The last option to import a CB is to open the Left Panel, select the Imports tab, and click “Import Block” to select the corresponding nTop file. All imported files will be listed under the Custom Blocks section of the Imports tab. If you have multiple variations of the same custom block imported, the block version will be labeled next to the block name.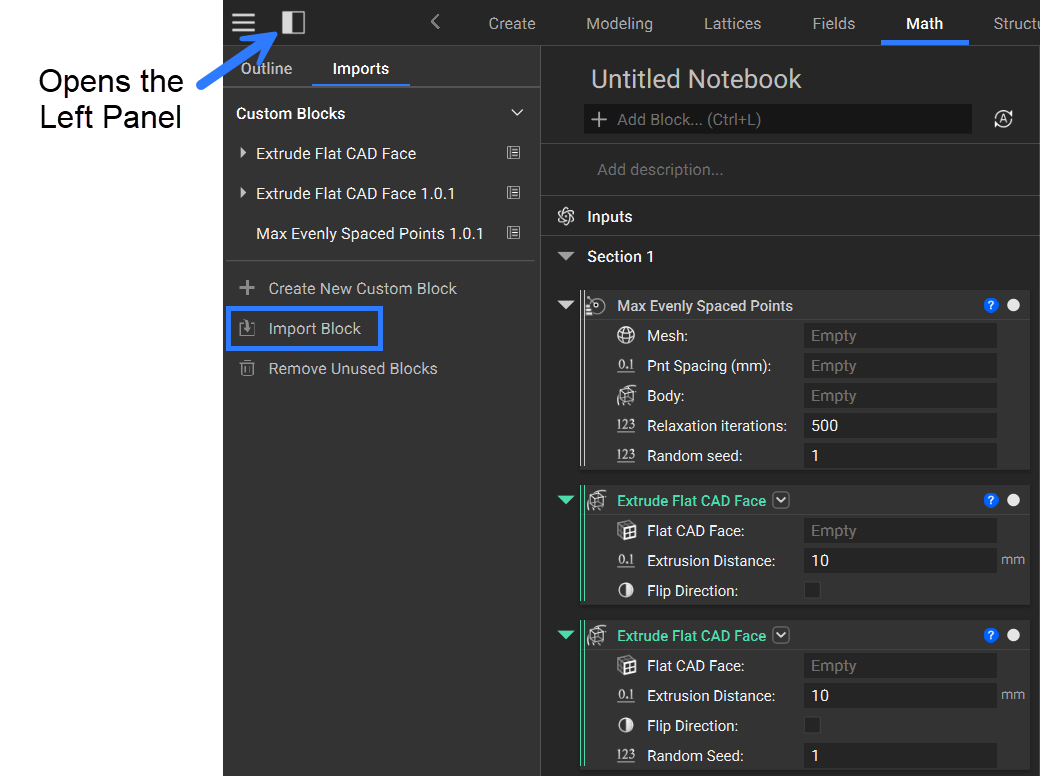
Using Imported Custom Blocks
Once you import the CB, you can add it to the notebook by searching for its name in the search bar. When imported, the CB will appear as a single block in the body of the notebook.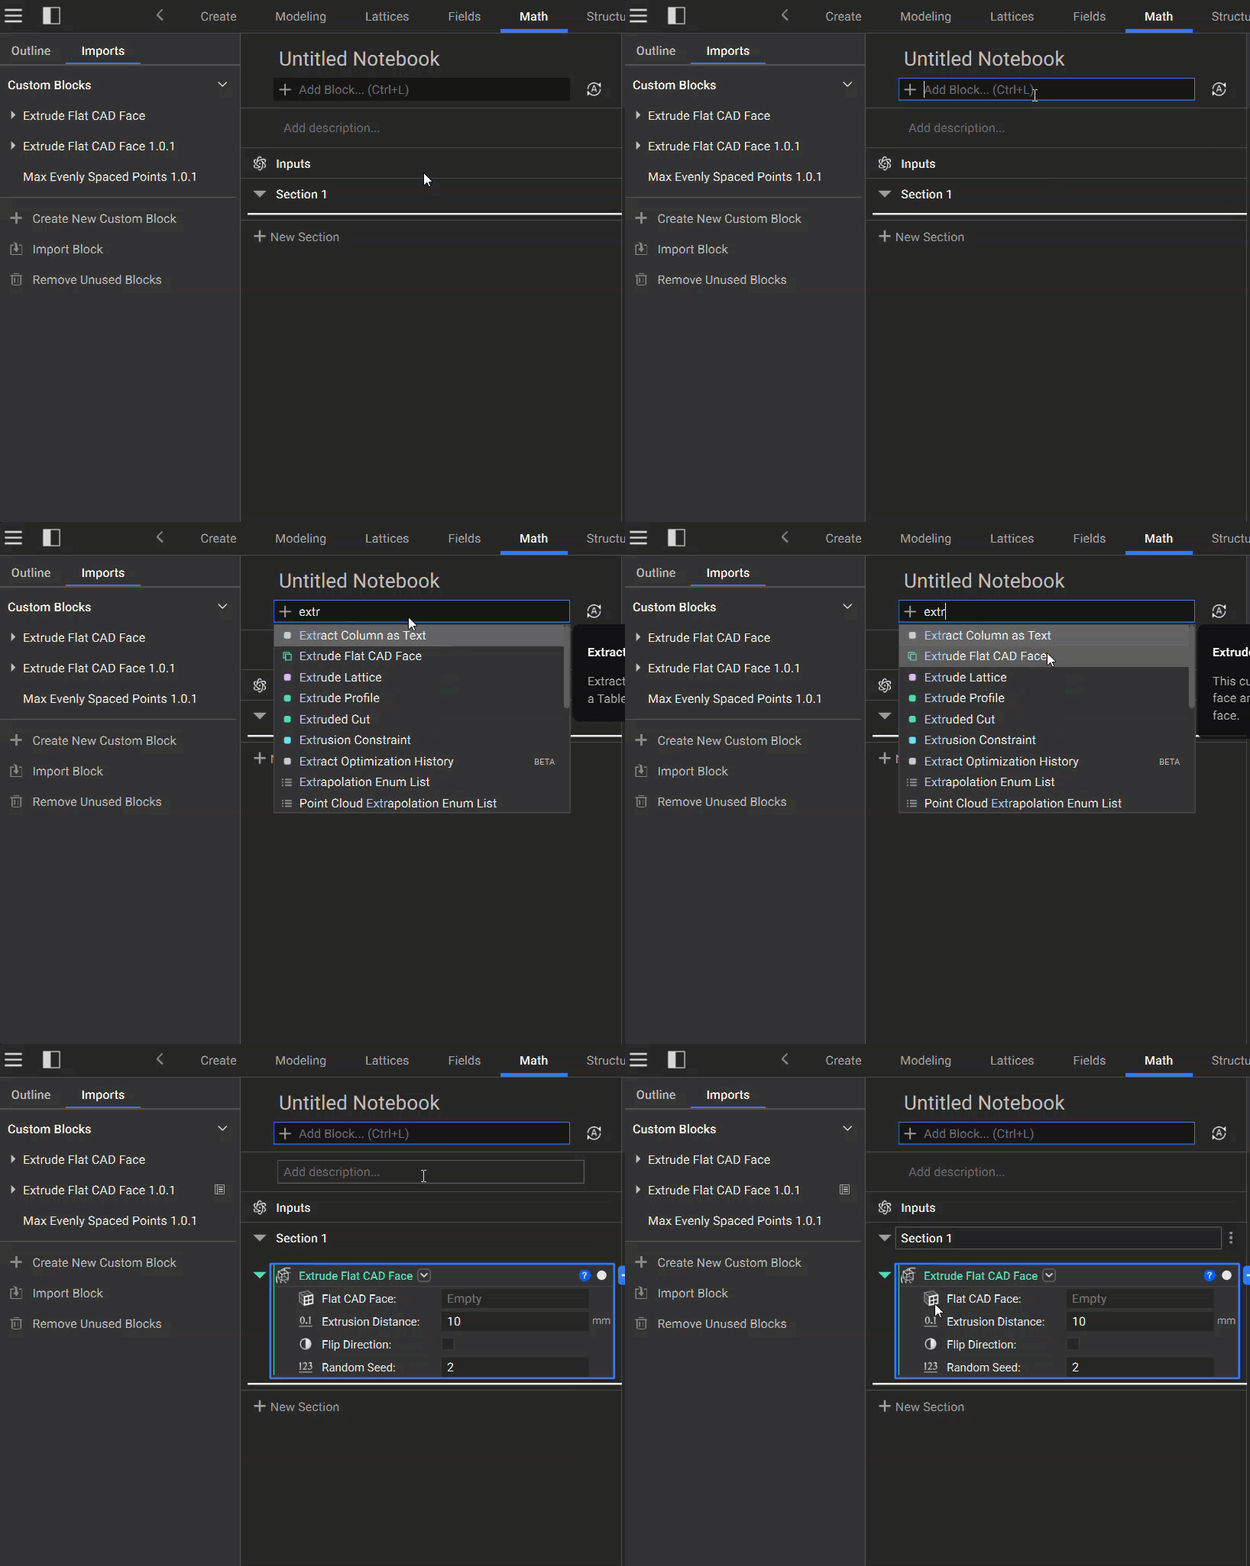
Deleting Unused Blocks
We recommend deleting unused custom blocks to decrease file size, improve opening speed, and maintain organization. You can only delete imported blocks from the Left Panel that are unused in the notebook. You can also click the “Remove Unused Blocks” to remove all the unused imported CBs. Blocks appearing at least once in a workflow are marked with a notebook icon in the Imports tab, like in the example below.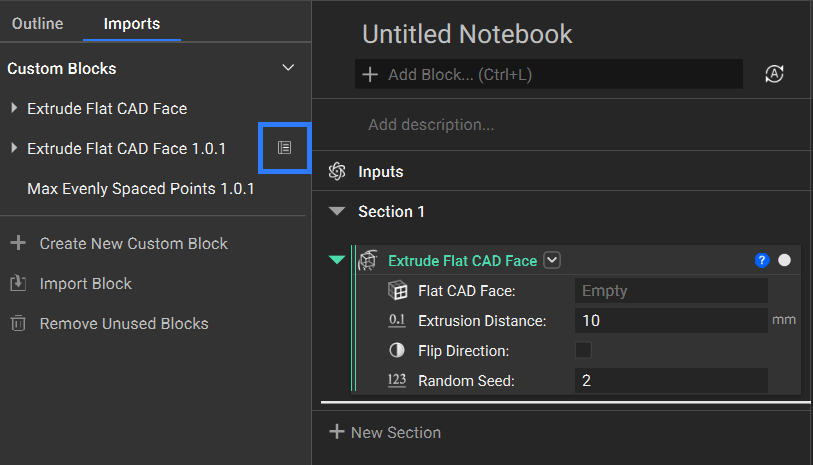
Lists
All blocks in nTop can exist as singular entities or as a list. A list contains multiple items of the same type in a single block, like a list of points. When a process runs on a list block, it runs the process on every list item. Working with list blocks is called List Processing. You can differentiate between a single block and a list block by a few block indicators.- The block name will have a quantity shown next to it in parentheses. Even if a block name has (1) next to it, it still is a list with one item.
- A small icon of 3 stacked horizontal bars will appear next to the block type icon.

List Properties
Each list contains a set of List properties at the top and individual properties for each item within that list grouped under List Elements. You can drag an individual property from a List to create an item in the notebook. You can expand the dropdown arrow next to the individual entities to reveal more information on that individual list entity.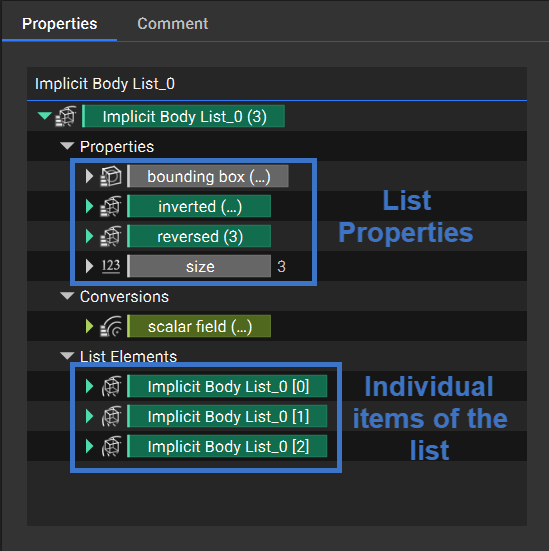
List Processing
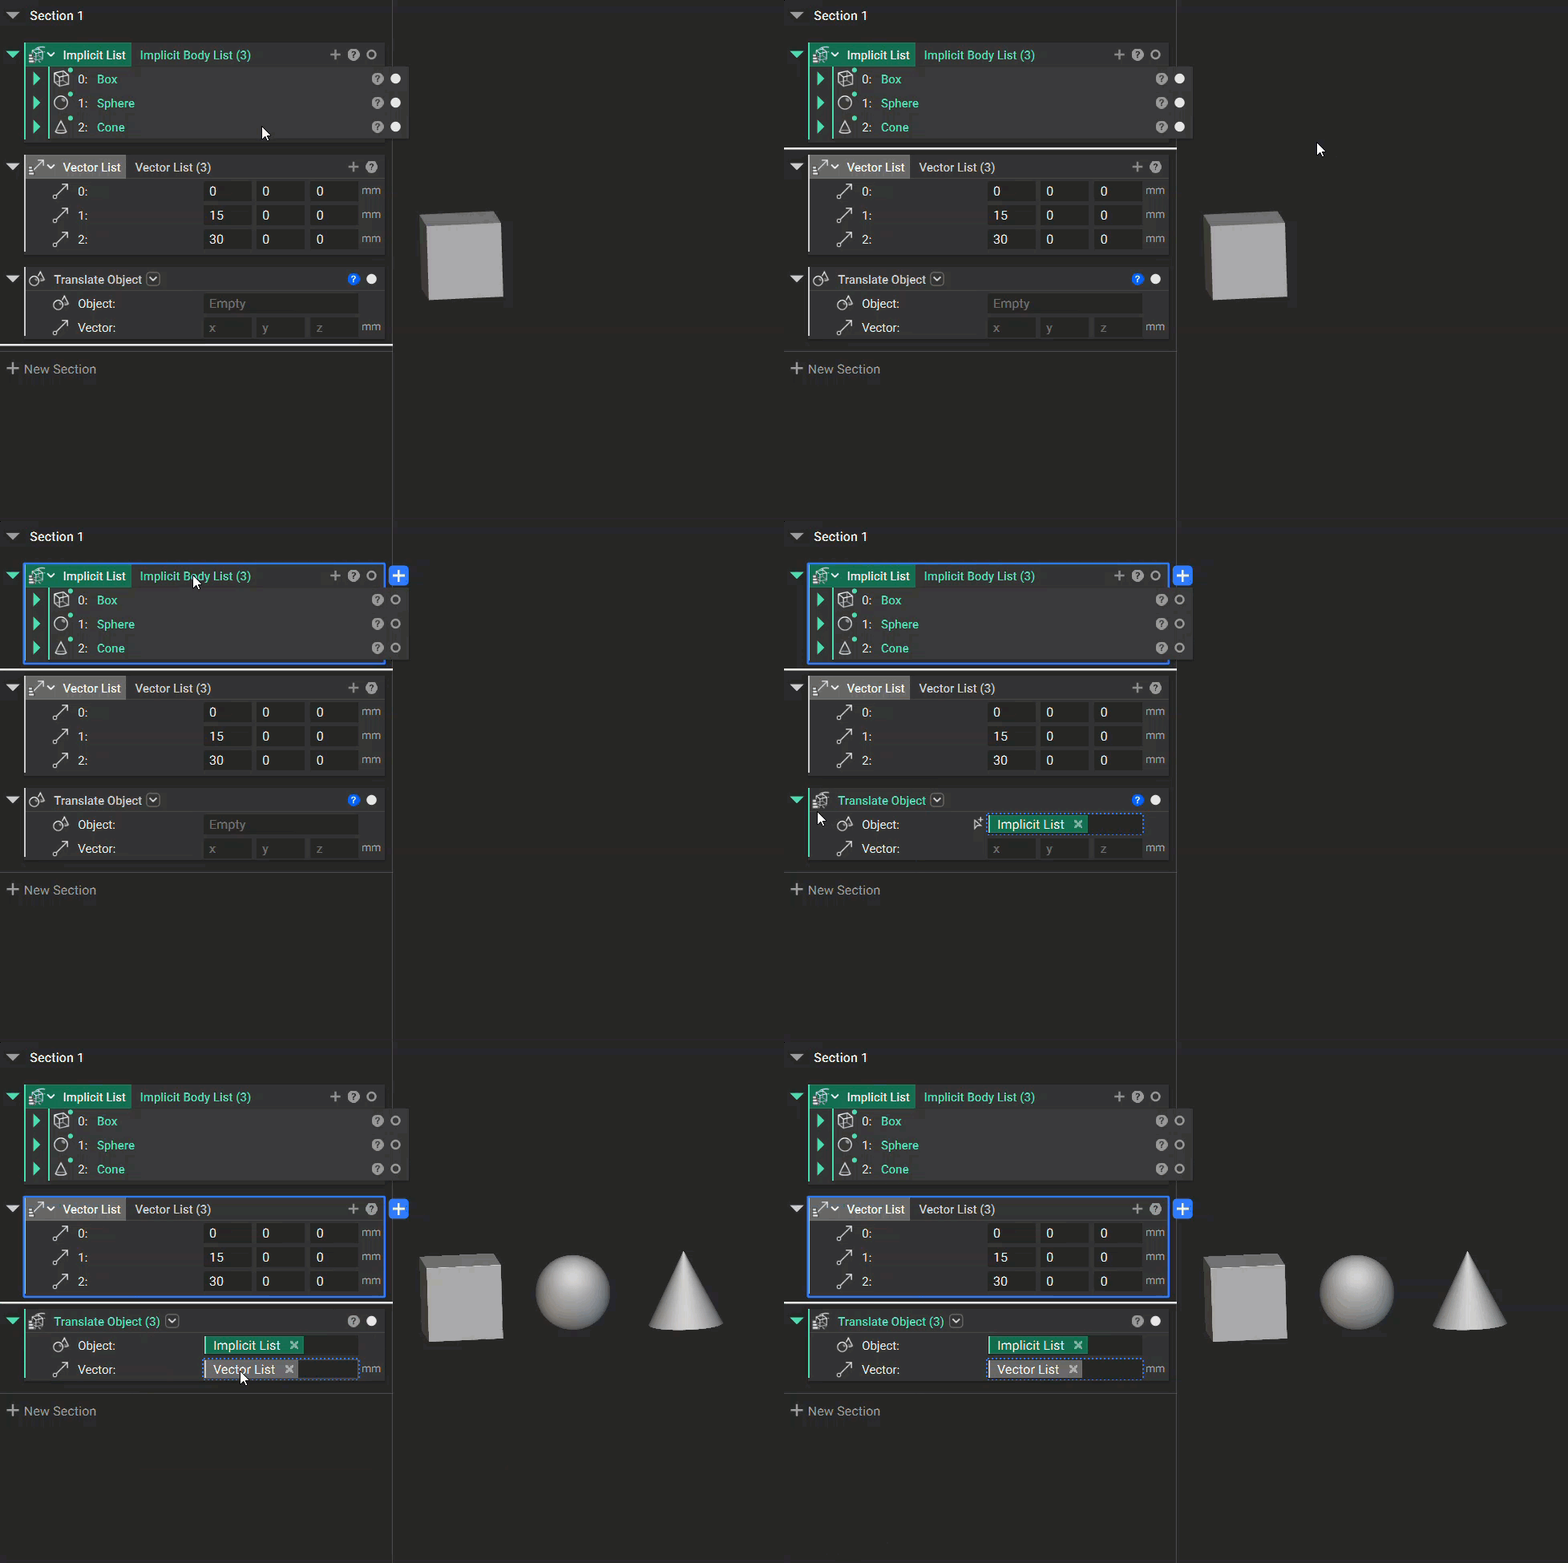
When applicable, blocks can accept list inputs instead of singular inputs. The block will then become a listed block of the same length as the input list. We refer to this as list processing. List processing can be helpful for:- Testing multiple input options for the same process (e.g. multiple unit cell options for a lattice)
- Saving calculation time by processing multiple bodies
- Reducing notebook clutter by condensing a repetitive process
List Manipulation
Regardless of block type, the method for modifying lists is the same. Select the ’+’ next to the View Block Details icon to add more inputs. If you add too many, use the ’-’ on the left of the input to remove them.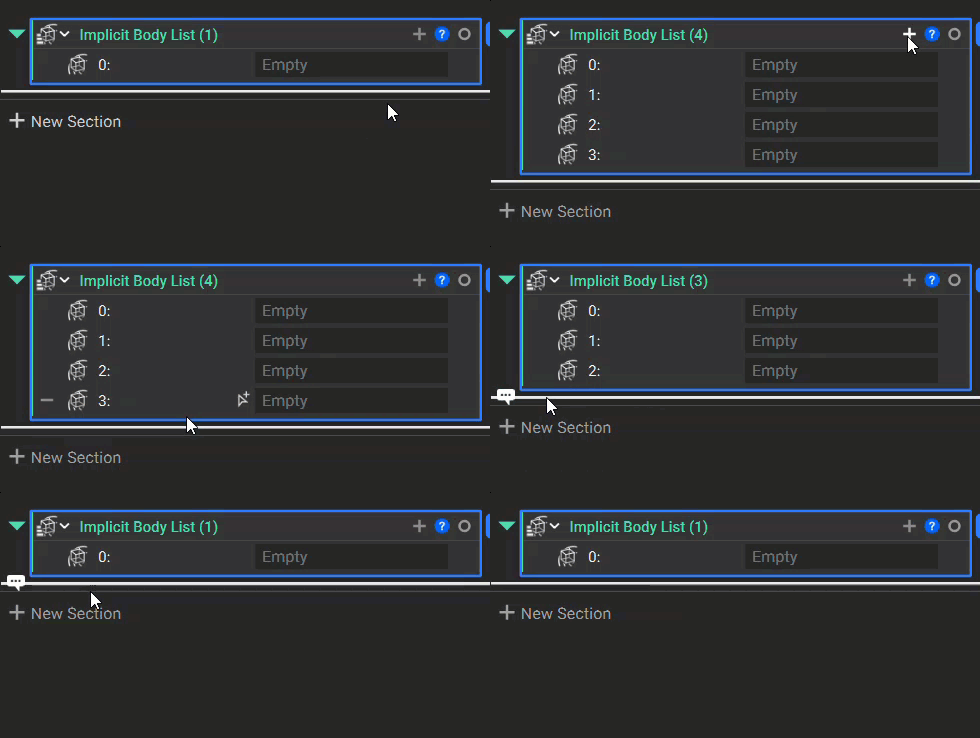
List Element
Extract a single entity from a list based on its index number. Note that the first item in a list is always index 0.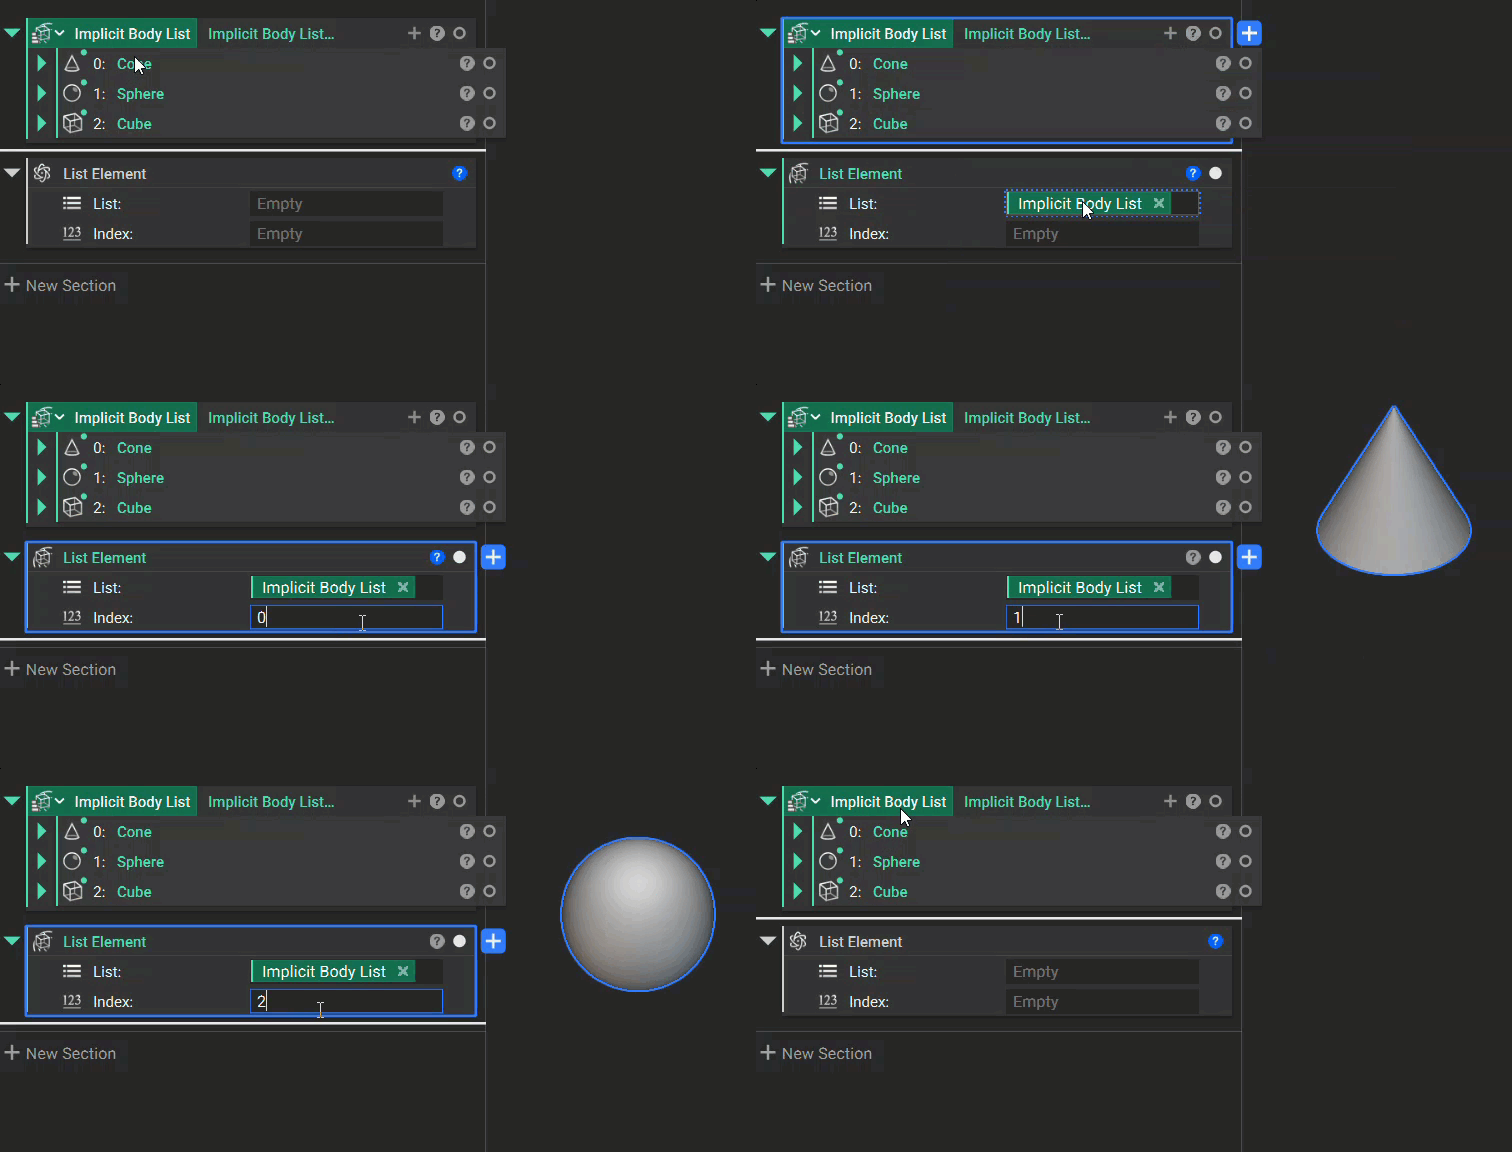
Insert
Combine two lists into one by inserting a list into another at a specified index location.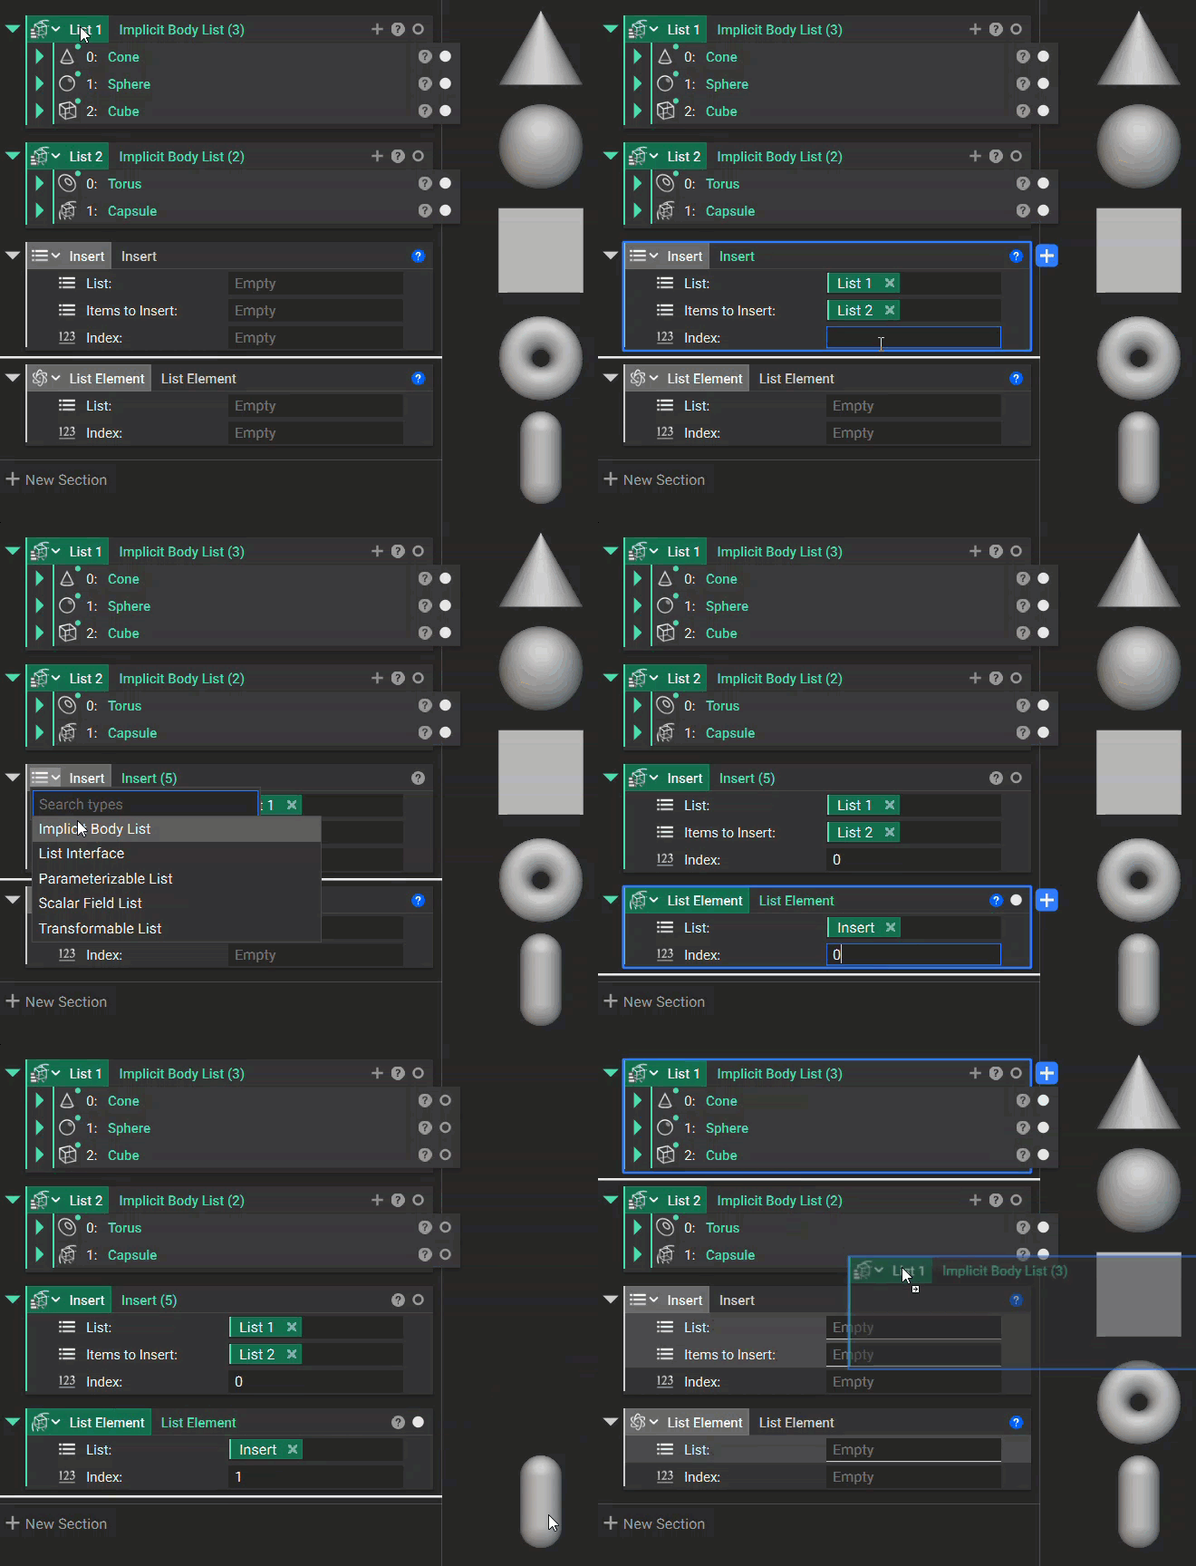
Sub List
Extract a smaller list from a larger input list, based on a starting index and the desired size of the sublist.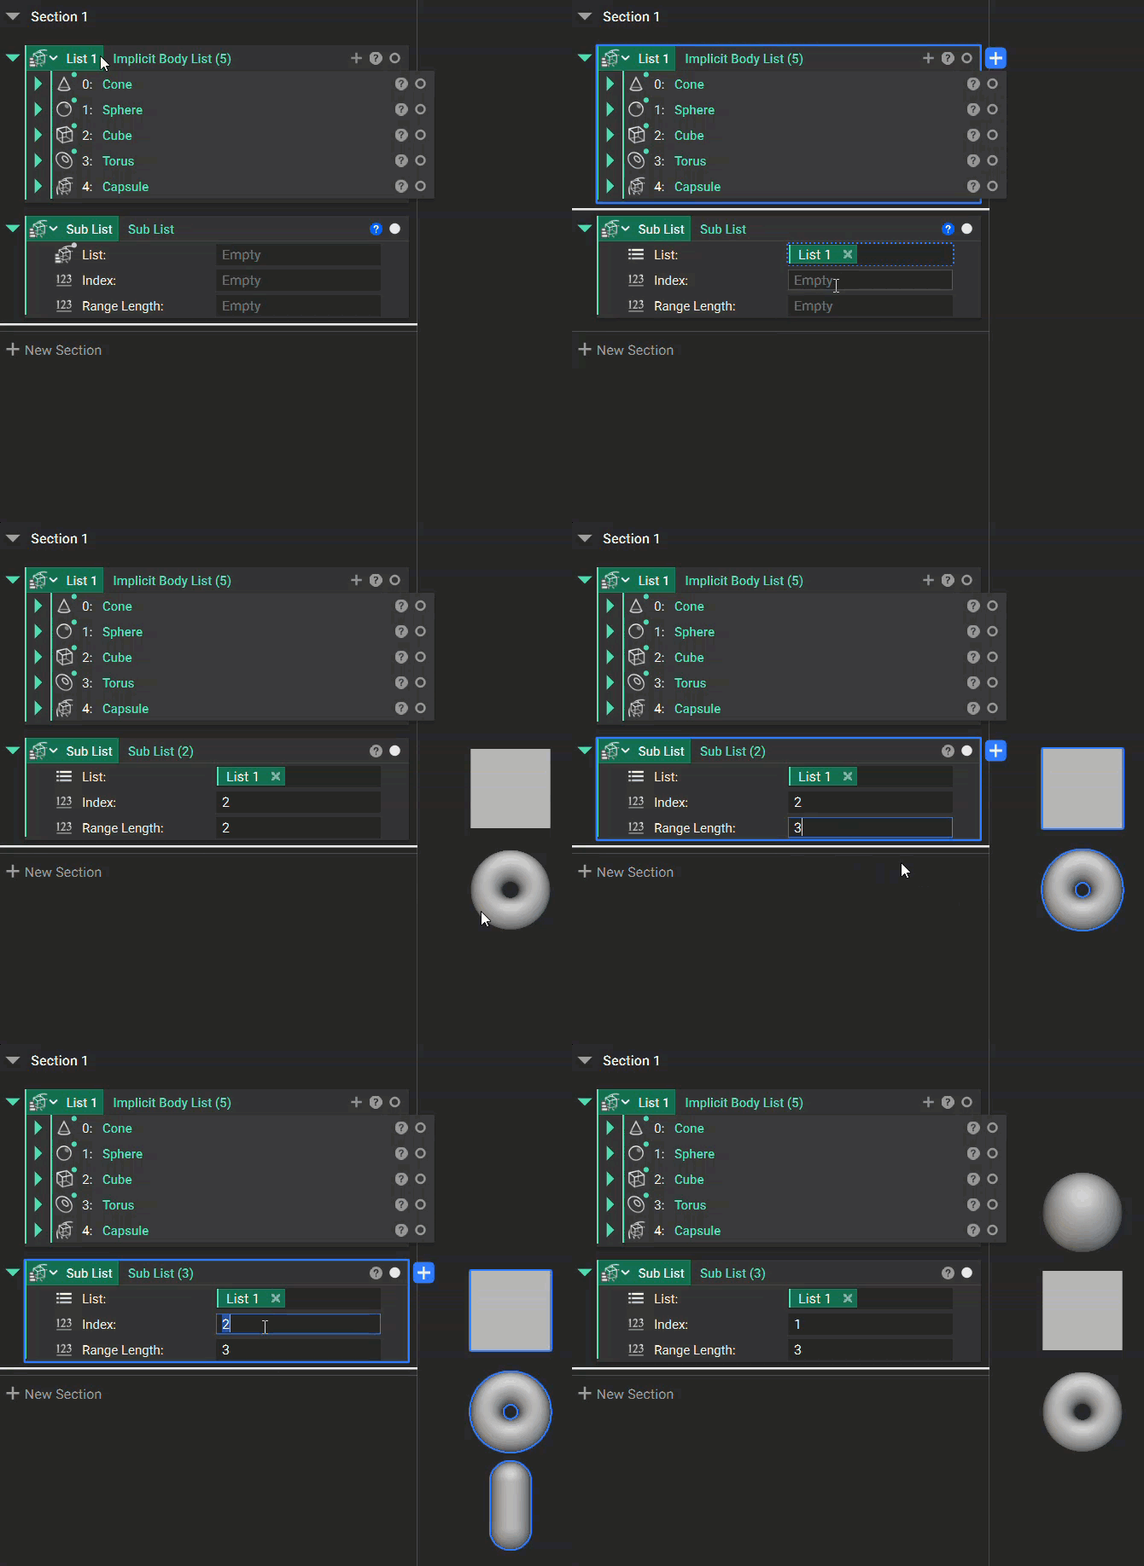
Remove
Remove one or more entities from a list, based on a starting index and the number of removed entities.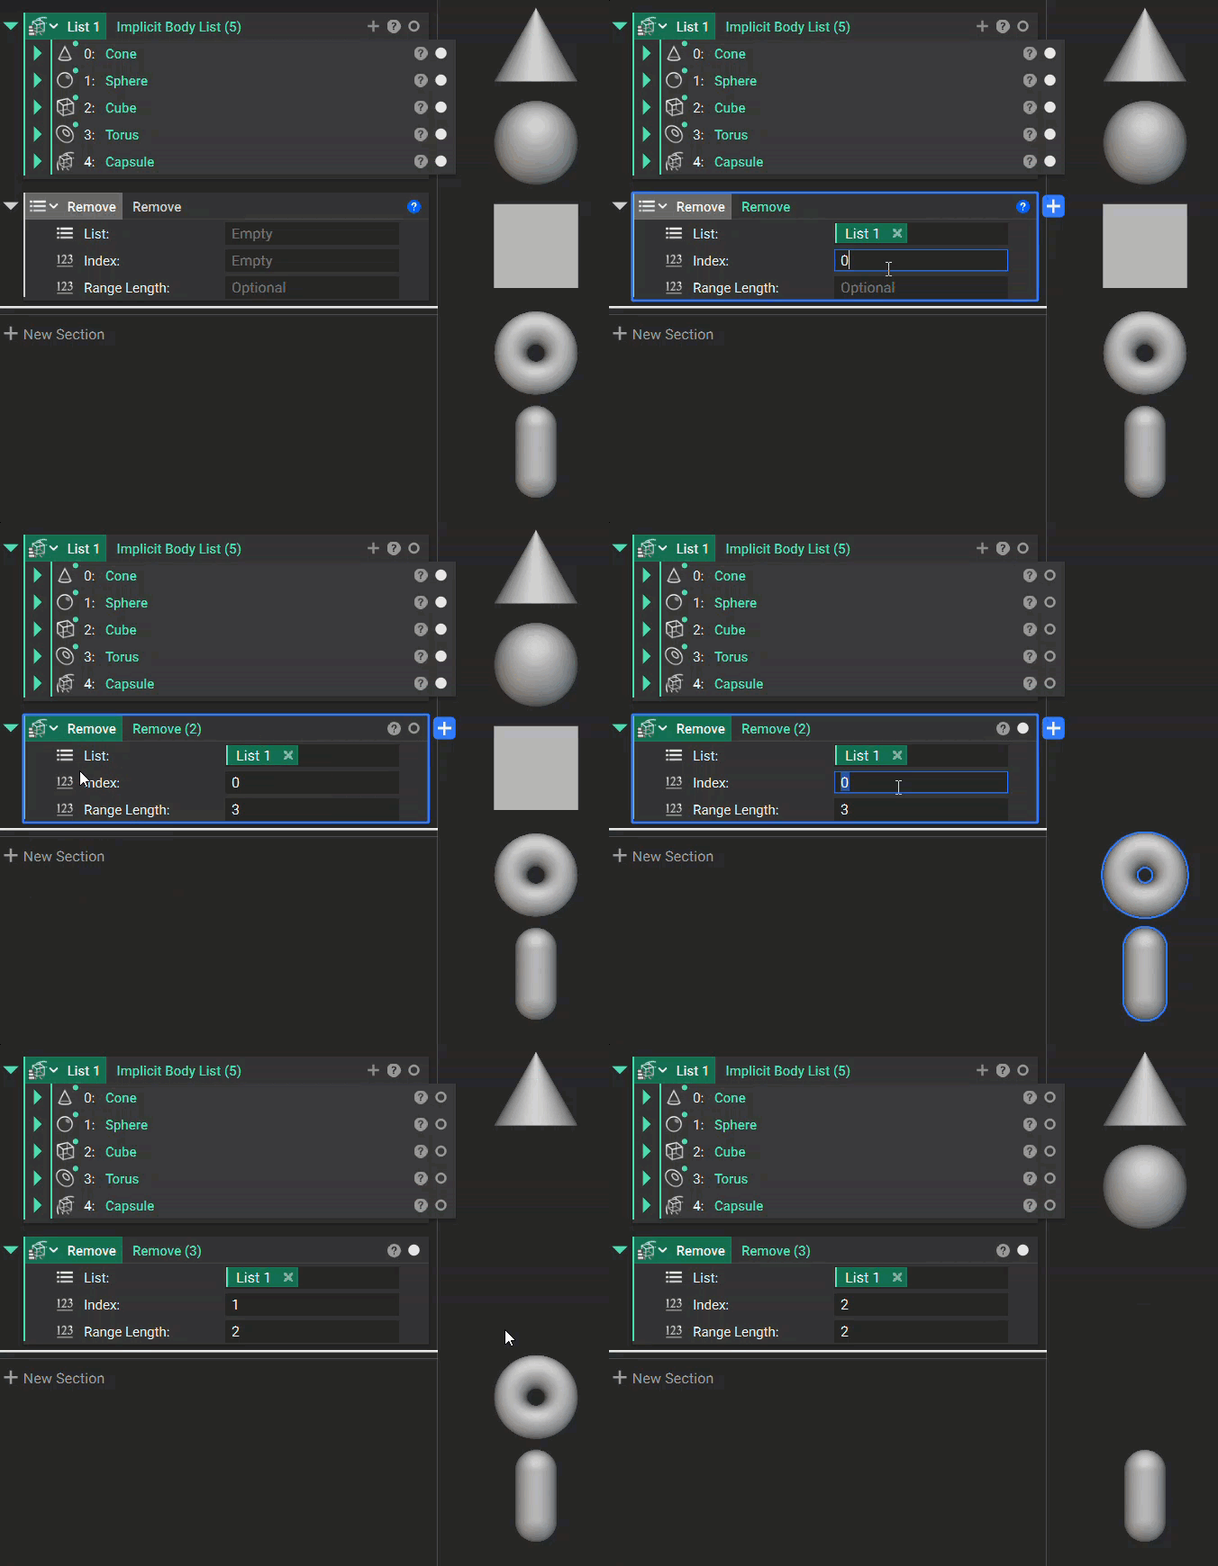
Concatenate List
Multiple lists can be added together using the Concatenate Lists block. In order to do this, the Lists must be of the same type.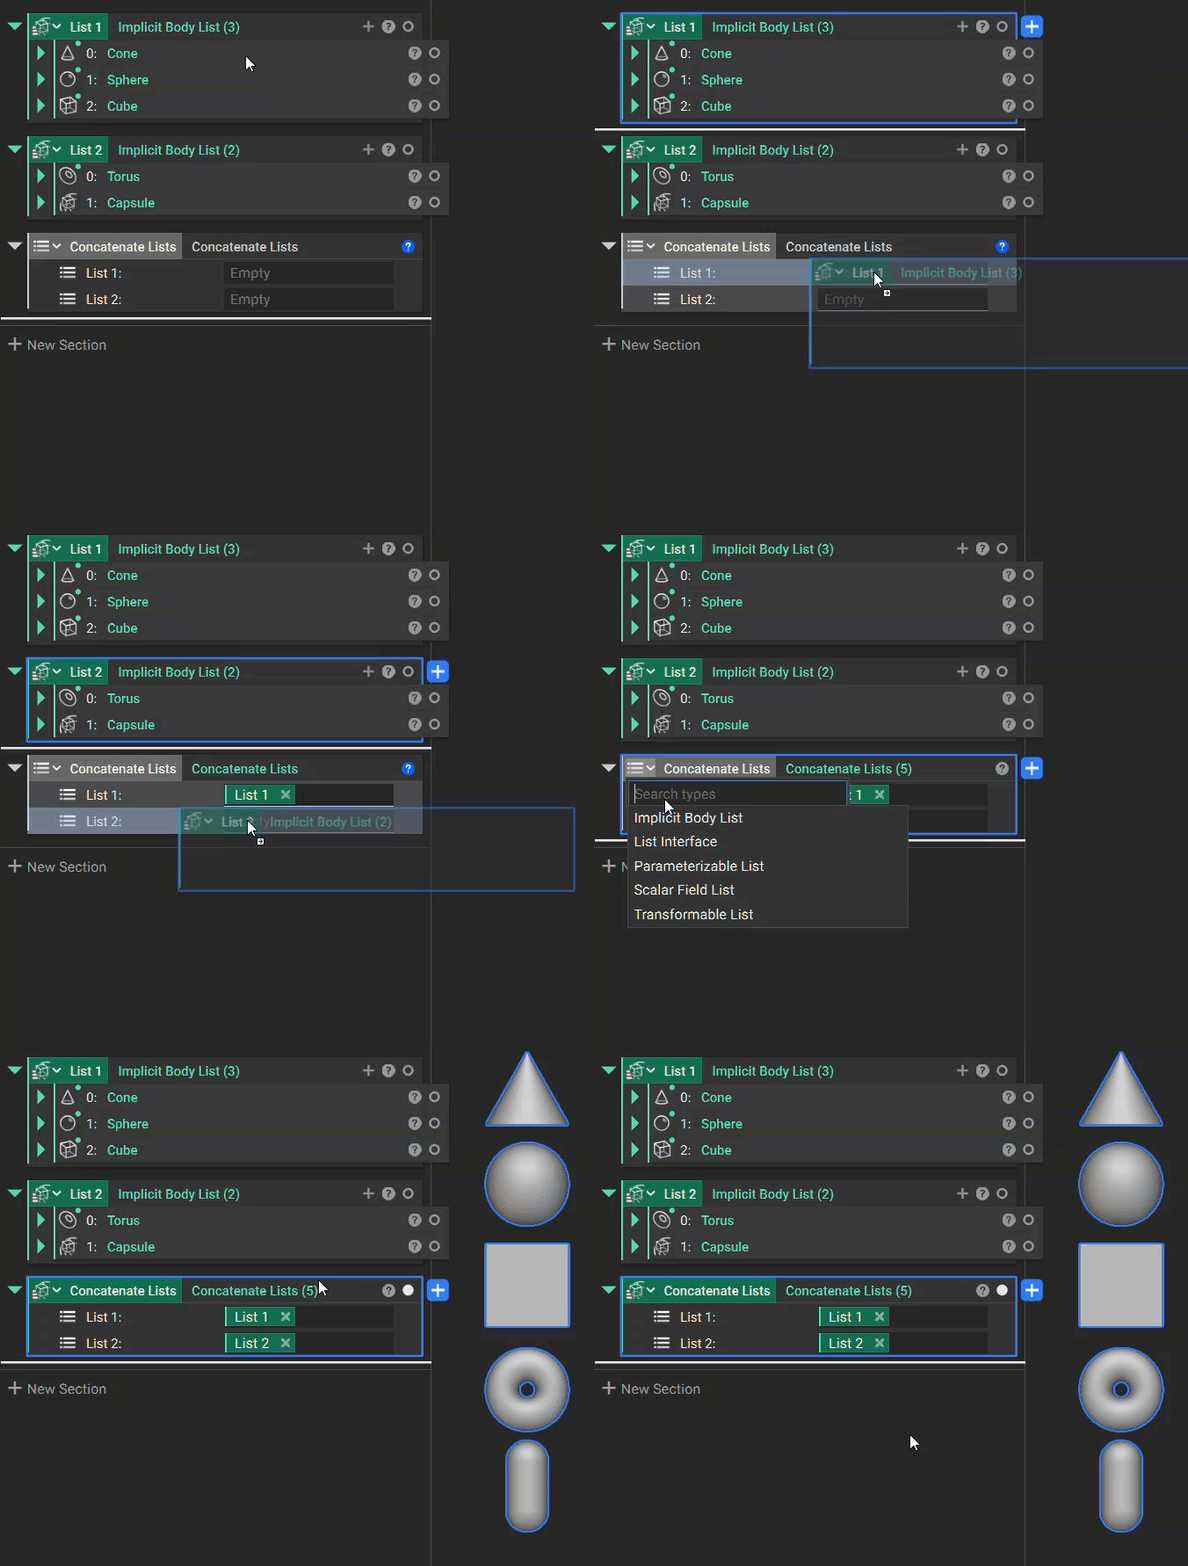
Sort
The Sort block will rearrange a list from the lowest to the highest value. If you would like the values sorted from highest to lowest, you can use the ‘reversed’ scalar list in the block’s properties.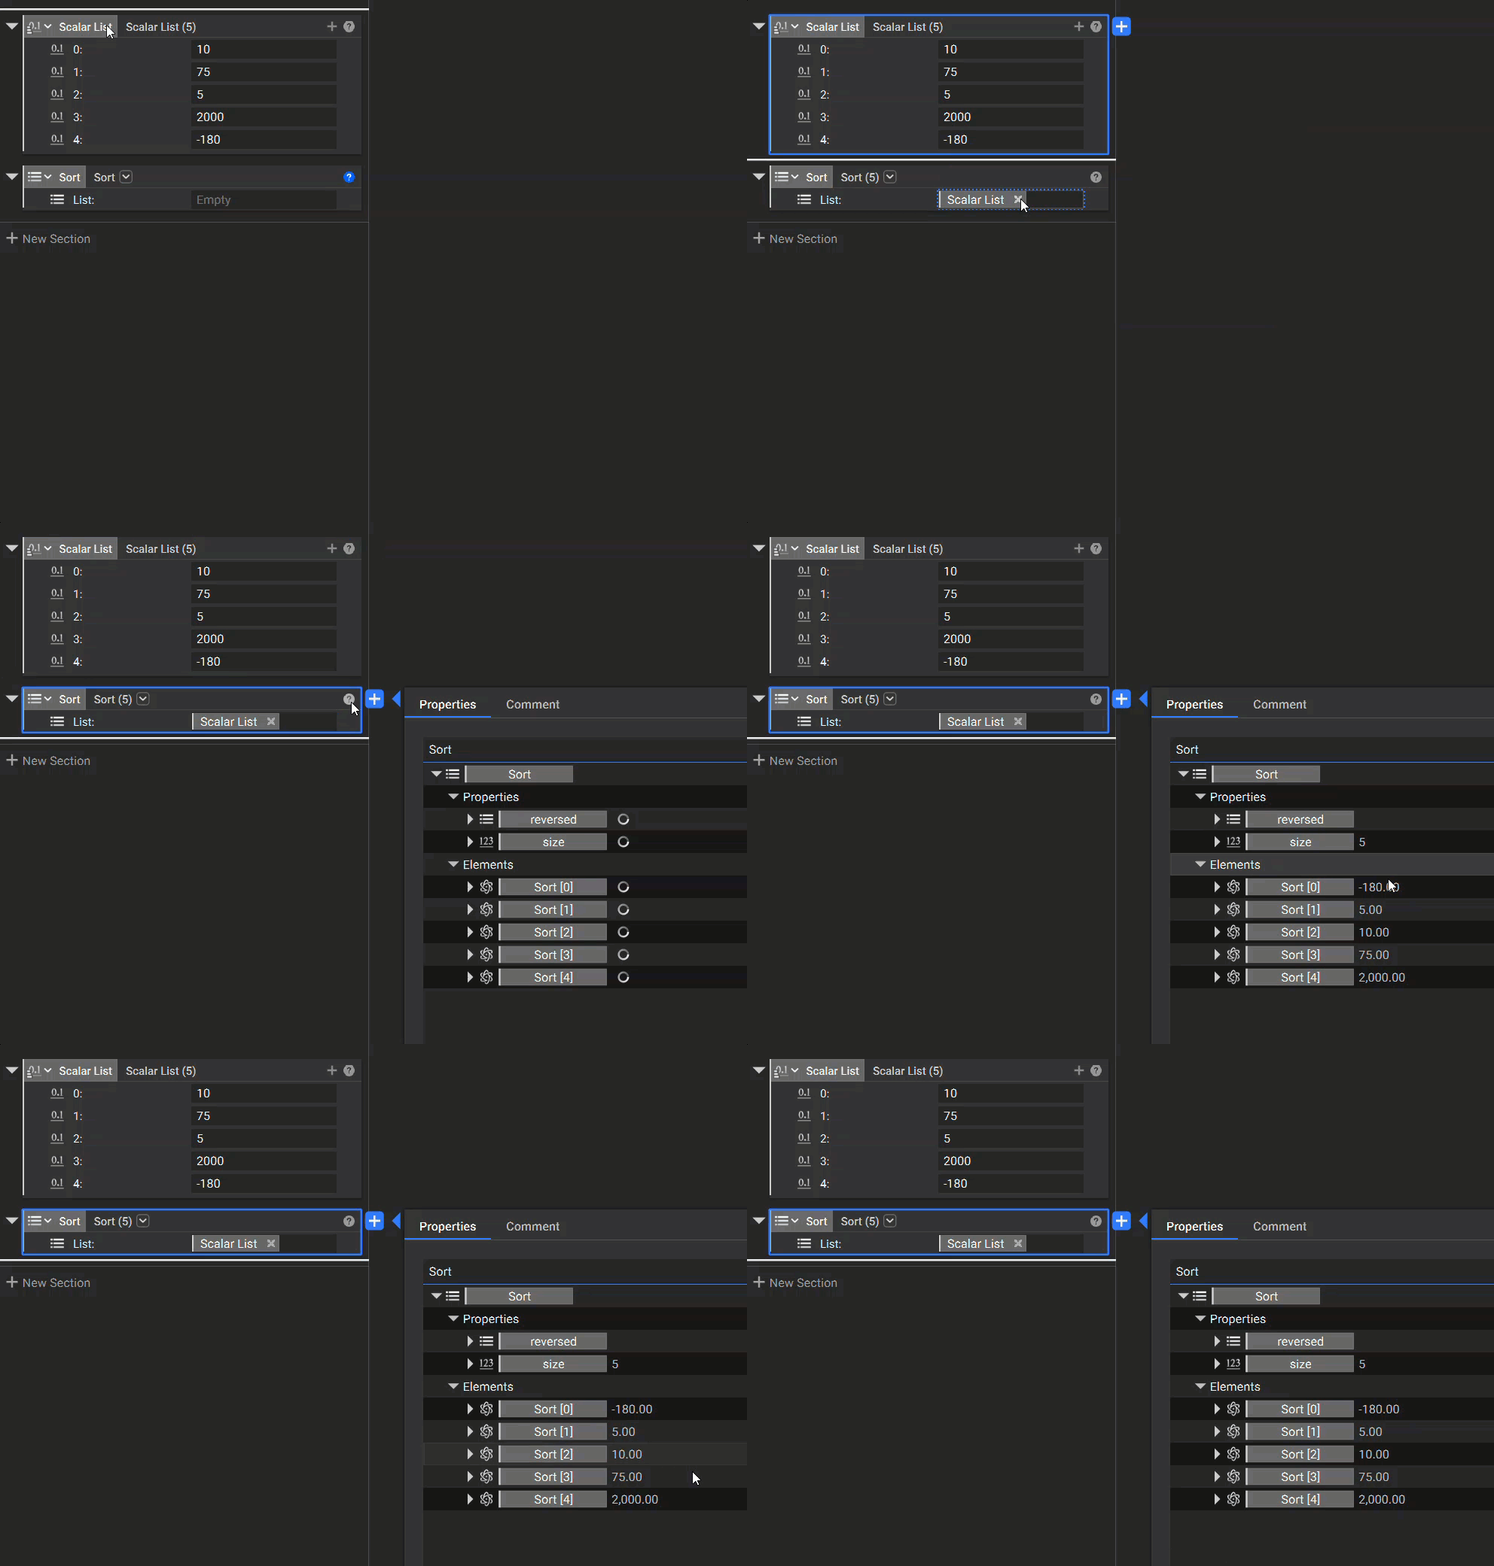
Filter
The Filter block removes items from a list based on a Bool List, which must be the same length as the List input in the block.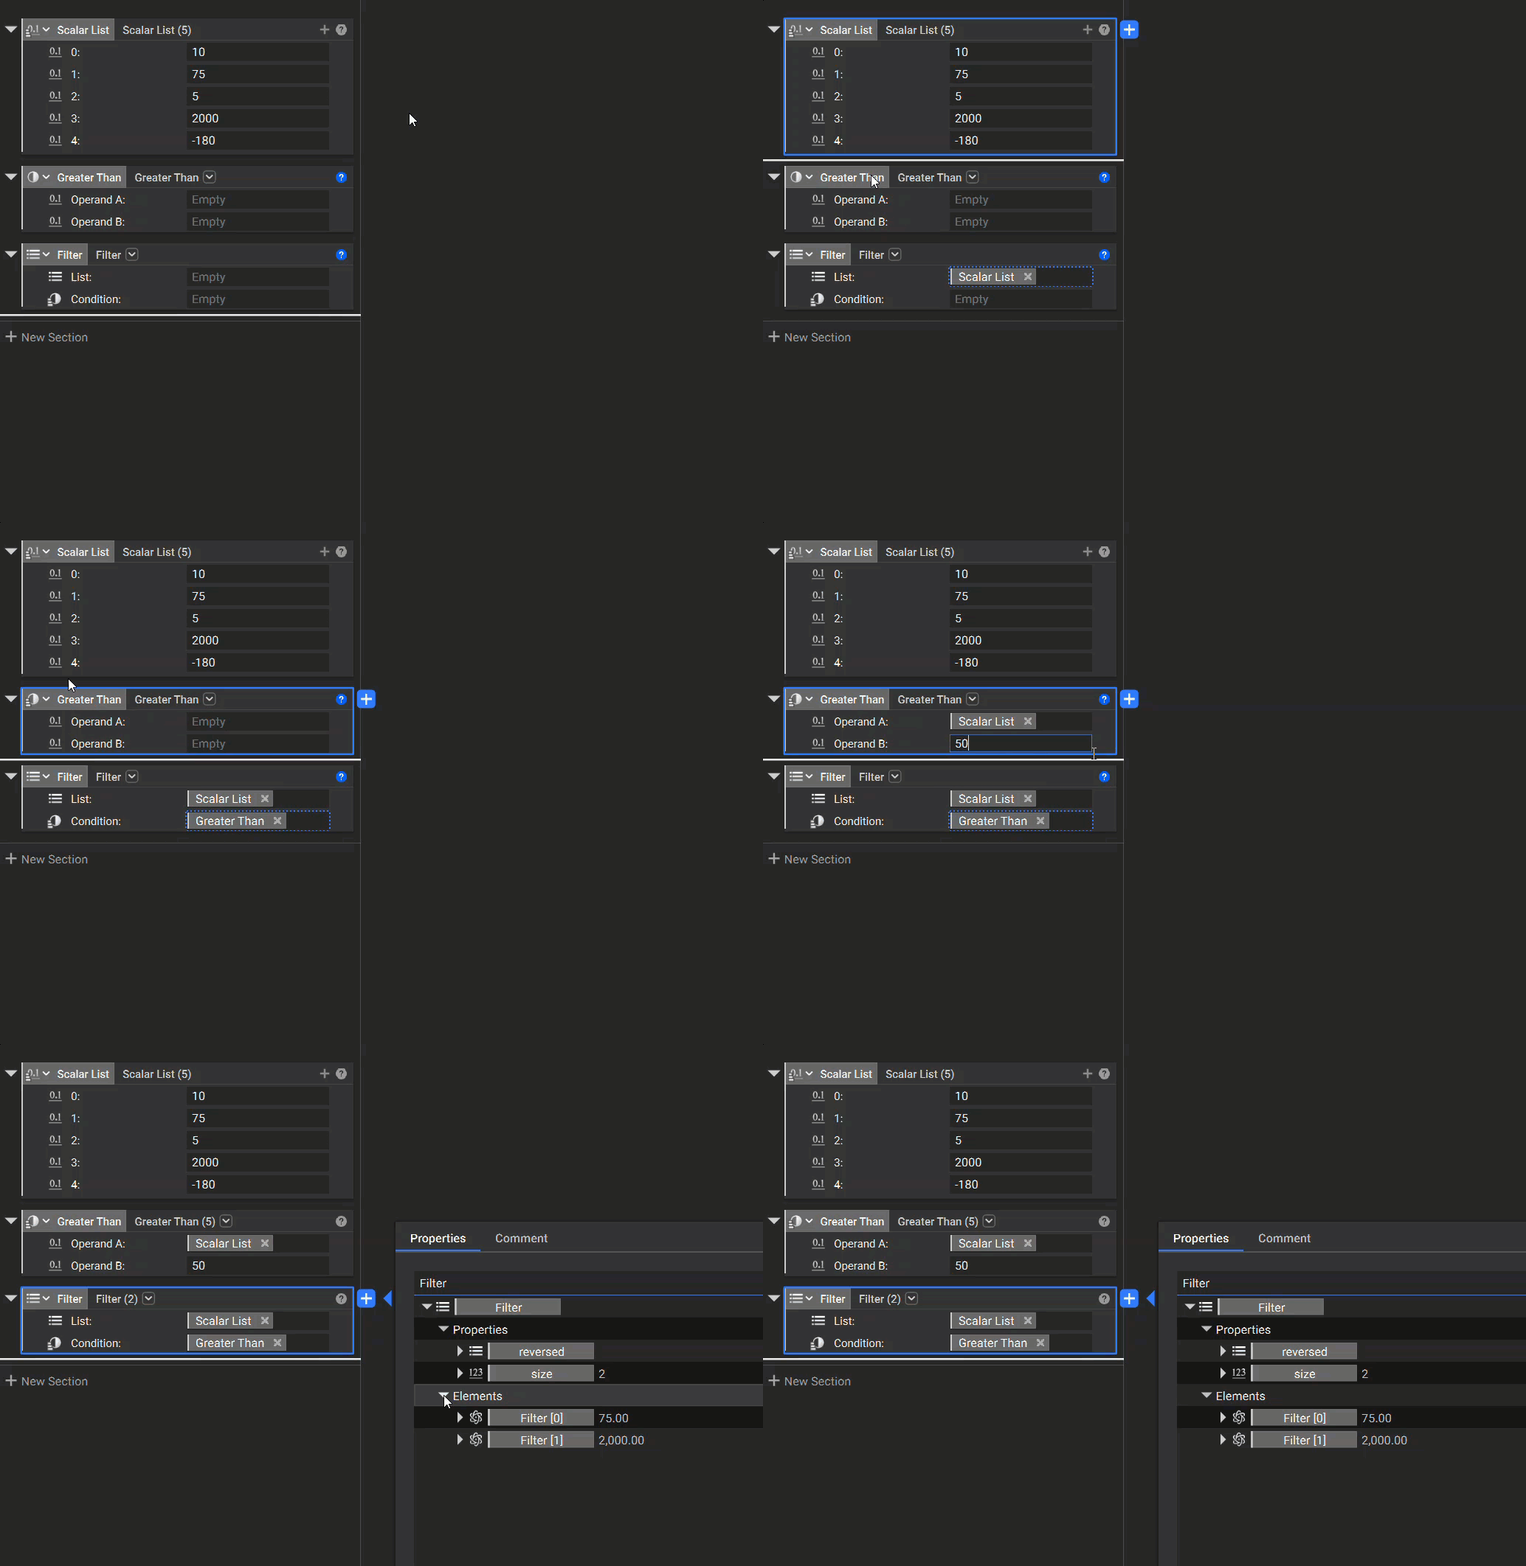
Group
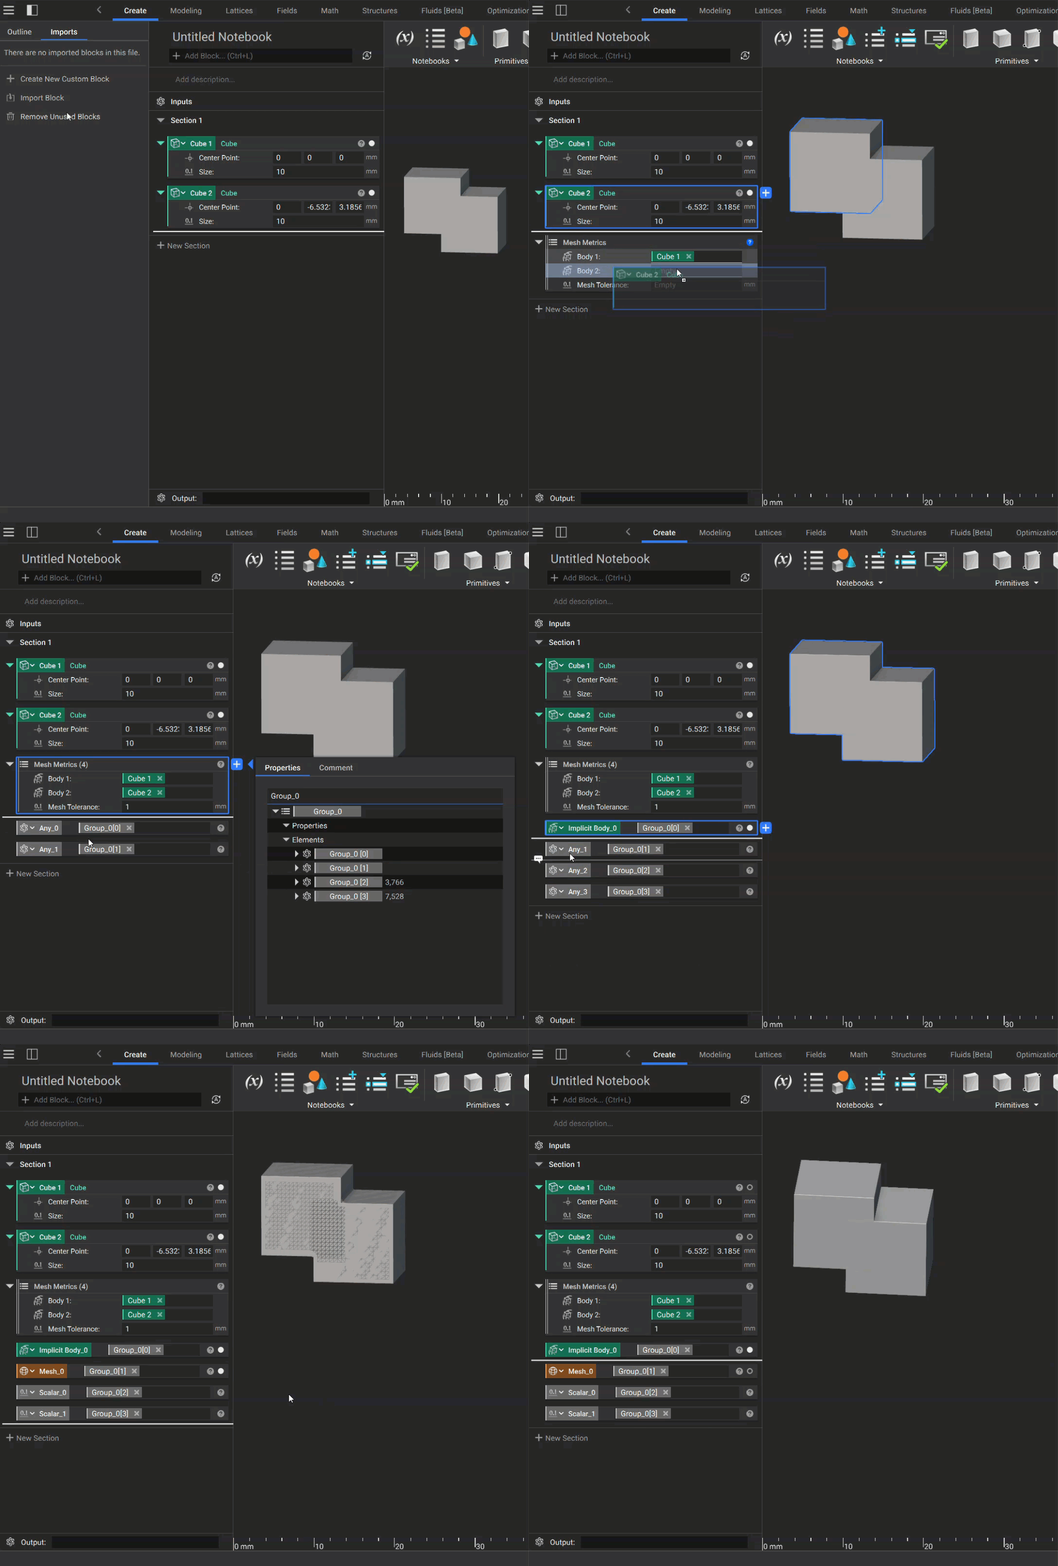
Groups in nTop are the same as lists, except they can contain a combination of block types. For example, the group below consists of a point, a sphere, and a line. The same list manipulation operations described can be performed on groups.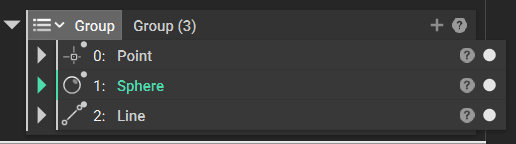
List Errors
When working with lists, it is important to understand the key errors that could occur, including invalid input errors and lists within lists, described below.Invalid Input Error
If you try to insert a block into an input and nTop won’t let you, the block is not a valid input. If you insert a variable into an input and it turns red, the block is not a valid input. Causes:- Inserting a list into a singular type input
- Inserting an incorrect block type list
- Inserting a list into a list
- The block that you are trying to insert a list into may have a block overload that accepts list inputs. Check if the block has overloads available that may accept your list.
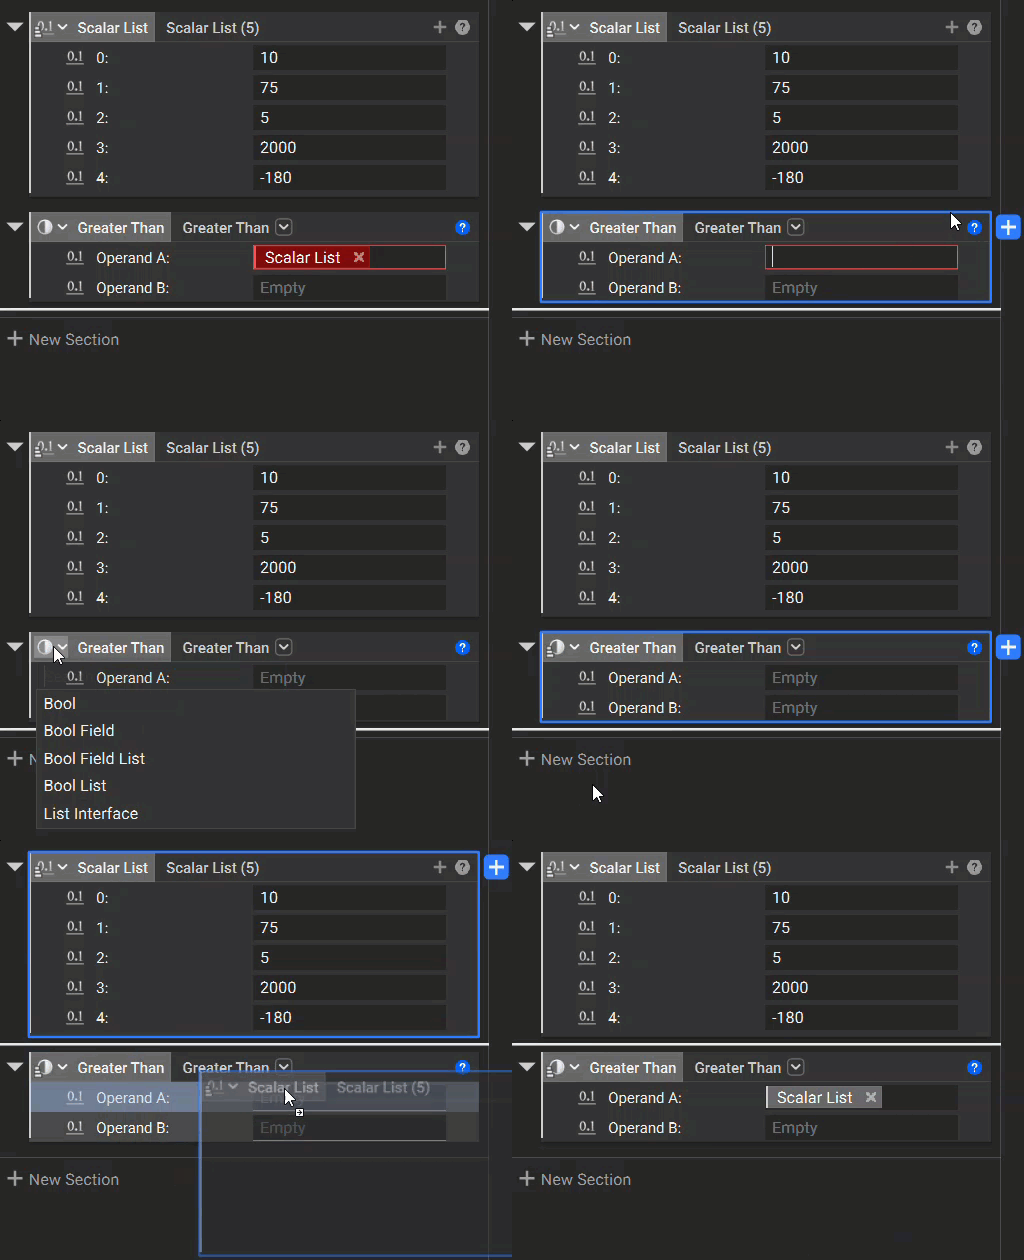
- The block type of your list needs to match the input block type. If you are getting an error due to mismatching types, you may need to convert your list to a different block type. You can also check if there is a block overload to accept that input type.
- A list block cannot be input into another list block. If you want to input a list into a block that doesn’t accept lists, you can create a custom block to run the list instead. This works because the inputs of a notebook are in variables, and variables cannot process lists.
Lists of One (1)
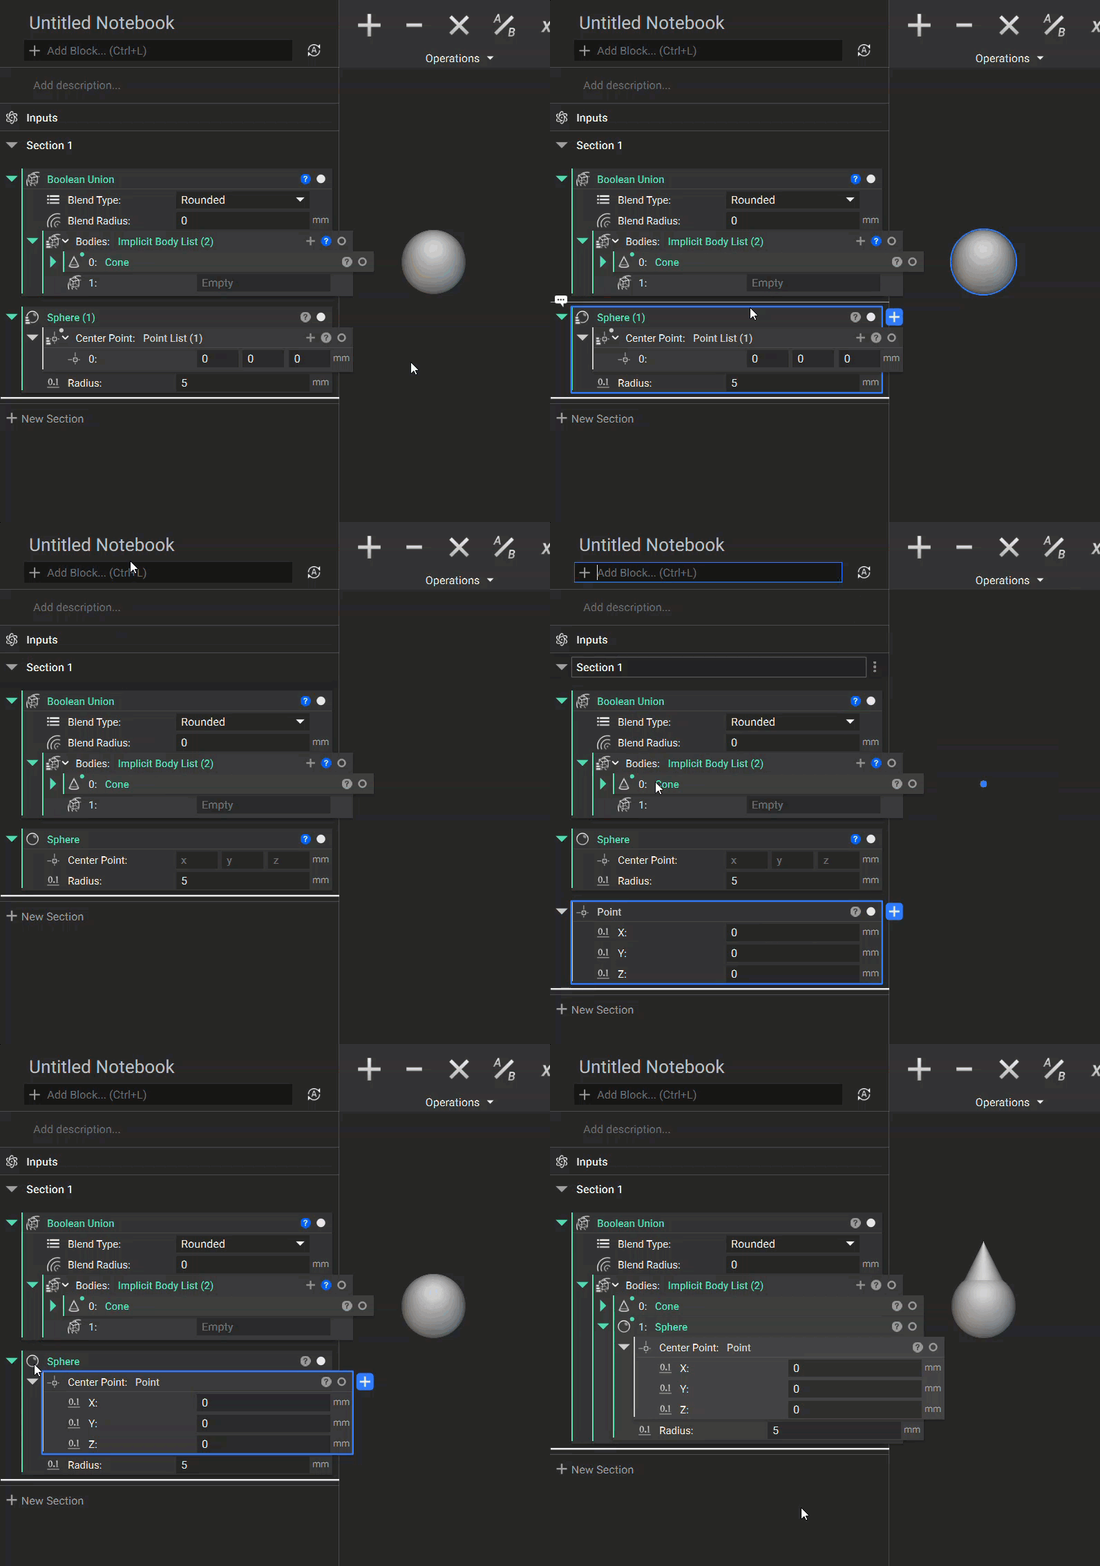
You may encounter a situation where you try to add one part to a block, and it won’t let you. If your intended input block looks like “Block Name (1)“, somewhere a “list of one” was created. Lists of one are sometimes unintentionally created by the user or during CAD/Part importing. Causes:- Accidentally converting a block to a list using a list input
- Extracting a list from a block properties panel when you meant to extract a singular element
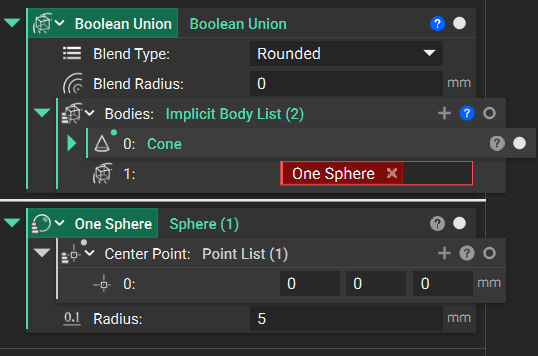
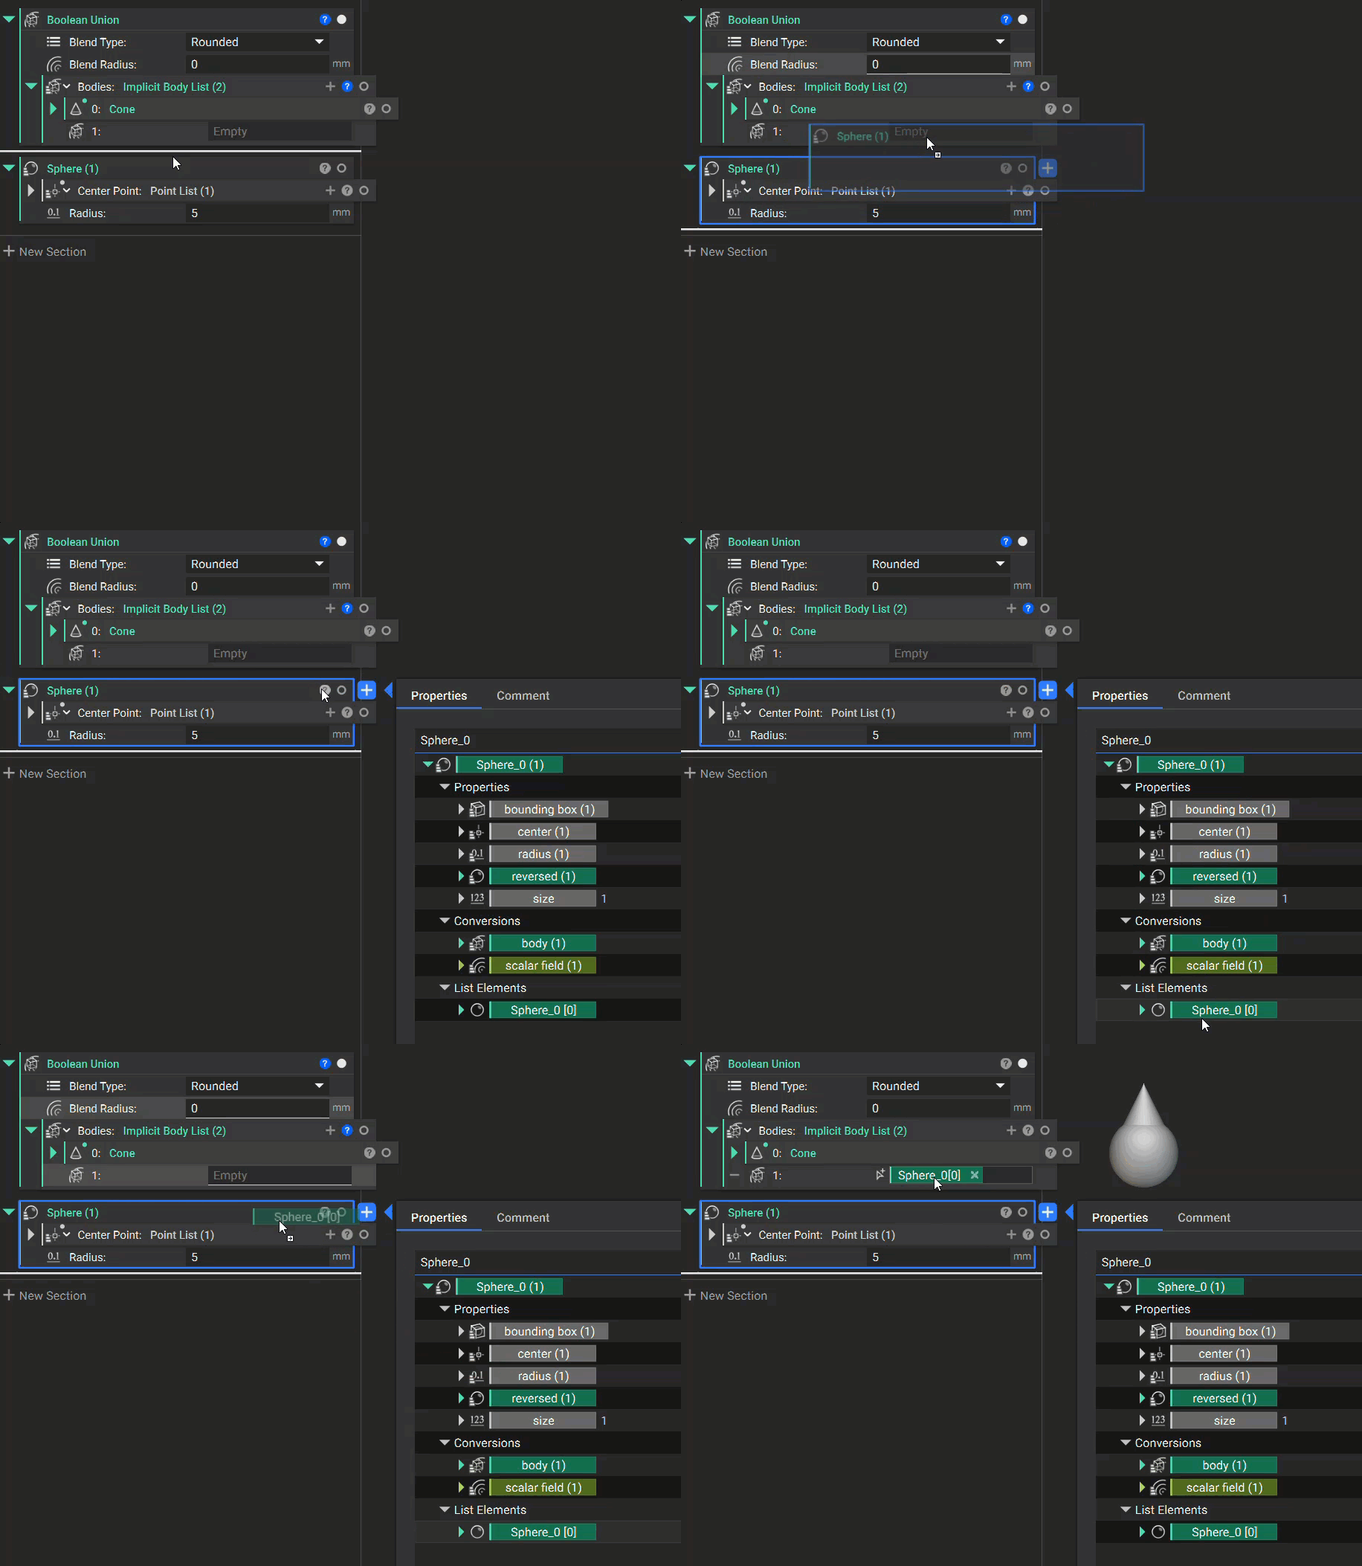
- Change the input type from a list to a single entity. Once you input the singular entity instead of the list, the block parent block should also update.
- Extract the singular list item from the List Elements section of the list’s properties panel.
Input List Length Mismatch
This occurs when two lists of different lengths are input into a block. The block can’t run because it tries to match the two lists together. Cause: The lengths of the input lists are not equal. Solution: Ensure that the list length of both operands is the same.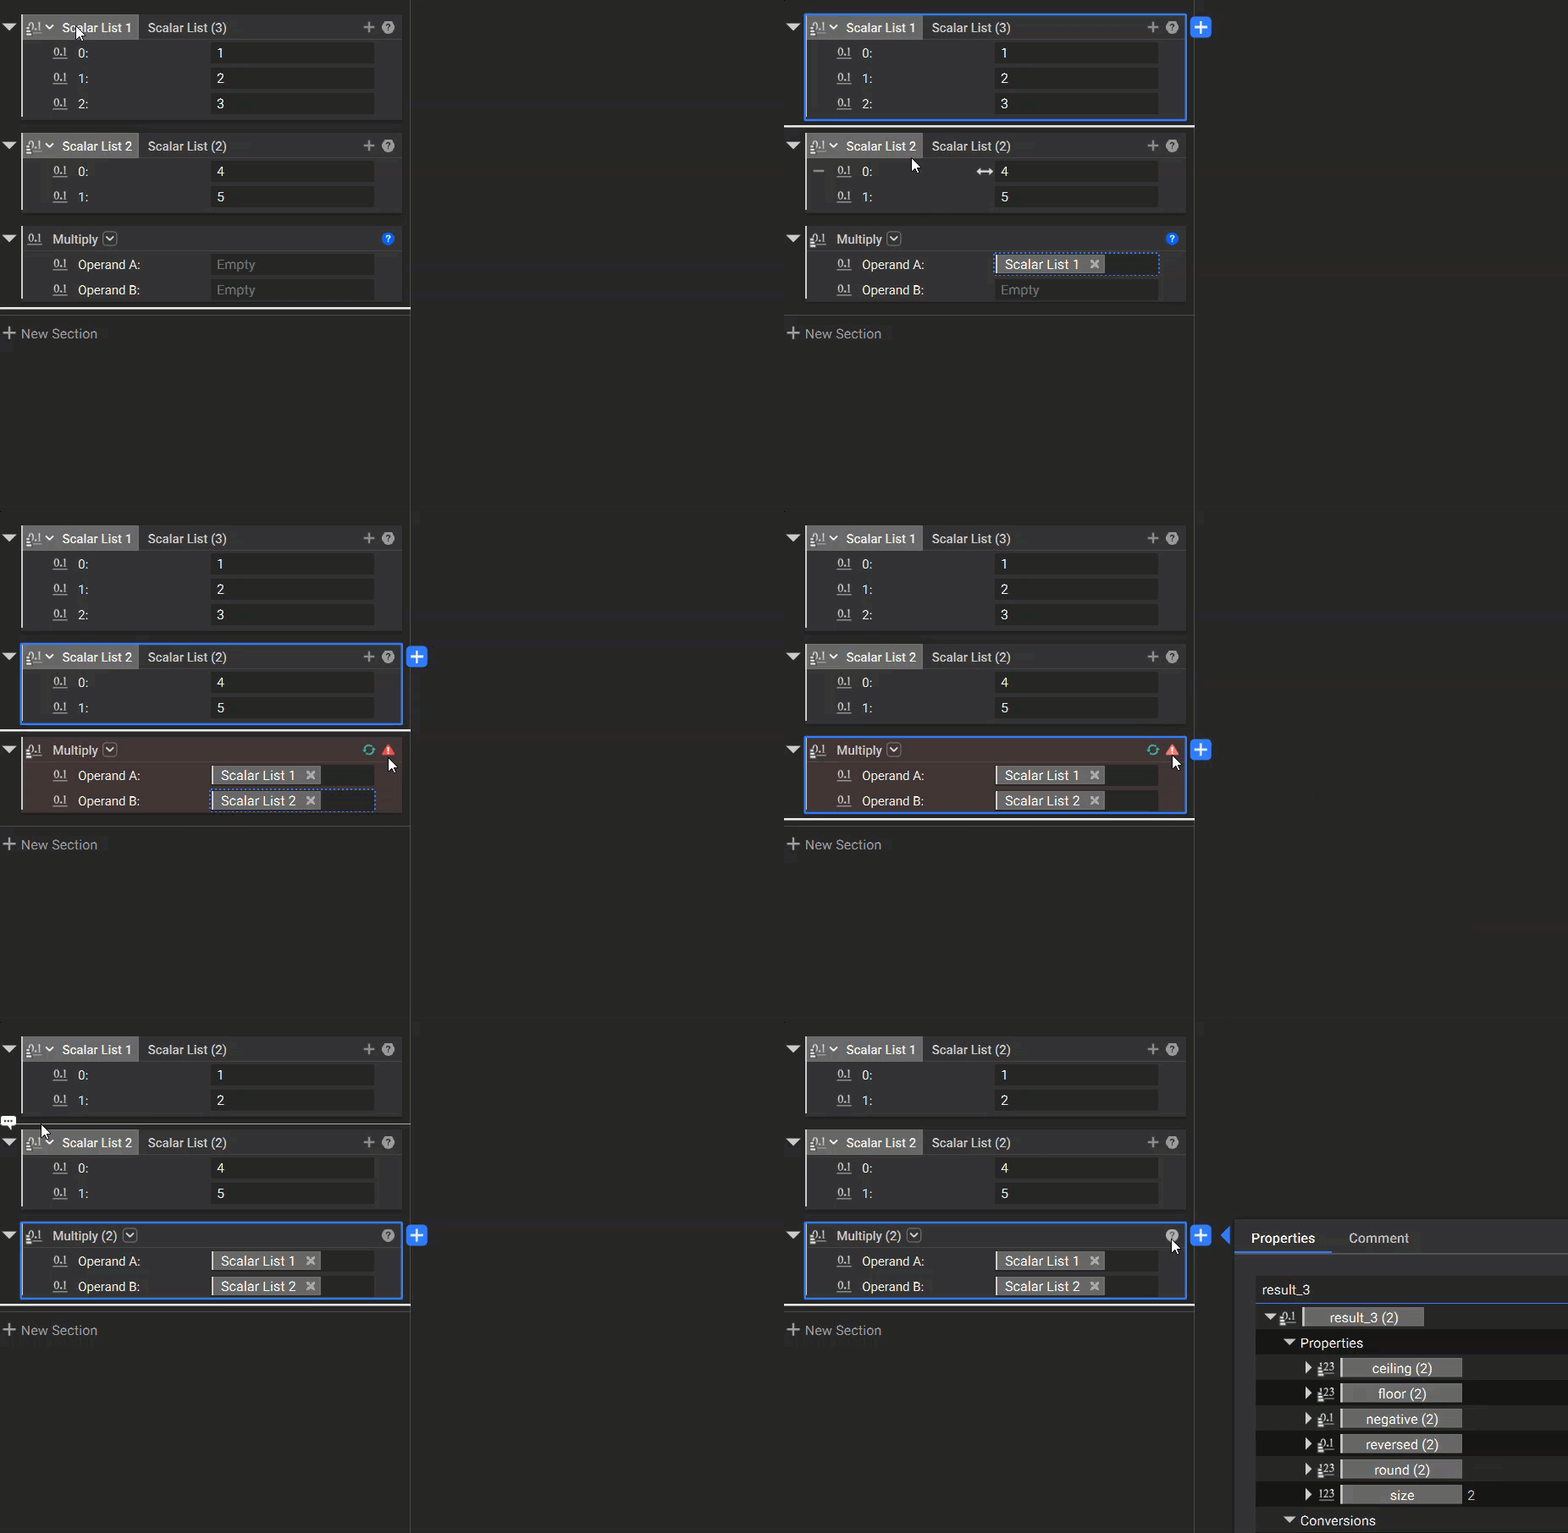
List Processing Custom Blocks
Now that we’ve learned how to create custom blocks and how lists work, we can combine these to use list processing in our CBs.List Processing Inputs
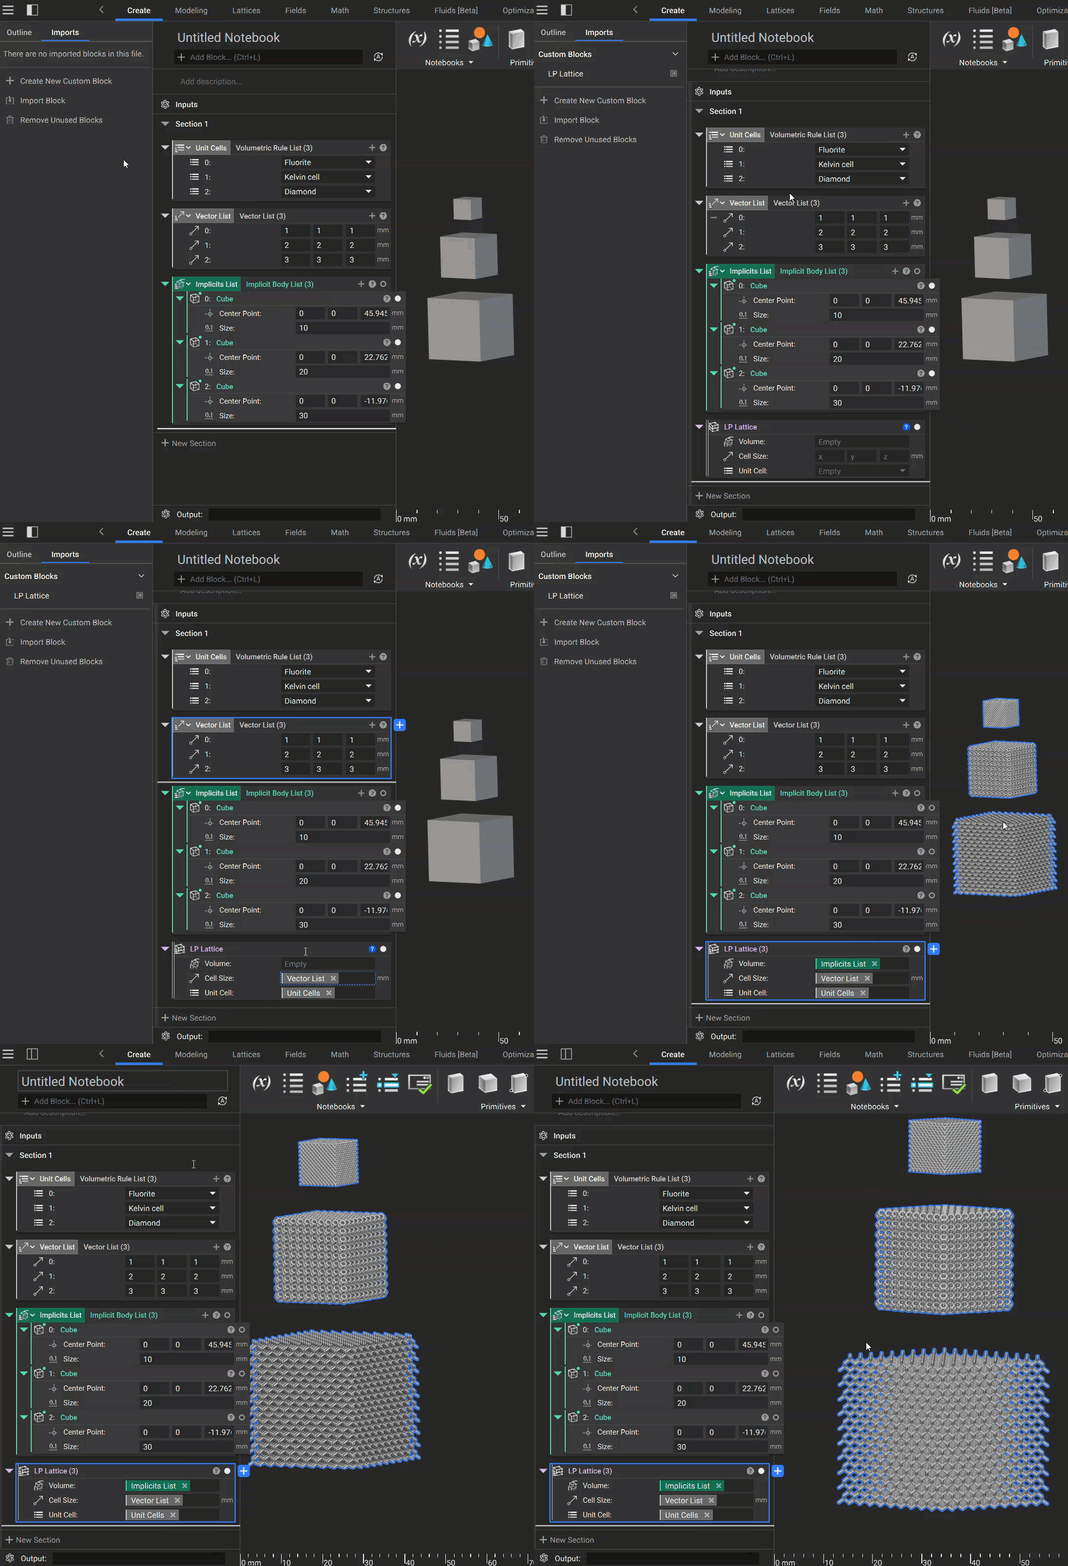
List processing custom block inputs is the same as list processing. Below is an example of a CB that is set up to lattice an input body with a defined cell size and unit cell type. It’s important to note that the inputs are not list types. If you try to make a custom block input a list, you will get an error message when you import the block. The error will inform you that it is not a valid block.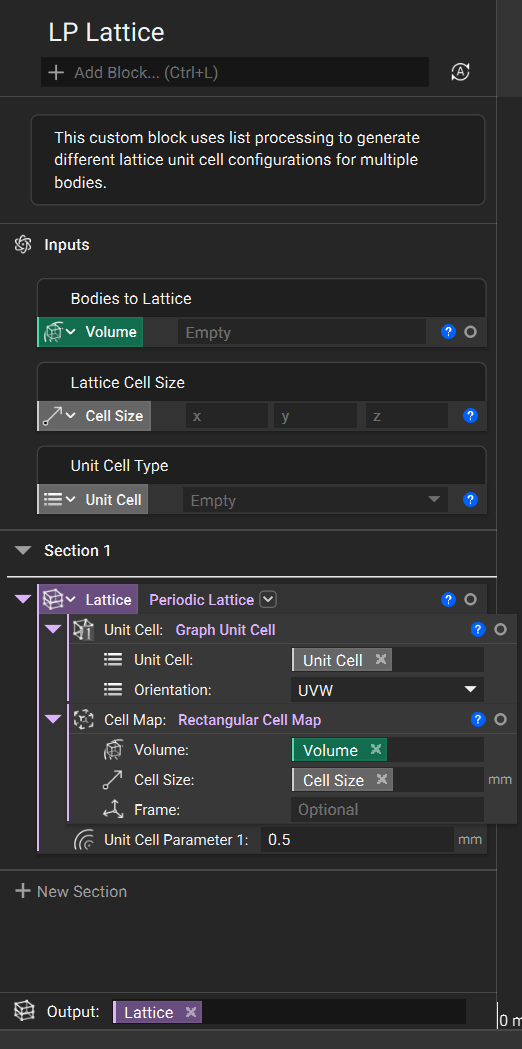
List Processing Outputs
List processing custom block outputs requires us to use the Group block. Since Groups are just lists that can have multiple block types, we can use them to output different bodies, values, etc. Here is another example of a custom block called Mesh Metrics. The gif below shows how we are setting up the Group block to output the merged implicit bodies, their mesh, and that mesh’s face and vertex count.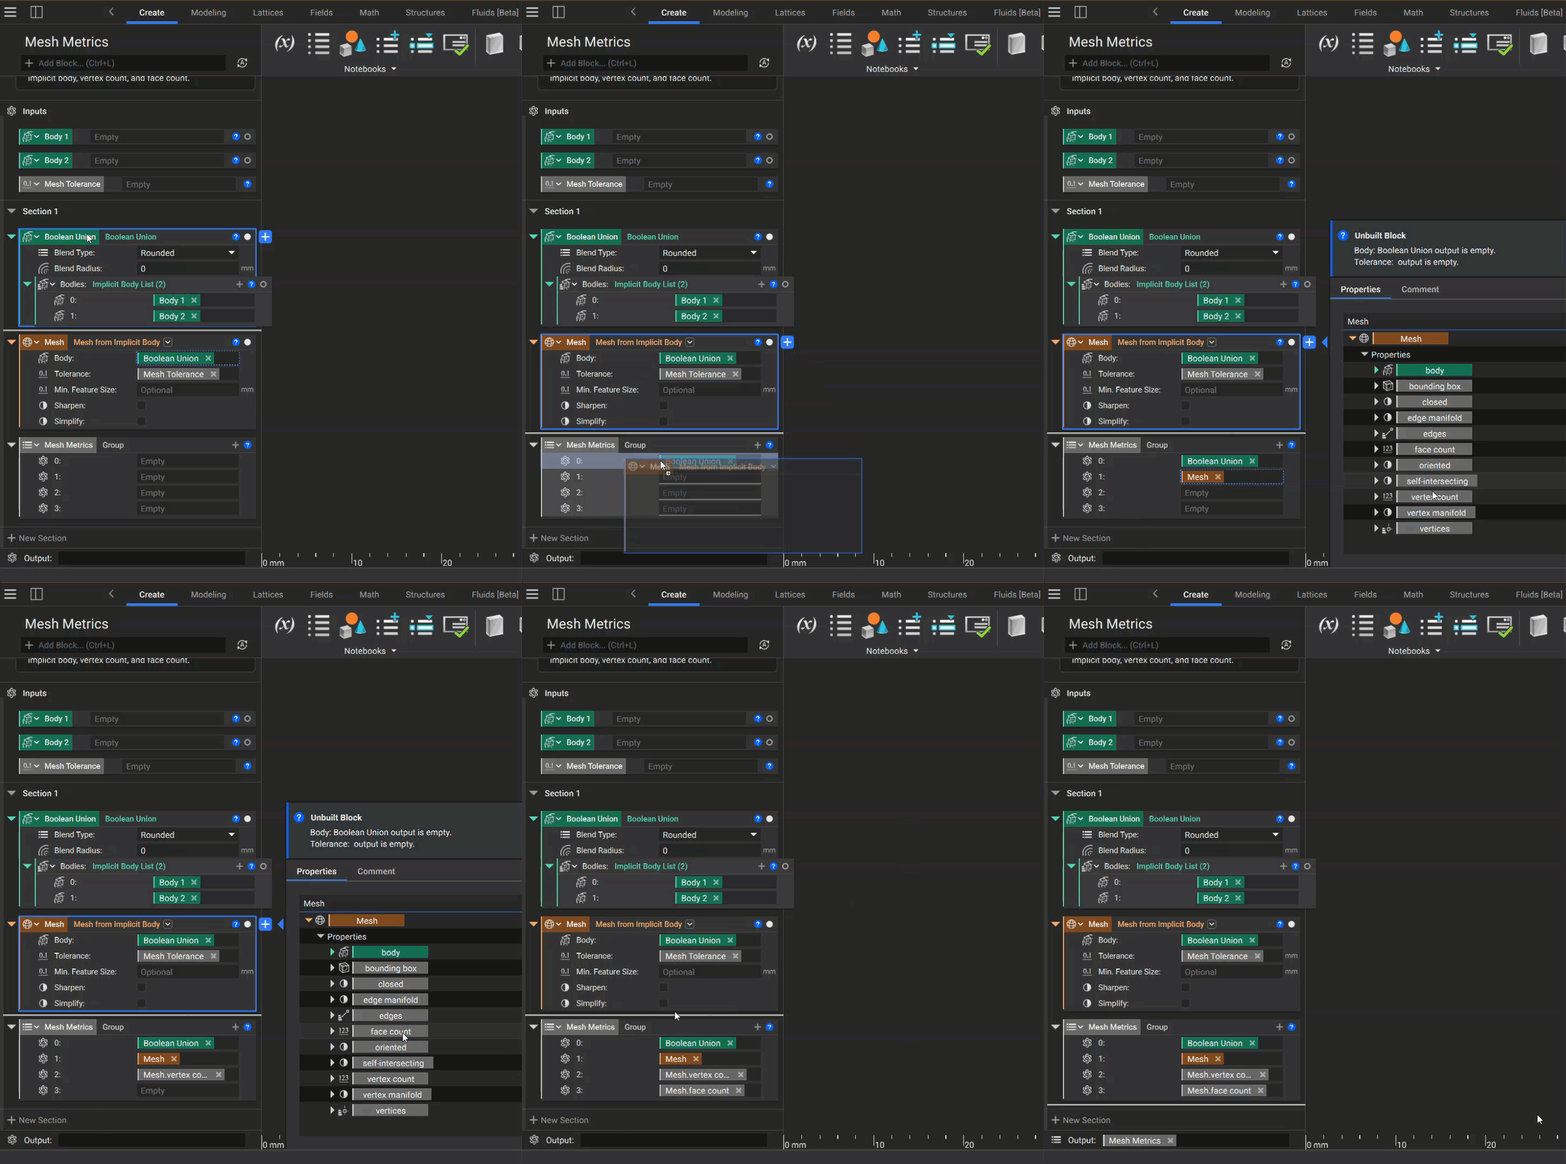
What to Take Away
- Custom blocks can make repetitive processes more efficient. Making a custom block of your design process can help you save time and organize your notebook.
- Lists are a powerful tool, but they can be finicky. Being aware of the quirks that come with using lists ensures users are able to troubleshoot their workflows quickly and identify potential downstream issues.
- List processing allows you to batch process blocks. This provides a similar efficiency to custom blocks. Combining them keeps your notebook incredibly organized and efficient.